Header image

Những Concepts Cốt Lõi Để Trở Thành Bậc Thầy Của Mọi FrontEnd Frameworks

18/04/2022

608

FrontEnd Frameworks

Ngày nay, Front-end web development không chỉ giới hạn ở HTML, CSS và JavaScript. Nhu cầu trải nghiệm web của người dùng ngày một cao, điều đó đòi hỏi FE phải mở rộng thêm nhiều libraries, frameworks để đáp ứng được công nghệ mới và gia tăng UI/UX. Vì thế rất nhiều frameworks được ra đời, và danh sách này sẽ còn gia tăng và phát triển trong rất nhiều năm tới. Đi kèm với đó, rất nhiều cuộc tranh cãi về việc đâu là framework tốt nhất, đâu là framework được developers chọn nhiều nhất, và dĩ nhiên, chưa bao giờ có câu trả lời thoả đáng bởi vì mỗi frameworks đều có những ưu và nhược điểm khác nhau. Cuộc chiến giành thị phần của 3 ông lớn Reactjs, Angular, Vuejs ngày một nóng hơn, bên cạnh đó những Ember.js, Foundation, jQuery, Svelte,… vẫn đang trên đường tìm sự công nhận.

Như lịch sử đã chứng minh, web development là một lĩnh vực phát triển với tốc độ mạnh mẽ, bạn sẽ ngụp lặn trong thế giới web nếu như không chuẩn bị sẵn sàng để chuyển từ framework này sang framework khác. Việc tiếp cận framework mới thực sự sẽ rất dễ dàng khi bạn nắm vững một vài concept chính trong bài viết này, và bạn sẽ trở thành một FE developer được săn đón trong nhiều năm tới, bất kể bạn đang chọn framework nào.

1. Components – cấu thành cơ bản nhất

Component là khái niệm cơ bản nhất mà một FE developer phải nắm, nó là nền tảng của sự phát triển giao diện người dùng nhưng cũng là khái niệm quan trọng nhất thúc đẩy sự phát triển của Frontend frameworks hiện đại ngày nay. Nếu không thực sự hiểu về components, ứng dụng web của bạn có thể sẽ phình to rất nhanh.

Vậy component là gì ?

Một component là 1 tổ hợp của các phần tử HTML đi kèm với markup (styling) và các script xoay quanh các phần tử đó. Tất cả các thành phần nhỏ nhất của web sẽ nhóm lại theo các tính năng tương ứng, và quy về component.

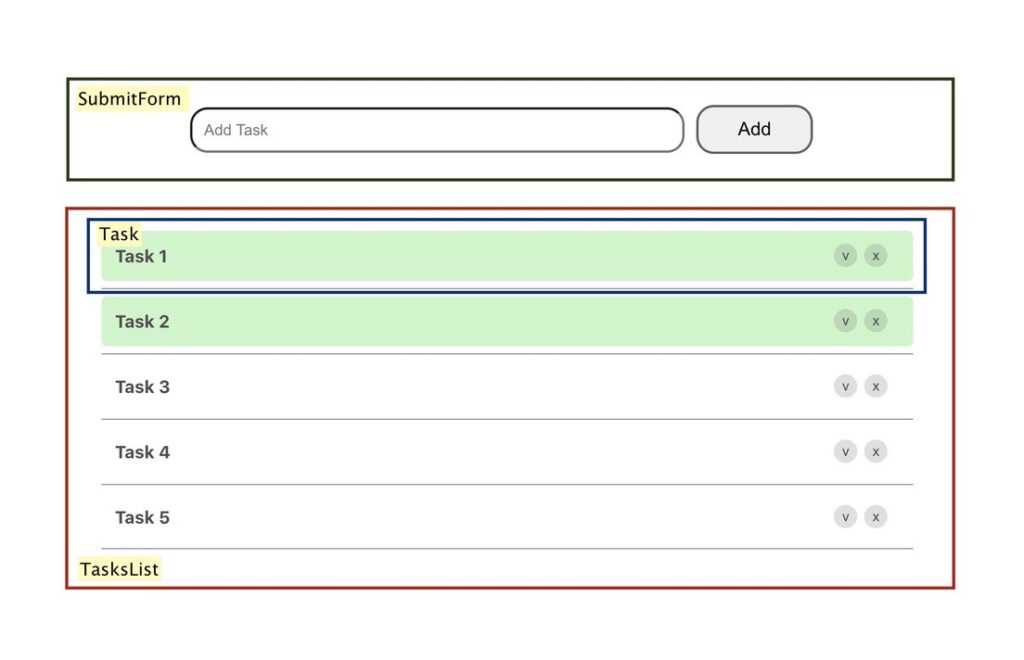
Lấy ví dụ: để show ra Todo list có 5 items, thì chúng ta sẽ phải xây dựng 2 components:
Components - cấu thành cơ bản nhất

  • Todo item: chứa giao diện của 1 item và các chức năng cần thiết như show content, edit & delete chính mình.
  • Todo list: chứa 5 components Todo item và có chức năng show ra các items, phân trang nếu như có quá nhiều items,….

3 thứ tạo nên components là Template, Styling, Script,và để có thể viết đc component thì FE developer phải nắm vững HTML, CSS, JS.

Tại sao phải cần component ?

Nếu như ko có component Todo item, và clients thay đổi specs, không có tính năng edit item nữa, thì developer phải thực hiện xoá phần code liên quan đến việc edit 5 lần. Điều này thực sự rất tốn thời gian so với việc chia component Todo Item và sử dụng lại, chỉ cần thay đổi content của component Todo Item 1 lần là sẽ áp dụng cho tất cả items.

Vì vậy bắt buộc phải chia component khi lập trình web ở bất cứ framework nào. Việc chia components giúp chúng ta có thể tái sử dụng, dễ dàng sửa đổi và mở rộng code. Code sẽ sạch sẽ và tường minh hơn rất nhiều khi components đc chia hợp lý.

2. Lifecycle Hooks – những sự kiện trong vòng đời của 1 component

Mỗi component instance sẽ trải qua 1 loạt các sự kiện khi nó đang tạo ra. Đồng thời, nó cũng chạy các function được gọi là life cycle hooks, cho phép người dùng có cơ hội thêm code ở các giai đoạn cụ thể.

Cũng giống như tất cả lifecycle khác, lifecycle hooks của 1 component bao gồm các sự kiện quan trọng diễn ra trong quá trình sống của component đó, lấy ví dụ, component được sinh ra (init), component setup data, compile template, mount instance đó vào DOM (mounted), và update DOM khi data thay đổi, và cuối cùng là component mất đi (unmounted).

Mỗi Framework sẽ có cách tiếp cận lifecycle hooks khác nhau, nên FE developer cần phải nắm được Lifecycle Diagram của từng framework.

Để dễ hiểu hơn, mình sẽ đưa ra 1 bài toán cụ thể, bài toán yêu cầu chỉ gọi API get về danh sách news khi vừa mở ra page News – page News được thiết kế là 1 component và API sẽ phải gọi khi nó init xong, dựa trên Lifecycle Diagram của từng framework chúng ta sẽ đặt code gọi API lần lượt ở trong các hooks ngOnInit (Angular), componentDidMount (Reactjs), mounted (Vuejs),….

3. Data Binding – Ràng buộc dữ liệu

Mỗi framework sẽ có 1 cơ chế data binding khác nhau, nhưng nhìn chung là chỉ cần nắm được syntax của những mục bên dưới.

  • Text interpolation – show value của variables trên UI

Angular, Vuejs: sử dụng “Mustache” syntax (double curly braces)

<span>Message: {{ msg }}</span>

React: sử dụng special syntax của JSX (curly braces)

<span>Message: { msg }</span>
  • Attribute Bindings – thao tác đến attribute của elements Để input value cho attribute thì mỗi framework đều có sử dụng 1 cách khác nhau, hãy xem ví dụ bên dưới: Angular – sử dụng [] trên attribute

<a [href]="url">...</a>

Vuejs – sử dụng : trên attribute

<a :href="url">...</a>

Reactjs – sử dụng curly braces {} trên variable

<a href={url}>...</a>

  • Class & Style Binding – thao tác đến class và inline style của elements

classstyle là attributes đặc biệt của element, một số frameworks support cách binding với Object, Array, sẽ tạo ra code tường minh hơn.

4. Components interaction – Tương tác giữa các components

Sự tương tác giữa các component có liên hệ với nhau là rất cần thiết trong modern frameworks.

Components interaction - Tương tác giữa các components

Các component lồng ghép nhau tạo nên component tree, và mỗi node trong tree sẽ là 1 component. node này có thể là parent của node kia, và cũng có thể là 1 child của 1 node khác. Mối quan hệ chủ yếu là parent – child. Nếu thực hiện tương tác giữa 2 node cách quá xa nhau có thể rơi vào case props drilling.

parent - child

Các cách để interact giữa parent & child mà frameworks thường hay sử dụng:

  • Truyền data từ parent vào child: truyền value vào cho child sử dụng.
  • Parent lắng nghe events từ child: tạo function và truyền vào cho child, child sẽ execute function và gửi kèm data ra cho parent khi một event xác định diễn ra.
  • Parent truy cập trực tiếp đến child: parent có thể truy cập đến tất cả variable và function ở bên trong child, thậm chí là thay đổi value của variable, hoặc thực thi function của child.

5. Routing – Điều hướng

Client-side routing là chìa khóa của SPA frameworks mà chúng ta thấy ngày nay. Rất dễ để implement nhưng cần nắm vững routing hierarchy.
Đầu tiên hãy tìm hiểu về dynamic routing . Trở lại với ví dụ todos ở mục 1, trang list ra tất cả todos sẽ có route /todos, khi user nhấp vào 1 todo, họ sẽ được đưa đến một trang dành riêng cho todo đó (Todo Detail), route của trang này sẽ phải có dạng /todos/:id. id là 1 dynamic variable, dù id=1, id=2 cũng sẽ show ra trang Todo Detail.

Tiếp theo, hãy tìm hiểu về cách để nested routing – trong 1 route sẽ có nhiều routes con phụ thuộc, nó cho phép thay đổi các fragment cụ thể của view dựa trên current route.

  • Ví dụ: trên trang user profile, sẽ hiển thị nhiều tab (ví dụ: Profile, Account) để điều hướng qua user info. Bằng cách nhấp vào các tab này, URL trong trình duyệt sẽ thay đổi, nhưng thay vì thay thế toàn bộ trang, chỉ nội dung của tab được thay thế.
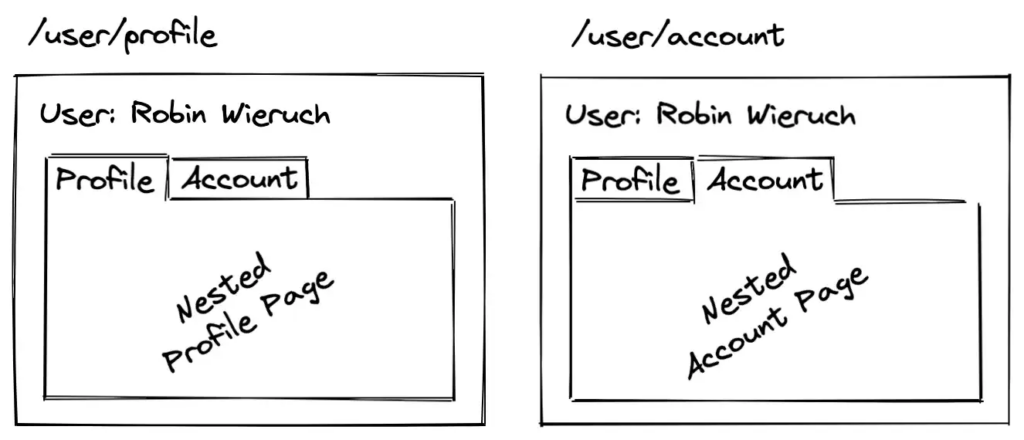
Routing - Điều hướng

Cuối cùng, hãy luôn lưu ý đến việc sử dụng lazy loading cho route, nó sẽ giúp cho webapp nhẹ hơn khi chỉ cần load những đoạn code liên quan đến route đang mở, thay vì load hết tất cả code ngay lần đầu tiên truy cập đến trang web.
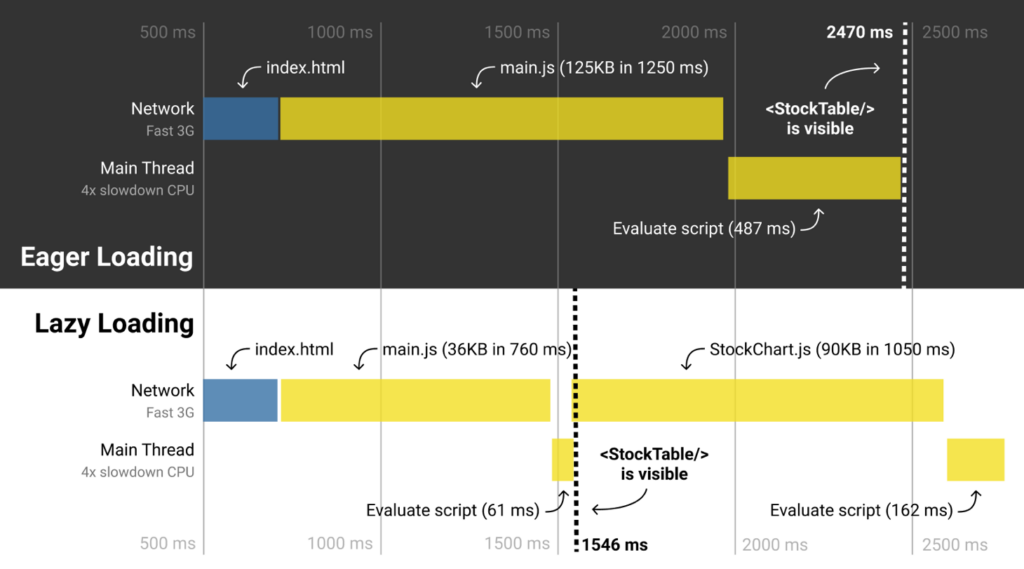
lazy loading

Theo diagram, có thể thấy, StockTable được render nhanh hơn với 1546ms của lazy loading so sánh với 2470ms của eager loading.

6. State Management – Phương thức quản lý các state của app

Khi một ứng dụng phát triển, sự phức tạp của việc quản lý state cũng tăng lên theo cấp số nhân. Trong một ứng dụng lớn, nơi chúng ta có rất nhiều components, việc quản lý state của chúng là một vấn đề lớn. Công việc chính của tất cả libraries hoặc frameworks là lấy state của ứng dụng, xử lý và biến nó thành DOM nodes, đó là lý do tại sao việc sắp xếp, quản lý state theo mô hình hợp lý sẽ nâng cao được chất lượng của ứng dụng.
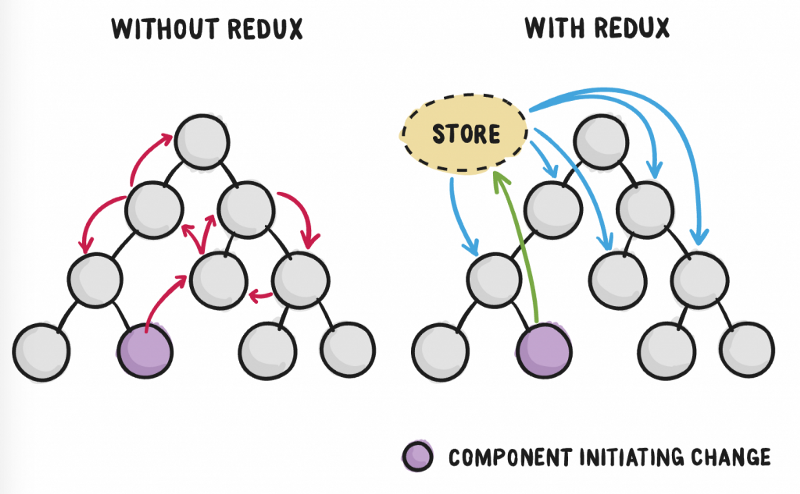
Hãy tưởng tượng state management như một tầng cloud, bên dưới là component tree. Tất cả component trong tree có thể truy xuất lên cloud để lấy về những state mà nó mong muốn. ĐIều này giúp cho việc giao tiếp dữ liệu trở nên thuận tiện hơn rất nhiều, đặc biệt là trong trường hợp 2 components không có quan hệ cụ thể trong tree.

Phần lớn các thư viện về state management được xây dựng dựa trên kiến trúc Flux.
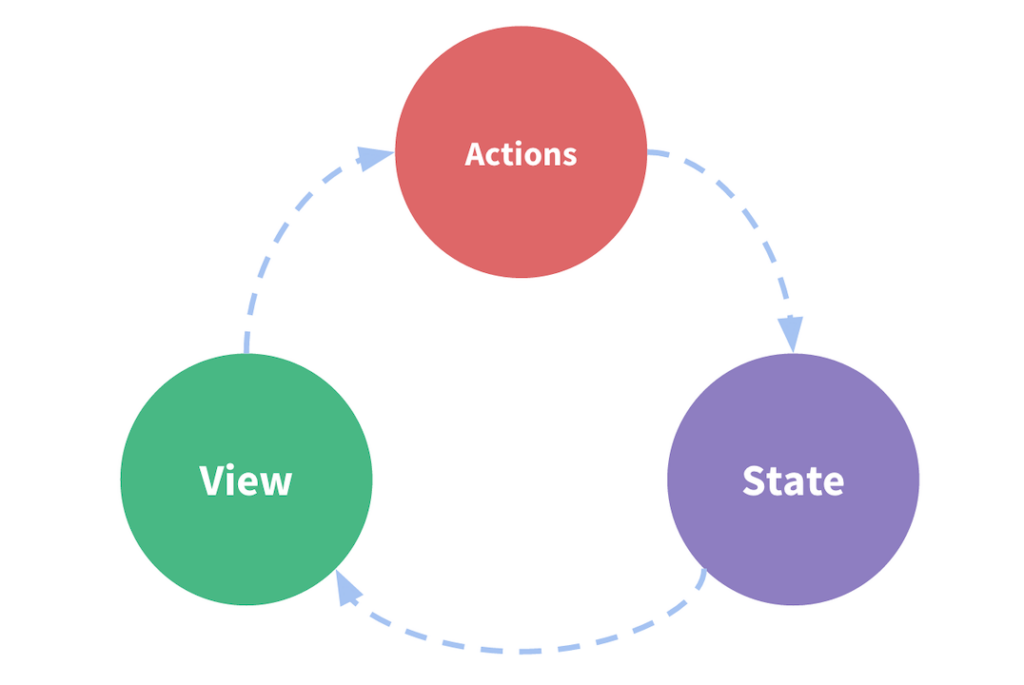
kiến trúc Flux.

Cách hoạt động

  • State được truyền vào view
  • Actions được triggered từ user trên view
  • Actions update state trong store
  • State thay đổi value và truyền lại vào view

Kiến trúc Flux bao gồm 3 đối tượng: Action & Store & Dispatcher.
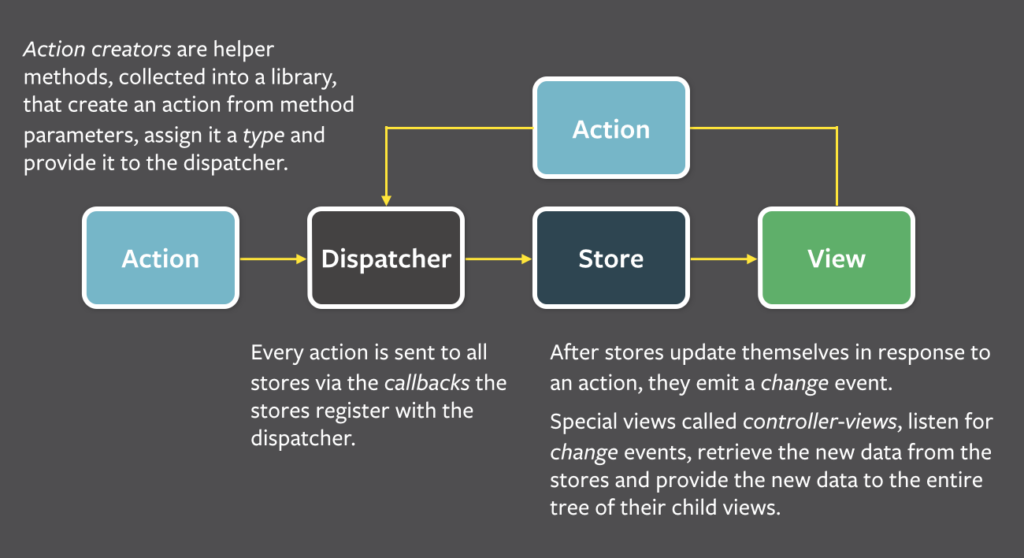
Kiến trúc Flux bao gồm 3 đối tượng: Action & Store & Dispatcher.

Cách làm việc này kết hợp với cấu trúc của Actions, Dispatchers, Reducer, đã tạo ra một tiêu chuẩn sẽ được áp dụng cho các thư viện tiếp theo cho rất nhiều ứng dụng. Từ đó, chúng ta có Redux, đây có lẽ là thư viện nổi tiếng nhất. Tuy nhiên, ngày nay, tùy thuộc vào loại dự án và frameworks chúng ta đang sử dụng, chúng ta sẽ lựa chọn những thư viện quản lý state phù hợp nhất.

  • Angular : NGRX : Ứng dụng Redux hướng tới Angular framework.
  • ReactJS : Redux, thư viện nổi tiếng nhất về quản lý state khi code Reactjs.
  • VueJS : Vuex, một thư viện giống Redux khi code VueJS.

Vì vậy nếu nắm vững được ý tưởng của kiến trúc Flux, thì việc tiếp cận đến các libraries chuyên quản lý state rất dễ dàng.

7. Kết luận

Lựa chọn framework vẫn là một chủ đề được bao quanh bởi các cuộc tranh luận. Không có đúng hay sai, chúng ta cần chọn những gì phù hợp nhất với dự án và con người trong team. Trong thực tế, có nhiều điểm khác biệt lớn giữa các frameworks, nhưng nhìn chung nắm bắt được các concepts trên sẽ giúp chúng ta làm chủ được công nghệ. Suy cho cùng, đó là mục tiêu của bài viết này, để mọi người học nhiều FrontEnd frameworks khác nhau ko còn là câu chuyện khó nữa!

Author: Quan Do

Related Blog

prd-thumb-draft-product

Software Development

+0

    TypeScript And “Any” Type

    TypeScript is a strongly typed programming language that builds on JavaScript, giving you a better ability to detect errors and describe your code. But sometimes you don't know the exact type of value that you're using because it comes from user input or a third-party API. In this case, you want to skip the type checking and allow the value to pass through the compile check. The TypeScript any type is the perfect solution for you because if you use it, the TypeScript compiler will not complain about the type issue. This blog will help you understand the any type in TypeScript, but before doing that, let's begin with some basic concepts! What is TypeScript? TypeScript checks a program for errors before execution and does so based on the kinds of values; it’s a static type checker. Superset of JavaScript TypeScript is a language that is a superset of JavaScript: JS syntax is, therefore, legal TS. However, TypeScript is a typed superset that adds rules about how different kinds of values can be used. Runtime Behavior TypeScript is also a programming language that preserves JavaScript's runtime behavior. This means that if you move code from JavaScript to TypeScript, it is guaranteed to run the same way, even if TypeScript thinks the code has type errors. Erased Types Roughly speaking, once TypeScript’s compiler is done with checking your code, it erases the types to produce the resulting compiled code. This means that once your code is compiled, the resulting plain JS code has no type information. An easy way of understanding TypeScript A languageA superset of JavaScriptPreserver the runtime behavior of JavaScriptType checker layer JavaScript + Types = TypeScript Basic typing Type annotations TypeScript uses type annotations to explicitly specify types for identifiers such as variables, functions, objects, etc. // Syntax : type Once an identifier is annotated with a type, it can be used as that type only. If the identifier is used as a different type, the TypeScript compiler will issue an error. let counter: number; counter = 1; counter = 'Hello'; // Error: Type '"Hello"' is not assignable to type 'number'. The following shows other examples of type annotations: let name: string = 'John'; let age: number = 25; let active: boolean = true; // Array let names: string[] = ['John', 'Jane', 'Peter', 'David', 'Mary']; // Object let person: { name: string; age: number }; person = { name: 'John', age: 25 }; // Valid // Function let sayHello : (name: string) => string; sayHello = (name: string) => { return `Hello ${name}`; }; Type inference Type inference describes where and how TypeScript infers types when you don’t explicitly annotate them. For example: // Annotations let counter: number; // Inference: TypeScript will infer the type the `counter` to be `number` let counter = 1; Likewise, when you assign a function parameter a value, TypeScript infers the type of the parameter to the type of the default value. For example: // TypeScript infers type of the `max` parameter to be `number` const setCounter = (max = 100) => { // ... } Similarly, TypeScript infers the return type to the type of the return value: const increment = (counter: number) => { return counter++; } // It is the same as: const increment = (counter: number) : number => { return counter++; } The following shows other examples of type inference: const items = [0, 1, null, 'Hi']; // (number | string)[] const mixArr = [new Date(), new RegExp('\d+')]; // (RegExp | Date)[] const increase = (counter: number, max = 100) => { return counter++; }; // (counter: number, max?: number) => number Contextual typing TypeScript uses the locations of variables to infer their types. This mechanism is known as contextual typing. For example: document.addEventListener('click', (event) => { console.log(event.button); // Valid }); In this example, TypeScript knows that the event the parameter is an instance of MouseEvent because of the click event. However, when you change the click event to the scroll the event, TypeScript will issue an error: document.addEventListener('scroll', (event) => { console.log(event.button); // Compile error }); // Property 'button' does not exist on type 'Event'. TypeScript knows that the event in this case, is an instance of UIEvent, not a MouseEvent. And UIEvent does not have the button property, therefore, TypeScript throws an error. Other examples of contextual typing // Array members const names = ['John', 'Jane', 'Peter', 'David', 'Mary']; // string[] names.map(name => name.toUpperCase()); // (name: string) => string // Type assertions const myCanvas = document.getElementById('main-canvas') as HTMLCanvasElement; Type inference vs Type annotations Type inferenceType annotationsTypeScript guesses the typeYou explicitly tell TypeScript the type What exactly is TypeScript any? When you don’t explicitly annotate and TypeScript can't infer exactly the type, that means you declare a variable without specifying a type, TypeScript assumes that you use the any type. This practice is called implicit typing. For example: let result; // Variable 'result' implicitly has an 'any' type. So, what exactly is any? TypeScript any is a particular type that you can use whenever you don't want a particular value to cause type-checking errors. That means the TypeScript compiler doesn't complain or issue any errors. When a value is of type any, you can access any properties of it, call it like a function, assign it to (or from) a value of any type, or pretty much anything else that’s syntactically legal: let obj: any = { x: 0 }; // None of the following lines of code will throw compiler errors. // Using `any` disables all further type checking, and it is assumed // you know the environment better than TypeScript. obj.foo(); obj(); obj.bar = 100; obj = 'hello'; const n: number = obj; Looking back at an easier-to-understand any: A special type.Skip/Disable type-checking.TypeScript doesn't complain or issue any errors.Default implicit typing is any. Note that to disable implicit typing to the any type, you change the noImplicitAny option in the tsconfig.json file to true. Why does TypeScript provide any type? As described above, while TypeScript is a type checker, any type tells TypeScript to skip/disable type-checking. Whether TypeScript has made a mistake here and why it provides any type? In fact, sometimes the developer can't determine the type of value or can't determine the return value from the 3rd party. In most cases they use any type or implicit typing as any. So they seem to think that TypeScript provides any to do those things. So, is that the root reason that TypeScript provides any? Actually, I think there is a more compelling reason for TypeScript providing any that the any type provides you with a way to work with the existing JavaScript codebase. It allows you to gradually opt-in and opt out of type checking during compilation. Therefore, you can use the any type for migrating a JavaScript project over to TypeScript. Conclusion TypeScript is a Type checker layer. The TypeScript any type allows you to store a value of any type. It instructs the compiler to skip type-checking. Use the any type to store a value when you migrate a JavaScript project over to a TypeScript project. In the next blog, I will show you more about the harmful effects of any and how to avoid them. Hope you like it! See you in the next blog! Reference TypeScript handbookTypeScript tutorial Author: Anh Nguyen

    07/09/2022

    825

    Software Development

    +0

      TypeScript And “Any” Type

      07/09/2022

      825

      React application rs

      How-to

      Software Development

      +0

        A Better Way To Use Services In React Application

        Sometimes you have/want to create and use a service in your application for the DRY principle. But do you know exactly what is a service? And what is the best way to use services in React applications? Hi everyone! It's nice to meet you again in React related series. In the previous article, we discussed about effective state management in React, we learned about Context: what is it? when to use it? One of the use cases is using a context to share a collection of services through the components tree, but what kind of things can be called a service? And how is it integrated into React application? Let's discover the following sections: What is a Service? Service is just a group of helper functions that handle something particularly and can be reused across application, for example: Authentication Service that includes authentication status checking, signing in, signing out, getting user info …Http Service that handles request header, request method, request body … How to use? There are different kinds of implementation and usage, I just provide my favorite one that follows Angular module/services provider concepts. Create a service A service is a JavaScript regular class, nothing related to React. export default class ApiService { constructor() {} _setInterceptors() {} _handleResponse_() {} _handleError_() {} get() {} post() {} put() {} delete() {} } export default class AuthService { constructor() {} isAuthenticated() {} getUserInfo() {} signIn() {} signOut() {} } Create a Context Create a context with provider and pass services as props. import { createContext, useState } from 'react'; import { ApiService, AuthService } from '@services'; const services = { apiService: new ApiService(), authService: new AuthService() }; const AppContext = createContext(); const { Provider } = AppContext; const AppProvider = ({ children }) => { return <Provider value={{ services }}>{children}</Provider>; }; export { AppContext, AppProvider } Use a context Place a context provider at an appropriate scope, all consumers should be wrapped in it. import { AppProvider } from './context/AppContext'; import ComponentA from './components/ComponentA' const App = () => { return ( <AppProvider> <div className="app"> <ComponentA /> </div> </AppProvider> ); }; export default App; Inside a child component, use React hooks useContext to access services as a context value. import { useContext, useEffect } from 'react'; import { AppContext } from '../context/AppContext'; const ChildComponent = () => { const { services: { apiService, authService } } = useContext(AppContext); useEffect(() => { if (authService.isAuthenticated()) { apiService.get(); } }, []); return <></>; } export default ComponentA; Above are simple steps to integrate services with context. But it would be complicated in the actual work. Consider organizing context with approriate level/scope. My recommendation is to have two kinds of service contexts in your application: App Services Context to put all singleton services. Bootstrap it once at root, so only one instance for each is created while having them shared over the component tree.For others, create separate contexts and use them anywhere you want and whenever you need. Alternatives Service is not the only one way to deal with reusable code, it depends on what you intend to do, highly recommend to: Use a custom hook, if you want to do reusable logic and hook into a state.Use a Higher-order component, if you want to do the same logic and then render UI differently. Reference Does React Context replace React Redux?React RetiX - another approach to state management Author: Vi Nguyen

        31/08/2022

        4.48k

        Vix Nguyen

        How-to

        +1

        • Software Development

        A Better Way To Use Services In React Application

        31/08/2022

        4.48k

        Vix Nguyen

        context-or-redux

        Software Development

        +0

          Does React Context Replace React Redux?

          Table of contents What is Context?How and when to use a Context?When to use Redux?Does Context replace Redux? context-or-redux-1024x768 As you all know, nowadays, React has become one of the most famous JavaScript libraries in the world. It's easy to learn and use. It comes with a good supply of documentation, tutorials, and training resources. Any developer who comes from a JavaScript background can easily understand and start creating web apps using React in a few days with the main concepts: JSXRendering ElementsComponents and PropsState and LifecycleHandling Events But to become an expert in React, it would take more time. You have to deep dive into advanced things: Higher-Order componentsContextCode-SplittingAvoiding unexpected rerenderEspecially, Effective state management When it comes to state management in React applications, we instantly think about React Redux. This is a favorite and widespread tool across developer's communities and applications. Recently, a lot of questions have come to us about using React Context as an alternative for React Redux. To answer those questions, have a brief of React Context first. What is the context? The context was originally introduced for passing props through the component tree, but since newer versions, React provided the powerful feature that allows updating context from a nested component. Meanwhile, Context can now be a state management tool. Let's see how easy it works? Context with Hooks There are many ways to integrate Context, in this article, I just demo the simplest one Create a context import { createContext } from 'react'; export const ThemeContext = createContext(defaultTheme); So simple, createContext is the built-in function that allows you to create a context with default value. Create a provider A provider allow consuming components to subscribe to context changes const { Provider } = ThemeContext; const ThemeProvider = ( { children } ) => { const theme = { ... }; return <Provider value={{ theme }}>{children}</Provider>; }; Create a consumer The simplest way to subscribe to the context value is to use the useContext hook. export const ThemeInfo = () => { const { theme } = useContext(ThemeContext); return ( <div>backgroundColor: {theme?.background}</div> ); } A consumer must be wrapped inside a Provider if not it would not be noticed and then re-render when context data changes. <App> <ThemeProvider> <ThemeInfo></ThemeInfo> </ThemeProvider> </App> Update the context from a consumer It is sometimes necessary to update the context from consumers, context itself doesn't provide any method to do that, but together with hooks, it can be easy: Use useState to manage context valuesetTime is passed as a callback const { Provider } = ThemeContext; const ThemeProvider = ( { children } ) => { const [theme, setTheme] = useState(defaultTheme); return <Provider value={{ theme, setTheme }}>{children}</Provider>; }; From a consuming component, we can update the context value by executing the callback provided by context export const ButtonChangeTheme = () => { const { setTheme } = useContext(ThemeContext); return ( <button onClick={() => setTheme(newTheme)}>Change</button> ); } Again, don't forget to wrap ButtonChangeTheme consumer inside ThemeProvider <App> <ThemeProvider> <ButtonChangeTheme></ButtonChangeTheme> </ThemeProvider> </App> When to use context? As official guideline Context is designed to share data that can be considered global for a tree of React components. Below are common examples of data that Context can cover: Application configurationsUser settingsAuthenticated userA collection of services How to use context in a better way? As mentioned before, when the context value changes, all consumers that use the context will be immediately re-rendered. So putting it all into one context is not a good decision. Instead, create multi-contexts for different kinds of data. EX: one context for Application configurations, one for Authenticated user and others.Besides separating unrelated contexts, using each in its proper place in the component tree is equally significant.Integrate context adds complexity to our app by creating, providing, and consuming the context, so drilling props through 2-3 levels in a tree component is not a problem(Recommended to use instead of context)Restrictively apply context for high-frequency data updated, because context is not designed for that.​ What about React Redux? Unlike Context, React Redux is mainly designed for state management purposes, and covers it well. However, take a look at some highlights from Redux team: Not all apps need Redux. It's important to understand the kind of application you're building, the kinds of problems that you need to solve, and what tools can best solve the problems you're facing. You'll know when you need Flux. If you aren't sure if you need it, you don't need it. Don't use Redux until you have problems with vanilla React. Those recommendations clearly answer the question: When to use Redux? Conclusion So, Does React Context replace React Redux? The short answer is no, it doesn’t. React Redux and React Context can be used together instead of as alternatives. But how to use them together? It depends. If you understand the main concepts for each: React Context is designed for props drilling, it also has ways to update context data, but is recommended to deal with the simple follow of data changes.Redux is built for state management, especially for the frequently updated states used at many places in the application. Based on that you can easily decide what should be implemented in your application. In the end, try to use Context first, if something is not covered by Context, it's time to use Redux. Enjoy coding! Reference Context official docsRedux FAQ: generalIf you are not interested in using Redux, you can check out React RetiX for a different approach to state management.I can not remember all the sources I have read, but it helps a lot in having comparison between Context and Redux. Thank you and sorry for not listing them all in this article!​ Author: Vi Nguyen

          17/06/2022

          1.33k

          Software Development

          +0

            Does React Context Replace React Redux?

            17/06/2022

            1.33k

            Knowledge

            Software Development

            +0

              Mastering AWS Lambda: An Introduction to Serverless Computing

              Imagine this: you have a system that sends emails to users to notify them about certain events at specific times of the day or week. During peak hours, the system demands a lot of resources, but it barely uses any for the rest of the time. If you were to dedicate a server just for this task, managing resources efficiently and maintaining the system would be incredibly complex. This is where AWS Lambda comes in as a solution to these challenges. Its ability to automatically scale, eliminate server management, and, most importantly, charge you only for the resources you use simplifies everything. Hello everyone! I’m Đang Đo Quang Bao, a Software Engineer at SupremeTech. Today, I’m excited to introduce the series' first episode, “Mastering AWS Lambda: An Introduction to Serverless Computing.” In this episode, we’ll explore: The definition of AWS Lambda and how it works.The benefits of serverless computing.Real-world use cases. Let’s dive in! What is AWS Lambda? AWS Lambda is a serverless computing service that Amazon Web Services (AWS) provides. It executes your code in response to specific triggers and scales automatically, charging you only for the compute time you use. How Does AWS Lambda Work? AWS Lambda operates on an event-driven model, reacting to specific actions or events. In simple terms, it executes code in response to particular triggers. Let’s explore this model further to gain a more comprehensive understanding. The above is a simplified workflow for sending emails to many users simultaneously, designed to give you a general understanding of how AWS Lambda works. The workflow includes: Amazon EventBridge:Role: EventBridge acts as the starting point of the workflow. It triggers the first AWS Lambda function at a specific time each day based on a cron schedule.How It Works:Configured to run automatically at 00:00 UTC or any desired time.Ensures the workflow begins consistently without manual intervention.Amazon DynamoDB:Role: DynamoDB is the primary database for user information. It holds the email addresses and other relevant metadata for all registered users.How It Works:The first Lambda function queries DynamoDB to fetch the list of users who need to receive emails.AWS Lambda (1st Function):Role: This Lambda function prepares the user data for email sending by fetching it from DynamoDB, batching it, and sending it to Amazon SQS.How It Works:Triggered by EventBridge at the scheduled time.Retrieves user data from DynamoDB in a single query or multiple paginated queries.Split the data into smaller batches (e.g., 100 users per batch) for efficient processing.Pushes each batch as a separate message into Amazon SQS.Amazon SQS (Simple Queue Service).Role: SQS serves as a message queue, temporarily storing user batches and decoupling the data preparation process from email-sending.How It Works:Each message in SQS represents one batch of users (e.g., 100 users).Messages are stored reliably and are processed independently by the second Lambda function.AWS Lambda (2nd Function):Role: This Lambda function processes each user batch from SQS and sends emails to the users in that batch.How It Works:Triggered by SQS for every new message in the queue.Reads the batch data (e.g., 100 users) from the message.Sends individual emails to each user in the batch using Amazon SES.Amazon SES (Simple Email Service).Role: SES handles the actual email delivery, reliably ensuring messages reach users’ inboxes.How It Works:Receives the email content (recipient address, subject, body) from the second Lambda function.Delivers emails to the specified users.Provides feedback on delivery status, including successful deliveries, bounces, and complaints. As you can see, AWS Lambda is triggered by external events or actions (AWS EventBridge schedule) and only "lives" for the duration of its execution. >>> Maybe you are interested: The Rise of Serverless CMS Solutions Benefits of AWS Lambda No Server Management:Eliminate the need to provision, configure, and maintain servers. AWS handles the underlying infrastructure, allowing developers to focus on writing code.Cost Efficiency:Pay only for the compute time used (measured in milliseconds). There are no charges when the function isn’t running.Scalability:AWS Lambda automatically scales horizontally to handle thousands of requests per second.Integration with AWS Services:Lambda integrates seamlessly with services like S3, DynamoDB, and SQS, enabling event-driven workflows.Improved Time-to-Market:Developers can deploy and iterate applications quickly without worrying about managing infrastructure. Real-World Use Cases for AWS Lambda AWS Lambda is versatile and can be applied in various scenarios. Here are some of the most common and impactful use cases: Real-Time File ProcessingExample: Automatically resizing images uploaded to an Amazon S3 bucket.How It Works:An upload to S3 triggered a Lambda function.The function processes the file (e.g., resizing or compressing an image).The processed file is stored back in S3 or another storage system.Why It’s Useful:Eliminates the need for a dedicated server to process files.Automatically scales based on the number of uploads.Building RESTful APIsExample: Creating a scalable backend for a web or mobile application.How It Works:Amazon API Gateway triggers AWS Lambda in response to HTTP requests.Lambda handles the request, performs necessary logic (e.g., CRUD operations), and returns a response.Why It’s Useful:Enables fully serverless APIs.Simplifies backend management and scaling.IoT ApplicationsExample: Processing data from IoT devices.How It Works:IoT devices publish data to AWS IoT Core, which triggers Lambda.Lambda processes the data (e.g., analyzing sensor readings) and stores results in DynamoDB or ElasticSearch.Why It’s Useful:Handles bursts of incoming data without requiring a dedicated server.Integrates seamlessly with other AWS IoT services.Real-Time Streaming and AnalyticsExample: Analyzing streaming data for fraud detection or stock market trends.How It Works:Events from Amazon Kinesis or Kafka trigger AWS Lambda.Lambda processes each data stream in real time and outputs results to an analytics service like ElasticSearch.Why It’s Useful:Allows real-time data insights without managing complex infrastructure.Scheduled TasksExample: Running daily tasks/reports or cleaning up expired data.How It Works:Amazon EventBridge triggers Lambda at scheduled intervals (e.g., midnight daily).Lambda performs tasks like querying a database, generating reports, or deleting old records.Why It’s Useful:Replaces traditional cron jobs with a scalable, serverless solution. Conclusion AWS Lambda is a powerful service that enables developers to build highly scalable, event-driven applications without managing infrastructure. Lambda simplifies workflows and accelerates time-to-market by automating tasks and seamlessly integrating with other AWS services like EventBridge, DynamoDB, SQS, and SEStime to market. We’ve explored the fundamentals of AWS Lambda, including its definition, how it works, its benefits, and its application in real-world use cases. It offers an optimized and cost-effective solution for many scenarios, making it a vital tool in modern development. At SupremeTech, we’re committed to harnessing innovative technologies to deliver impactful solutions. This is just the beginning of our journey with AWS Lambda. In upcoming episodes, we’ll explore implementing AWS Lambda in different programming languages and uncover best practices for building efficient serverless applications. Stay tuned, and let’s continue mastering AWS Lambda together!

              25/12/2024

              37

              Bao Dang D. Q.

              Knowledge

              +1

              • Software Development

              Mastering AWS Lambda: An Introduction to Serverless Computing

              25/12/2024

              37

              Bao Dang D. Q.

              Customize software background

              Want to customize a software for your business?

              Meet with us! Schedule a meeting with us!