Header image

Mini Apps – Ứng Dụng Công Nghệ Là Chìa Khoá Thành Công Với Doanh Nghiệp Của Bạn (Part 1)

13/05/2022

975

Mini Apps

Giới thiệu

Thị trường thương mại điện tử, chuyển đổi số, số hóa dữ liệu, bán hàng online … là một trong rất nhiều từ khóa mà chúng ta đã và đang được nghe hàng ngày trên thế giới Internet. Tuy nhiên, để hiểu và áp dụng được những từ khóa đó vào thực tế một cách hiệu quả nhằm giải quyết được bài toán vận hành, chi phí, cũng như các vấn đề tồn đọng hiện tại thì thực sự không hề đơn giản chút nào.

Chính vì vậy, việc lựa chọn giải pháp phù hợp để đảm bảo được hiệu quả vận hành, mang lại trải nghiệm tốt với khách hàng là một trong những chìa khóa quan trọng để doanh nghiệp có thể từng bước tiến tới thành công hơn, nhưng vẫn đảm bảo được các tiêu chí về chi phí, hiệu quảđộ tiện dụng.

Chuỗi bài viết sau đây mình sẽ giới thiệu và chia sẻ những kinh nghiệm về một mô hình ứng dụng đang được phát triển mạnh mẽ tại nhiều thị trường lớn trên thế giới, tựa bài viết nói về Mini Apps/ Mini programs và cách tạo ra một ứng dụng Mini App tại thị trường Nhật Bản.

Mini Apps – Chìa khoá để thành công với mô hình OMO

OMO – hay có thể hiểu và gọi với cái tên Online-Merged-with-Offline là hình thức kết hợp giữa mô hình Online và Offline của 1 doanh nghiệp, 1 đơn vị bán hàng, … nhằm cung cấp trải nghiệm cho người dùng 1 cách tốt nhất, hiệu quả và tiết kiệm chi phí.

Nó giống như việc bạn muốn mua 1 sản phẩm tại cửa hàng, nhưng thay vì phải tới cửa hàng, xem sản phẩm, sử dụng thử, và thanh toán với nhiều thủ tục khác, … thì bạn có thể giảm rất nhiều thao tác để giúp cho người dùng vừa có thể trải nghiệm sản phẩm tại cửa hàng (Offline), vừa có thể thanh toán và nhận hàng ngay tại nhà (Online) và còn nhiều điều tuyệt vời hơn nữa tùy theo giải pháp mà bạn chọn để tăng hiệu quả và giúp bạn đo lường kết quả rõ ràng.

Để có thể làm được điều này, bạn có thể kết hợp với công nghệ (technology) thông qua các ứng dụng, web hoặc các phương tiện truyền thông, … nhưng trong bài viết này, chúng ta sẽ tập trung vào 1 giải pháp, đó là ứng dụng và web.

Mini Apps_1

Nếu bạn là chủ 1 cửa hàng, chắc hẳn đa số các bạn đều đã được tư vấn về việc triển khai 1 ứng dụng hoặc website của cửa hàng/ doanh nghiệp, để tạo profile cho khách hàng, giúp bạn chăm sóc khách hàng tốt hơn, tăng độ uy tín của cửa hàng, …

Tuy nhiên, việc có hàng nghìn, hàng triệu ứng dụng, website hiện tại làm cho khách hàng cảm thấy bị choáng ngợp và cảm thấy lười trong việc sử dụng và tải về. Cũng giống như việc, bạn đang quan tâm 5-10 cửa hàng chuyên về ẩm thực, mỗi cửa hàng đều triển khai 1 website/ứng dụng riêng biệt, mỗi ứng dụng đều có chức năng tích điểm cũng như nhắc nhở giống nhau, nghĩ thử xem, trên điện thoại của bạn cần phải tải về 10 ứng dụng tương tự như vậy chỉ để phục vụ cho cùng 1 nội dung, chỉ khác cửa hàng, và sau đó nếu vô tình bạn cần phải đổi điện thoại, bạn lại phải lặp lại thao tác tải về, …

Nghĩ tới thôi, chắc hẳn ai cũng cảm thấy bị stress và lâu dần chắc hẳn bạn sẽ bỏ hẳn hoàn toàn ứng dụng của cửa hàng đó. Tôi đã bỏ hẳn ứng dụng đặt vé xem phim của các hãng lớn như CGV, Lotte, … và chỉ tải về 1 ứng dụng đặt vé duy nhất là 123Phim chỉ để giảm dung lượng chiếc điện thoại và đăng nhập 1 nơi duy nhất, vẫn đủ chức năng cần.

Cũng vì lý do đó, giải pháp mô hình Mini Apps/ Mini Programs đã được triển khai và cũng là 1 trong những mô hình chuyển đổi số đang được áp dụng rộng rãi và thành công tại rất nhiều quốc gia trên thế giới, đi đầu vẫn là Trung Quốc, Nhật Bản, Hàn Quốc, Mỹ … với thành công trong việc đưa các tiểu ứng dụng (mini app) tích hợp vào bên trong 1 ứng dụng khác như Line, WhatsApp, Wechat,… người dùng bây giờ thay vì chỉ xài 1 ứng dụng nhắn tin thông thường, thì nay họ đã có thể sử dụng rất nhiều tiện ích ứng dụng khác (mini app) bên trong ứng dụng tin nhắn này.

Cập nhật: Mini app đã và đang được triển khai và phát triển mạnh hơn bên ngoài các ứng dụng nhắn tin, bạn có thể triển khai mini app trên các ứng dụng thương mai điện tử khác như: Shopee, Lazada, Shopify, …. tùy theo mức độ hỗ trợ của nền tảng.

Lấy ví dụ như đại dịch Covid-19 vừa rồi, nếu việc triển khai hàng loạt ứng dụng chỉ với 1 mục đích duy nhất là kiểm soát đại dịch Covid, nhưng nếu mỗi tiện ích chỉ phục vụ cho 1 mục đích cụ thể khác nhau, thì người dùng sẽ cần phải tải về rất nhiều ứng dụng trong thiết bị, điều này gây trải nghiệm không tốt, tốn kém và đôi lúc gây tác dụng ngược tới tâm lý người sử dụng. Vậy thì, đây chính là từ khóa để bạn nghĩ tới Mini App.

Dưới đây là danh sách 1 vài ứng dụng cho phép tích hợp Mini App/ Mini Programs vào ứng dụng.

STTỨng dụngThị trường
1LineNhật Bản, Đài Loan, Thái Lan
2WhatsAppMỹ, Global
3WeChat/WeixinTrung Quốc, Global
4ZaloViệt Nam, Myanmar
5KakaotalkHàn Quốc

Ưu điểm khi sử dụng Mini App

  • Lượng người dùng sẵn có và rất lớn, vì ứng dụng nhắn tin này phục vụ cho đa số dân cư tại quốc gia sử dụng nên số lượng người dùng ứng dụng là rất lớn.
  • Chủ sở hữu uy tín và là các tập đoàn lớn.
  • Hỗ trợ và nhà phát triển cũng như doanh nghiệp.
  • Tiết kiệm rất nhiều chi phí vận hành, bạn trả tiền cho những gì bạn sử dụng.
  • Chỉ cần cài đặt duy nhất 1 ứng dụng.
  • Bạn có thể làm báo cáo, thống kê lượt sử dụng của khách hàng, tận dụng hành vi mua sắm của khách hàng trên nền tảng.

Nhược điểm:

  • Phụ thuộc vào tính năng mở, hỗ trợ của nền tảng bạn sử dụng.

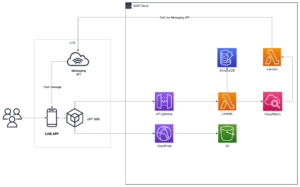
Trong chủ đề ngày hôm nay, mình sẽ chia sẻ về Line Mini App – là 1 trong nền tảng và giải pháp đang được triển khai mạnh mẽ tại Nhật Bản, nội dung bài viết xoay quanh cách việc bạn xác định vấn đề của doanh nghiệp, định hình vấn đề để tìm ra giải pháp phù hợp hướng tới sử dụng Mini App để giải quyết bài toán của bạn. Chuỗi bài viết này sẽ xuyên suốt cho tới khi bạn có thể tạo ra 1 ứng dụng Mini App tích hợp trên Line cơ bản.

Line Mini App

Line là 1 trong những nền tảng ứng dụng nhắn tin phổ biên bậc nhất tại Nhật Bản, với lượng người dùng rất lớn, tiện lợi và gắn liền với đời sống người dân Nhật, ứng dụng này dần trở nên phổ biến và hầu như mọi người Nhật đều có ứng dụng này trên thiết bị thông minh (điện thoại, máy tính, máy tính bảng, …) của mình.

Line cũng đang phát triển mạnh và lan tỏa ra 2 thị trường khác bao gồm Đài Loan và Thái Lan.

Nghĩ đơn giản hơn, nếu bạn ở Việt Nam, bạn thường dùng ứng dụng Zalo để nhắn tin, công việc thì cũng giống như tại Nhật bạn buộc phải cài ứng dụng Line vậy. Ứng dụng nhắn tin Line đã và đang được sử dụng với tất cả người dân Nhật Bản, độ tiện dụng của nó chắc hẳn người Nhật nào cũng đã nhận ra. Chính vì lẽ đó, Line cũng đã tận dụng nền tảng của mình để phát triển và phát hành ra cho nhà phát triển những công cụ, tiện ích và thư viện để nhà phát triển có thể tạo ra những ứng dụng tích hợp vào bên trong nền tảng Line, việc tạo ra những ứng dụng nhỏ chạy trên nền tảng Web và tích hợp vào Line được gọi là Line Mini App.

Ứng dụng Line Mini App hiển thị các sản phẩm và mua hàng trên ứng dụng

Một vài ví dụ về ứng dụng của Line Mini App đang được đẩy mạnh tại thị trường Nhật, bao gồm:

  • Cửa hàng bán quần áo, mỹ phẩm.
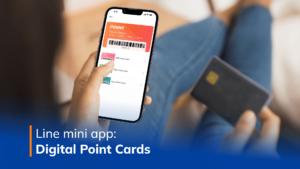
  • Ứng dụng tích điểm, chăm sóc khách hàng.
  • Ứng dụng nhắc nhở khách hàng về sức khỏe, tài chính, lời khuyên, …
  • Ứng dụng thông báo tới khách hàng, chia sẻ thông tin khuyến mãi, giảm giá, happy hours, …
  • Ứng dụng cho việc thanh toán, sử dụng Line Pay hoặc các hệ thống payment tùy chỉnh.
  • … và còn vô vàn trải nghiệm khác.

Ứng dụng Line Mini App: Đăng ký đặt chỗ tại cửa hàng cắt tóc

Để hiểu sâu hơn về cách tạo ra 1 ứng dụng, chúng ta sẽ cùng đi hết Seri của chuỗi bài viết để biết cách tạo 1 ứng dụng Line Mini App để giải quyết bài toán hiển thị thông tin cửa hàng và nắm được những use-case mà chúng ta có thể làm việc được khi người dùng sử dụng cửa hàng trên mini app này như thế nào nhé.

Kết luận

Mini App đã và đang là làn sóng chuyển đổi số phổ biến tại rất nhiều quốc gia lớn, và nó sẽ là giải pháp tuyệt vời cho các doanh nghiệp, tổ chức thậm chí chính phủ dùng để triển khai ứng dụng mình trên một nền tảng khác, với chi phí thấp, tính khả dụng cao và nó thực sự linh hoạt khi kết hợp cùng với nền tảng nhắn tin, mạng xã hội để tiếp cận khách hàng một cách đơn giản nhất, giúp người tiêu dùng gắn kết hơn với nền tảng này.

Bài tiếp theo, chúng ta sẽ nói về Làm thế nào để tạo ra một ứng dụng Line Mini App trên nền tảng Line, các bạn có thể theo dõi tiếp nhé.

Liên kết

Author: Kiet Vo

Related Blog

aws-infra

How-to

Online-Merge-Offline Retail

+0

    Mini Apps – Ứng Dụng Công Nghệ Là Chìa Khoá Thành Công Với Doanh Nghiệp Của Bạn (Part 3)

    Giới thiệu Chào các bạn, như vậy sau 2 bài viết trong chuỗi Seri tìm hiểu về Line Mini App của mình, chắc hẳn mọi người cũng đã nắm được cơ bản về việc tạo channel cũng như khởi tạo LIFF app rồi. Ở bài viết này, chúng ta sẽ tìm hiểu cách để triển khai ứng dụng LIFF app theo đề bài ban đầu. Tạo một ứng dụng chuyên tích điểm dành cho khách hàng thường xuyên check-in tại cửa hàng, và khi khách hàng đạt ngưỡng một số điểm nhất định, chúng ta sẽ gửi thông báo tới khách hàng và tặng khách hàng mã Voucher giảm giá sản phẩm, với yêu cầu đơn giản này, chúng ta hãy cùng xem ứng dụng mini app có thực sự tiện lợi không nhé. Đọc kỹ yêu cầu, chúng ta có 2 yêu cầu chính trong ứng dụng này. Chức năng tích điểm khi check-in tại cửa hàng, mỗi khi khách hàng tới cửa hàng sẽ nhấn nút check-in và hệ thống sẽ lưu lại và tặng điểm cho mỗi lần khách hàng thực hiện thao tác này.Chức năng gửi Voucher cho khách hàng khi tích đủ số Point nhất định. Lựa chọn giải pháp Khi tiến hành với việc triển khai giải pháp bằng việc lựa chọn công nghệ thích hợp, việc đầu tiên chúng ta cần phải nghĩ tới ngay đó là hiệu quả và chi phí vận hành. Rõ ràng, có rất nhiều giải pháp để triển khai một hệ thống, tuy nhiên để cân bằng trạng thái P/P (Price-Performance Ratio - tỷ lệ cân bằng giữa giá và hiệu suất) là điều rất cần thiết. Ở bài này, chúng ta sẽ cùng tìm hiểu về một trong những giải pháp đáp ứng được P/P, đang được rất nhiều hệ thống nhỏ sử dụng hiệu quả, giải pháp liên quan tới Cloud và Serverless, cụ thể trong bài viết này, chúng ta sẽ cùng tìm hiểu và triển khai về AWS Cloud và Serverless (Lambda + API Gateway) Dưới đây là mô hình AWS infrastructure cơ bản để demo sản phẩm này. Giải thích thành phần: API Gateway: cổng kết nối trung gian dịch vụ giữa ứng dụng LIFF và các dịch vụ bên trong (Lambda), là nơi thiết kế các API truy xuất dữ liệu.CloudFront: là CDN dùng để kết nối tới các host chứa dữ liệu, dữ liệu bài viết này là source code của ứng dụng Web, chúng ta sử dụng Single Page Web App cho ứng dụng sắp triển khai.S3: hiện là nơi lưu trữ dữ liệu source code của web app (SPA).Lambda: là một dạng computing được viết theo từng function, thay cho máy chủ để tính toán, truy xuất dữ liệu từ DB và trả về kết quả, chúng ta không cần máy chủ trong ứng dụng này, mọi chi phí sẽ dựa theo lượng request sử dụng.DynamoDB: là cơ sở dữ liệu (Database Engine) lưu trữ thông tin của user, trong khuôn khổ bài viết này, chúng ta sẽ lưu trữ số Point của end-user.CloudWatch: là nơi lưu trữ log của Lambda và dùng để trigger sự kiện theo schedule, ở bài viết này chúng ta sẽ dùng CloudWatch trigger mỗi 5 phút/ lần để gửi mã Voucher thử nghiệm nếu user đã đủ point.Messaging API: Là API do LINE cung cấp, dùng để gửi message tới user đang sử dụng LINE app và đã đăng ký với channel ứng dụng của chúng ta đang triển khai.LIFF SDK: là SDK dùng để tích hợp với Web app mà ta sẽ triển khai. Như vậy, chúng ta đã đi sơ qua các thành phần và giải pháp sẽ triển khai ứng dụng, bước tiếp theo chúng ta cần đăng ký tài khoản AWS và cùng thử xem sơ qua cách tính chi phí vận hành của ứng dụng với mô hình này nhé. Tìm hiểu về AWS và đăng ký tài khoản Ở phần trên, chúng ta sẽ thực hiện giải pháp sử dụng AWS Cloud làm mô hình Serverless cho ứng dụng, để bắt đầu, bạn cần hiểu sơ về AWS Cloud. Amazon Web Services (AWS) là nền tảng đám mây toàn diện và được sử dụng rộng rãi nhất, cung cấp trên 200 dịch vụ đầy đủ tính năng từ các trung tâm dữ liệu trên toàn thế giới. Hàng triệu khách hàng—bao gồm các công ty khởi nghiệp tăng trưởng nhanh nhất, các tập đoàn lớn nhất cũng như các cơ quan hàng đầu của chính phủ—đều tin tưởng vào AWS để giảm chi phí, trở nên linh hoạt hơn và đổi mới nhanh hơn. Đăng ký tài khoản AWS của bạn ngay. Sau khi đã đăng ký được tài khoản, bạn tiến hành đăng nhập, để đảm bảo tuân thủ Security Best Practice, bạn không nên sử dụng Root user, nhưng trong phạm vi khuôn khổ bài viết, chúng ta sẽ sử dụng root user để triển khai. Đừng quên tìm hiểu thêm lý do vì sao không nên xài root user. Giao diện đăng nhập AWS sau khi đăng nhập thành công sẽ như thế này. Như vậy là xong, bạn đã hoàn tất việc tạo 1 tài khoản AWS, lưu ý, mọi dịch vụ trên AWS đều có thể mất phí, vì vậy bạn cần hiểu rõ về dịch vụ mình cần sử dụng, để không mất quá nhiều tiền cho sản phẩm thử nghiệm của mình nhé, trong khuôn khổ bài viết chúng ta không thể phân tích chi tiết về phí dịch vụ, nhưng hãy luôn lưu ý vấn đề này khi sử dụng AWS Cloud. Kết thúc Trong khuôn khổ bài viết này, chúng ta đã hình dung được mô hình cấu trúc (AWS infrastructure) AWS khi triển khai ứng dụng LIFF App cùng với Serverless. Ở bài tiếp theo, chúng ta sẽ xây dựng một ứng dụng và triển khai (deploy) ứng dụng này lên Cloud, các bạn cùng chờ bài viết tiếp theo nhé. Cùng đón đọc các phần trước của series này nhé! Author: Kiet Vo

    03/06/2022

    768

    How-to

    +1

    • Online-Merge-Offline Retail

    Mini Apps – Ứng Dụng Công Nghệ Là Chìa Khoá Thành Công Với Doanh Nghiệp Của Bạn (Part 3)

    03/06/2022

    768

    intro2

    How-to

    Online-Merge-Offline Retail

    +0

      Mini Apps – Ứng Dụng Công Nghệ Là Chìa Khoá Thành Công Với Doanh Nghiệp Của Bạn (Part 2)

      Giới thiệu Ở bài viết trước, chúng ta đã hiểu được Line Mini App là gì, cũng như những ví dụ minh họa cơ bản về những trường hợp nên sử dụng Mini App trên Line. Trong khuôn khổ bài viết này, chúng ta sẽ làm quen với việc tạo một ứng dụng Line Mini App và tích hợp nó vào trong Line. Trước khi bắt đầu tạo một ứng dụng Line Mini App sẽ cần phải xác định trước những yêu cầu của nền tảng mà bạn đang tính xây dựng, thông thường sẽ liên quan tới luật và chính sách của quốc gia sở tại, vậy nên bạn nên đọc kỹ phần chính sách và điều khoản để đáp ứng được các yêu cầu. Đối với Line, yêu cầu đó có thể bao gồm: thông tin khách hàng, thông tin doanh nghiệp, nội dung chia sẻ và vấn đề liên quan tới bản quyền, … và lưu ý quan trọng, trong quá trình phát triển ứng dụng bạn có thể hoạt động tự do. Tuy nhiên, để ứng dụng được Publish, bạn cần được review và chấp nhận từ công ty Line. Để tìm hiểu kỹ hơn về điều khoản và chính sách liên quan tới Line Mini App, bạn có thể xem bảng chi tiết tại đây. Lưu ý, với mỗi quốc gia sẽ có chính sách riêng biệt hãy xem kỹ nội dung theo quốc gia bạn đang hướng tới để áp dụng phù hợp với giải pháp định chọn. Sau khi đã xác định và hiểu rõ, bạn có thể bắt đầu tiến hành tạo một ứng dụng Line Mini App theo các bước trong mục tiếp theo. Tạo ứng dụng Line Mini App Để bắt đầu với một ứng dụng, giả sử chúng ta đang xây dựng ứng dụng Line Mini App là một ứng dụng chuyên tích điểm dành cho khách hàng thường xuyên check-in tại cửa hàng, và khi khách hàng đạt ngưỡng một số điểm nhất định, chúng ta sẽ gửi thông báo tới khách hàng và tặng khách hàng mã Voucher giảm giá sản phẩm, với yêu cầu đơn giản này, chúng ta hãy cùng xem ứng dụng mini app có thực sự tiện lợi không nhé. Dưới đây, là các bước cần chuẩn bị trước khi tạo ứng dụng Mini App. Chuẩn bị tài khoản Line Việc đầu tiên, bạn cần truy cập tới trang quản trị dành cho nhà phát triển ứng dụng (nhấn tại đây). Bạn có thể đăng nhập với tài khoản Line hoặc tài khoản doanh nghiệp trên Line, để tìm hiểu kỹ hơn về tài khoản doanh nghiệp, hãy tham khảo tại đây. Sau khi đã đăng nhập thành công, màn hình quản trị sẽ hiển thị như dưới, bạn cần tạo 1 Provider để thử nghiệm, nhấn vào nút Create Điền tên Provider, ở đây chúng ta đặt tên Test-Mini-App, sau đó nhấn Create Sau khi quá trình tạo Provider hoàn tất, bạn được chuyển tới màn hình mới, với 3 Tabs chính:Channels: đây là tất cả các kênh mà nền tảng Line hỗ trợ để bạn có thể xây dựng các dịch vụ, trong khuôn khổ bài viết này, chúng ta chỉ cần quan tâm tới 2 channel là Line Login Channel và Line Messaging API ChannelRoles: đây là nơi bạn có thể thêm thành viên, nhà phát triển và người kiểm thử (Tester) để có quyền kết nối tới các channel bạn đã tạo.Settings: là những cài đặt cơ bản quan tới Provider. Lựa chọn giữa LIFF hoặc Line Mini App Sau khi khởi tạo tài khoản và tạo Provider ở bước trên, ở bước này chúng ta có thể tiến hành khởi tạo Line Mini App channel để bắt đầu, tuy nhiên, để có thể tạo được 1 Line Mini App channel, bạn sẽ qua bước kiểm tra và xác nhận từ LINE. Việc này sẽ tốn thời gian, vậy nên trong khuôn khổ bài viết này, chúng ta sẽ cùng tìm hiểu tới LIFF (LINE Front-end Framework), là nền tảng tương tự như Line Mini App và không cần phải chờ đợi review từ LINE. Trước hết, chúng ta sẽ xem qua những điểm khác biệt giữa LIFF và Line Mini App Điểm chung: Cả 2 đều chạy trên nền tảng Web và chạy bởi trình duyệt LIFF, được nhúng vào trong ứng dụng Line.Cả 2 đều có thể tích hợp nhiều công nghệ web mới nhất để cung cấp nhanh dịch vụ. Điểm riêng: LIFF appLINE MINI AppMôi trường- Chạy trên ứng dụng LINE.- Chạy được trên hầu hết các trình duyệt phổ biến.- Chỉ chạy được duy nhất trên ứng dụng LINE (điện thoại)LINE review và chấp nhậnKhông cần, bạn có thể phát hành bất cứ lúc nào.- Phải được review và chấp nhận bởi LINE.- Sau khi thỏa mãn điều kiện review, ứng dụng Line Mini App sẽ được xuất hiện bằng chức năng tìm kiếm và tại tab Home của ứng dụng LINE.Service message chat roomKhông có sẵnBạn có thể sử dụng, chức năng có sẵn trên toàn bộ ứng dụng Line Mini Apps. Tham khảo: tại đây Trong khuôn khổ seri này, chúng ta sẽ lựa chọn LIFF app, là phương án nhanh nhất để bắt đầu, sau khi phát triển hoàn tất, chúng ta có thể tiến hành chuyển đổi sang Line Mini App channel. Tiếp theo, hãy tạo 2 channels như đã đề cập bên trên, bao gồm: Line Login channel: hãy để mọi thông tin là mặc định, lưu ý vài điểm sau.Region: chọn JapanCompany or owner's country or region: JapanChannel name: DEV-Login channelChannel description: Line Mini AppApp Type: chọn WebMessaging API channel: hãy để mọi thông tin là mặc định, lưu ý vài điểm sau.Company or owner's country or region: JapanChannel name: DEV-Messaging APIChannel description: Line Mini AppCategory: Local Business and E-commerceSubcategory: Shopping & retail Như vậy, là xong phần chuẩn bị cơ bản liên quan tới quản trị trên nền tảng Line, bạn sẽ cần chuẩn bị thêm về tài liệu để khởi tạo một ứng dụng mini app trên Line, hãy cùng tìm hiểu về LIFF (LINE Front-end Framework), một nền tảng chạy trên web app được cung cấp bởi LINE. Khởi tạo LIFF apps. Ở bước bên trên, chúng ta đã khởi tạo thành công 1 Provider có chứa sẵn 2 Channels là Login channel và Messaging API channel, ở bước này chúng ta sẽ tiến hành khởi tạo 1 LIFF app và cấu hình LIFF app có thể tương tác với 2 channel này nhé. Line Mini App là ứng dụng chạy trên nền tảng web và nó chạy trên LINE.LIFF app (LINE Front-end Framework) là một framework dùng để xây dựng 1 ứng dụng web, được cung cấp bởi LINE, sử dụng LIFF, bạn sẽ giảm rất nhiều thời gian để xây dựng, xử lý, vì mọi thứ đã được LINE định nghĩa và cung cấp bên trong LIFF. Phiên bản mới nhất hiện tại của LIFF là version 2 (LINE Front-end Framework v2)Bạn có thể sử dụng tính năng thử nghiệm (playground) với LIFF playground để dễ hình dung hơn các tính năng của LIFF. Bước 01: Truy cập vào Login channel và tạo 1 LIFF app. Bước 02: Nhập thông tin, ví dụ như bên dưới Tên trườngMô tảGiá trịLIFF app nameTên của ứng dụng.demo-appSizeLà kích thước của LIFF brower khi bật lênFullEndpoint URLLà tên miền của ứng dụng, chúng ta sẽ cập nhật lại sauhttps://localhost.com:3000Scopeskhai báo quyền cần cấp để xin dữ liệu khi chứng thực với LINEprofile, openidBot link featureoffScan QRonModule modeoff Bước 03: Sau khi đã điền đủ thông tin, nhấn vào nút Add, và quá trình tạo 1 LIFF app đã hoàn tất. Kết thúc Như vậy, với những bước trên, bạn đã hoàn thành được việc đăng ký tài khoản LINE, khởi tạo 1 ứng dụng LIFF trên LINE console. Bài tiếp theo, chúng ta sẽ sang một seri mới liên quan tới kỹ thuật, đó là làm thế nào để triển khai ứng dụng LIFF và chạy nó trên nền tảng LINE. Author: Kiet Vo

      20/05/2022

      1.32k

      How-to

      +1

      • Online-Merge-Offline Retail

      Mini Apps – Ứng Dụng Công Nghệ Là Chìa Khoá Thành Công Với Doanh Nghiệp Của Bạn (Part 2)

      20/05/2022

      1.32k

      line mini app to digital transform customer service

      Online-Merge-Offline Retail

      Our success stories

      +0

        LINE Mini App: Digital Transform Customer Service with Digital Point Cards

        SupremeTech has been on an impressive journey of building and developing, positively impacting customers. One of our recent and innovative projects involved meeting our client's request to launch digital point cards integrated in Line Mini App. These cards allow customers to accumulate points or make payments within their network of stores. Previously, our client used physical cards for this purpose. However, recognizing the potential of using digital means to encourage more transactions, they swiftly moved forward. Initiating suitable solutions for a traditional issue With a commitment to customer satisfaction and delivering the best app experience, we proved our capabilities in doing this project. Understanding the client's needs, we embarked on research to provide a viable solution for developing and maintaining a mobile application for issuing and managing digital point cards. The app enables users to effortlessly carry and use their point cards on their smartphones, with key features including card issuance, displaying corresponding barcodes, and generating one-time barcodes for transactions. Developing a Loyalty App on Line App: What Sets it Apart A unique requirement for this project was the development of a mini-app on the Line app. Line, a popular international communication and calling app developed by LINE Corporation, offers various gaming and platform applications for users' entertainment and interaction within a virtual environment. This was an entirely new platform for SupremeTech, and despite no prior experience, the team immediately dove into research. Developing the app on Line presented challenges such as limited customization options for interface and user experience, adherence to Line's regulations, and potential limitations or lack of support for specific features. Overcoming Challenges and Successfully Launching the Line Mini-App Despite these challenges, SupremeTech successfully completed the Line mini-app project. Leveraging the versatility of React and Node.js, the team maximized Line's API and SDK potential for seamless integration and interaction with Line App features. Additionally, research was conducted to combine with other systems for data retrieval. After six months of dedicated efforts, the Loyalty App on Line App was successfully released. Highlighted Features This mobile app can issue digital point cards by entering user information or linking with physical cards to display information as barcodes. Key features include: Card Issuance: Allows customers to issue digital point cards.Barcode Display: Displays corresponding barcodes for each digital point card.One-time Barcodes: Generates one-time barcodes for specific transactions or interactions. Contributing to the Business Ecosystem This technological solution significantly contributes to the current business ecosystem by optimizing customer loyalty programs. It encourages customer transactions across all business service points. The app seamlessly connects with customer data systems, ensuring a smooth experience for the business and its customers. If you want to modernize your business and enterprise ecosystem with a cutting-edge loyalty app, don't hesitate to contact SupremeTech. We're here to help your business thrive.

        05/12/2023

        1.91k

        Thuong Truong

        Online-Merge-Offline Retail

        +1

        • Our success stories

        LINE Mini App: Digital Transform Customer Service with Digital Point Cards

        05/12/2023

        1.91k

        Thuong Truong

        Knowledge

        +0

          Best Practices for Building Reliable AWS Lambda Functions

          Welcome back to the "Mastering AWS Lambda with Bao" series! The previous episode explored how AWS Lambda connects to the world through AWS Lambda triggers and events. Using S3 and DynamoDB Streams triggers, we demonstrated how Lambda automates workflows by processing events from multiple sources. This example provided a foundation for understanding Lambda’s event-driven architecture. However, building reliable Lambda functions requires more than understanding how triggers work. To create AWS lambda functions that can handle real-world production workloads, you need to focus on optimizing performance, implementing robust error handling, and enforcing strong security practices. These steps optimize your Lambda functions to be scalable, efficient, and secure. In this episode, SupremeTech will explore the best practices for building reliable AWS Lambda functions, covering two essential areas: Optimizing Performance: Reducing latency, managing resources, and improving runtime efficiency.Error Handling and Logging: Capturing meaningful errors, logging effectively with CloudWatch, and setting up retries. Adopting these best practices, you’ll be well-equipped to optimize Lambda functions that thrive in production environments. Let’s dive in! Optimizing Performance Optimize the Lambda function's performance to run efficiently with minimal latency and cost. Let's focus first on Cold Starts, a critical area of concern for most developers. Understanding Cold Starts What Are Cold Starts? A Cold Start occurs when AWS Lambda initializes a new execution environment to handle an incoming request. This happens under the following circumstances: When the Lambda function is invoked for the first time.After a period of inactivity (execution environments are garbage collected after a few minutes of no activity – meaning it will be shut down automatically).When scaling up to handle additional concurrent requests. Cold starts introduce latency because AWS needs to set up a new execution environment from scratch. Steps Involved in a Cold Start: Resource Allocation:AWS provisions a secure and isolated container for the Lambda function.Resources like memory and CPU are allocated based on the function's configuration.Execution Environment Initialization:AWS sets up the sandbox environment, including:The /tmp directory is for temporary storage.Networking configurations, such as Elastic Network Interfaces (ENI), for VPC-based Lambdas.Runtime Initialization:The specified runtime (e.g., Node.js, Python, Java) is initialized.For Node.js, this involves loading the JavaScript engine (V8) and runtime APIs.Dependency Initialization:AWS loads the deployment package (your Lambda code and dependencies).Any initialization code in your function (e.g., database connections, library imports) is executed.Handler Invocation:Once the environment is fully set up, AWS invokes your Lambda function's handler with the input event. Cold Start Latency Cold start latency varies depending on the runtime, deployment package size, and whether the function runs inside a VPC: Node.js and Python: ~200ms–500ms for non-VPC functions.Java or .NET: ~500ms–2s due to heavier runtime initialization.VPC-Based Functions: Add ~500ms–1s due to ENI initialization. Warm Starts In contrast to cold starts, Warm Starts reuse an already-initialized execution environment. AWS keeps environments "warm" for a short time after a function is invoked, allowing subsequent requests to bypass initialization steps. Key Differences: Cold Start: New container setup → High latency.Warm Start: Reused container → Minimal latency (~<100ms). Reducing Cold Starts Cold starts can significantly impact the performance of latency-sensitive applications. Below are some actionable strategies to reduce cold starts, each with good and bad practice examples for clarity. 1. Use Smaller Deployment Packages to optimize lambda function Good Practice: Minimize the size of your deployment package by including only the required dependencies and removing unnecessary files.Use bundlers like Webpack, ESBuild, or Parcel to optimize your package size.Example: const DynamoDB = require('aws-sdk/clients/dynamodb'); // Only loads DynamoDB, not the entire SDK Bad Practice: Bundling the entire AWS SDK or other large libraries without considering modular imports.Example: const AWS = require('aws-sdk'); // Loads the entire SDK, increasing package size Why It Matters: Smaller deployment packages load faster during the initialization phase, reducing cold start latency. 2. Move Heavy Initialization Outside the Handler Good Practice: Place resource-heavy operations, such as database or SDK client initialization, outside the handler function so they are executed only once per container lifecycle – a cold start.Example: const DynamoDB = new AWS.DynamoDB.DocumentClient(); exports.handler = async (event) => {     const data = await DynamoDB.get({ Key: { id: '123' } }).promise();     return data; }; Bad Practice: Reinitializing resources inside the handler for every invocation.Example: exports.handler = async (event) => {     const DynamoDB = new AWS.DynamoDB.DocumentClient(); // Initialized on every call     const data = await DynamoDB.get({ Key: { id: '123' } }).promise();     return data; }; Why It Matters: Reinitializing resources for every invocation increases latency and consumes unnecessary computing power. 3. Enable Provisioned Concurrency1 Good Practice: Use Provisioned Concurrency to pre-initialize a set number of environments, ensuring they are always ready to handle requests.Example:AWS CLI: aws lambda put-provisioned-concurrency-config \ --function-name myFunction \ --provisioned-concurrent-executions 5 AWS Management Console: Why It Matters: Provisioned concurrency ensures a constant pool of pre-initialized environments, eliminating cold starts entirely for latency-sensitive applications. 4. Reduce Dependencies to optimize the lambda function Good Practice: Evaluate your libraries and replace heavy frameworks with lightweight alternatives or native APIs.Example: console.log(new Date().toISOString()); // Native JavaScript API Bad Practice: Using heavy libraries for simple tasks without considering alternatives.Example: const moment = require('moment'); console.log(moment().format()); Why It Matters: Large dependencies increase the deployment package size, leading to slower initialization during cold starts. 5. Avoid Unnecessary VPC Configurations Good Practice: Place Lambda functions outside a VPC unless necessary. If a VPC is required (e.g., to access private resources like RDS), optimize networking using VPC endpoints.Example:Use DynamoDB and S3 directly without placing the Lambda inside a VPC. Bad Practice: Deploying Lambda functions inside a VPC unnecessarily, such as accessing services like DynamoDB or S3, which do not require VPC access.Why It’s Bad: Placing Lambda in a VPC introduces additional latency due to ENI setup during cold starts. Why It Matters: Functions outside a VPC initialize faster because they skip ENI setup. 6. Choose Lightweight Runtimes to optimize lambda function Good Practice: Use lightweight runtimes like Node.js or Python for faster initialization than heavier runtimes like Java or .NET.Why It’s Good: Lightweight runtimes require fewer initialization resources, leading to lower cold start latency. Why It Matters: Heavier runtimes have higher cold start latency due to the complexity of their initialization process. Summary of Best Practices for Cold Starts AspectGood PracticeBad PracticeDeployment PackageUse small packages with only the required dependencies.Bundle unused libraries, increasing the package size.InitializationPerform heavy initialization (e.g., database connections) outside the handler.Initialize resources inside the handler for every request.Provisioned ConcurrencyEnable provisioned concurrency for latency-sensitive applications.Ignore provisioned concurrency for high-traffic functions.DependenciesUse lightweight libraries or native APIs for simple tasks.Use heavy libraries like moment.js without evaluating lightweight alternatives.VPC ConfigurationAvoid unnecessary VPC configurations; use VPC endpoints when required.Place all Lambda functions inside a VPC, even when accessing public AWS services.Runtime SelectionChoose lightweight runtimes like Node.js or Python for faster initialization.Use heavy runtimes like Java or .NET for simple, lightweight workloads. Error Handling and Logging Error handling and logging are critical for optimizing your Lambda functions are reliable and easy to debug. Effective error handling prevents cascading failures in your architecture, while good logging practices help you monitor and troubleshoot issues efficiently. Structured Error Responses Errors in Lambda functions can occur due to various reasons: invalid input, AWS service failures, or unhandled exceptions in the code. Properly structured error handling ensures that these issues are captured, logged, and surfaced effectively to users or downstream services. 1. Define Consistent Error Structures Good Practice: Use a standard error format so all errors are predictable and machine-readable.Example: {   "errorType": "ValidationError",   "message": "Invalid input: 'email' is missing",   "requestId": "12345-abcd" } Bad Practice: Avoid returning vague or unstructured errors that make debugging difficult. { "message": "Something went wrong", "error": true } Why It Matters: Structured errors make debugging easier by providing consistent, machine-readable information. They also improve communication with clients or downstream systems by conveying what went wrong and how it should be handled. 2. Use Custom Error Classes Good Practice: In Node.js, define custom error classes for clarity: class ValidationError extends Error {   constructor(message) {     super(message);     this.name = "ValidationError";     this.statusCode = 400; // Custom property   } } // Throwing a custom error if (!event.body.email) {   throw new ValidationError("Invalid input: 'email' is missing"); } Bad Practice: Use generic errors for everything, making identifying or categorizing issues hard.Example: throw new Error("Error occurred"); Why It Matters: Custom error classes make error handling more precise and help segregate application errors (e.g., validation issues) from system errors (e.g., database failures). 3. Include Contextual Information in Logs Good Practice: Add relevant information like requestId, timestamp, and input data (excluding sensitive information) when logging errors.Example: console.error({     errorType: "ValidationError",     message: "The 'email' field is missing.",     requestId: context.awsRequestId,     input: event.body,     timestamp: new Date().toISOString(), }); Bad Practice: Log errors without any context, making debugging difficult.Example: console.error("Error occurred"); Why It Matters: Contextual information in logs makes it easier to identify what triggered the error and where it happened, improving the debugging experience. Retry Logic Across AWS SDK and Other Services Retrying failed operations is critical when interacting with external services, as temporary failures (e.g., throttling, timeouts, or transient network issues) can disrupt workflows. Whether you’re using AWS SDK, third-party APIs, or internal services, applying retry logic effectively can ensure system reliability while avoiding unnecessary overhead. 1. Use Exponential Backoff and Jitter Good Practice: Apply exponential backoff with jitter to stagger retry attempts. This avoids overwhelming the target service, especially under high load or rate-limiting scenarios.Example (General Implementation): async function retryWithBackoff(fn, retries = 3, delay = 100) {     for (let attempt = 1; attempt <= retries; attempt++) {         try {             return await fn();         } catch (error) {             if (attempt === retries) throw error; // Rethrow after final attempt             const backoff = delay * 2 ** (attempt - 1) + Math.random() * delay; // Add jitter             console.log(`Retrying in ${backoff.toFixed()}ms...`);             await new Promise((res) => setTimeout(res, backoff));         }     } } // Usage Example const result = await retryWithBackoff(() => callThirdPartyAPI()); Bad Practice: Retrying without delays or jitter can lead to cascading failures and amplify the problem. for (let i = 0; i < retries; i++) {     try {         return await callThirdPartyAPI();     } catch (error) {         console.log("Retrying immediately...");     } } Why It Matters: Exponential backoff reduces pressure on the failing service, while jitter randomizes retry times, preventing synchronized retry storms from multiple clients. 2. Leverage Built-In Retry Mechanisms Good Practice: Use the built-in retry logic of libraries, SDKs, or APIs whenever available. These are typically optimized for the specific service.Example (AWS SDK): const DynamoDB = new AWS.DynamoDB.DocumentClient({     maxRetries: 3, // Number of retries     retryDelayOptions: { base: 200 }, // Base delay in ms }); Example (Axios for Third-Party APIs):Use libraries like axios-retry to integrate retry logic for HTTP requests. const axios = require('axios'); const axiosRetry = require('axios-retry'); axiosRetry(axios, {     retries: 3, // Retry 3 times     retryDelay: (retryCount) => retryCount * 200, // Exponential backoff     retryCondition: (error) => error.response.status >= 500, // Retry only for server errors }); const response = await axios.get("https://example.com/api"); Bad Practice: Writing your own retry logic unnecessarily when built-in mechanisms exist, risking suboptimal implementation. Why It Matters: Built-in retry mechanisms are often optimized for the specific service or library, reducing the likelihood of bugs and configuration errors. 3. Configure Service-Specific Retry Limits Good Practice: Set retry limits based on the service's characteristics and criticality.Example (AWS S3 Upload): const s3 = new AWS.S3({ maxRetries: 5, // Allow more retries for critical operations retryDelayOptions: { base: 300 }, // Slightly longer base delay }); Example (Database Queries): async function queryDatabaseWithRetry(queryFn) {     await retryWithBackoff(queryFn, 5, 100); // Retry with custom backoff logic } Bad Practice: Allowing unlimited retries can cause resource exhaustion and increase costs. while (true) {     try {         return await callService();     } catch (error) {         console.log("Retrying...");     } } Why It Matters: Excessive retries can lead to runaway costs or cascading failures across the system. Always define a sensible retry limit. 4. Handle Transient vs. Persistent Failures Good Practice: Retry only transient failures (e.g., timeouts, throttling, 5xx errors) and handle persistent failures (e.g., invalid input, 4xx errors) immediately.Example: const isTransientError = (error) =>     error.code === "ThrottlingException" || error.code === "TimeoutError"; async function callServiceWithRetry() {     await retryWithBackoff(() => {         if (!isTransientError(error)) throw error; // Do not retry persistent errors         return callService();     }); } Bad Practice: Retrying all errors indiscriminately, including persistent failures like ValidationException or 404 Not Found. Why It Matters: Persistent failures are unlikely to succeed with retries and can waste resources unnecessarily. 5. Log Retry Attempts Good Practice: Log each retry attempt with relevant context, such as the retry count and delay. async function retryWithBackoff(fn, retries = 3, delay = 100) {     for (let attempt = 1; attempt <= retries; attempt++) {         try {             return await fn();         } catch (error) {             if (attempt === retries) throw error;             console.log(`Attempt ${attempt} failed. Retrying in ${delay}ms...`);             await new Promise((res) => setTimeout(res, delay));         }     } } Bad Practice: Failing to log retries makes debugging or understanding the retry behavior difficult. Why It Matters: Logs provide valuable insights into system behavior and help diagnose retry-related issues. Summary of Best Practices for Retry logic AspectGood PracticeBad PracticeRetry LogicUse exponential backoff with jitter to stagger retries.Retry immediately without delays, causing retry storms.Built-In MechanismsLeverage AWS SDK retry options or third-party libraries like axios-retry.Write custom retry logic unnecessarily when optimized built-in solutions are available.Retry LimitsDefine a sensible retry limit (e.g., 3–5 retries).Allow unlimited retries, risking resource exhaustion or runaway costs.Transient vs PersistentRetry only transient errors (e.g., timeouts, throttling) and fail fast for persistent errors.Retry all errors indiscriminately, including persistent failures like validation or 404 errors.LoggingLog retry attempts with context (e.g., attempt number, delay,  error) to aid debugging.Fail to log retries, making it hard to trace retry behavior or diagnose problems. Logging Best Practices Logs are essential for debugging and monitoring Lambda functions. However, unstructured or excessive logging can make it harder to find helpful information. 1. Mask or Exclude Sensitive Data Good Practice: Avoid logging sensitive information like:User credentialsAPI keys, tokens, or secretsPersonally Identifiable Information (PII)Use tools like AWS Secrets Manager for sensitive data management.Example: Mask sensitive fields before logging: const sanitizedInput = {     ...event,     password: "***", }; console.log(JSON.stringify({     level: "info",     message: "User login attempt logged.",     input: sanitizedInput, })); Bad Practice: Logging sensitive data directly can cause security breaches or compliance violations (e.g., GDPR, HIPAA).Example: console.log(`User logged in with password: ${event.password}`); Why It Matters: Logging sensitive data can expose systems to attackers, breach compliance rules, and compromise user trust. 2.  Set Log Retention Policies Good Practice: Set a retention policy for CloudWatch log groups to prevent excessive log storage costs.AWS allows you to configure retention settings (e.g., 7, 14, or 30 days). Bad Practice: Using the default “Never Expire” retention policy unnecessarily stores logs indefinitely. Why It Matters: Unmanaged logs increase costs and make it harder to find relevant data. Retaining logs only as long as needed reduces costs and keeps logs manageable. 3. Avoid Excessive Logging Good Practice: Log only what is necessary to monitor, troubleshoot, and analyze system behavior.Use info, debug, and error levels to prioritize logs appropriately. console.info("Function started processing..."); console.error("Failed to fetch data from DynamoDB: ", error.message); Bad Practice: Logging every detail (e.g., input payloads, execution steps) unnecessarily increases log volume.Example: console.log(`Received event: ${JSON.stringify(event)}`); // Avoid logging full payloads unnecessarily Why It Matters: Excessive logging clutters log storage, increases costs, and makes it harder to isolate relevant logs. 4. Use Log Levels (Info, Debug, Error) Good Practice: Use different log levels to differentiate between critical and non-critical information.info: For general execution logs (e.g., function start, successful completion).debug: For detailed logs during development or troubleshooting.error: For failure scenarios requiring immediate attention. Bad Practice: Using a single log level (e.g., console.log() everywhere) without prioritization. Why It Matters: Log levels make it easier to filter logs based on severity and focus on critical issues in production. Conclusion In this episode of "Mastering AWS Lambda with Bao", we explored critical best practices for building reliable AWS Lambda functions, focusing on optimizing performance, error handling, and logging. Optimizing Performance: By reducing cold starts, using smaller deployment packages, lightweight runtimes, and optimizing VPC configurations, you can significantly lower latency and optimize Lambda functions. Strategies like moving initialization outside the handler and leveraging Provisioned Concurrency ensure smoother execution for latency-sensitive applications.Error Handling: Implementing structured error responses and custom error classes makes troubleshooting easier and helps differentiate between transient and persistent issues. Handling errors consistently improves system resilience.Retry Logic: Applying exponential backoff with jitter, using built-in retry mechanisms, and setting sensible retry limits optimizes that Lambda functions gracefully handle failures without overwhelming dependent services.Logging: Effective logging with structured formats, contextual information, log levels, and appropriate retention policies enables better visibility, debugging, and cost control. Avoiding sensitive data in logs ensures security and compliance. Following these best practices, you can optimize lambda function performance, reduce operational costs, and build scalable, reliable, and secure serverless applications with AWS Lambda. In the next episode, we’ll dive deeper into "Handling Failures with Dead Letter Queues (DLQs)", exploring how DLQs act as a safety net for capturing failed events and ensuring no data loss occurs in your workflows. Stay tuned! Note: 1. Provisioned Concurrency is not a universal solution. While it eliminates cold starts, it also incurs additional costs since pre-initialized environments are billed regardless of usage. When to Use:Latency-sensitive workloads like APIs or real-time applications where even a slight delay is unacceptable.When Not to Use:Functions with unpredictable or low invocation rates (e.g., batch jobs, infrequent triggers). For such scenarios, on-demand concurrency may be more cost-effective.

          13/01/2025

          97

          Bao Dang D. Q.

          Knowledge

          +0

            Best Practices for Building Reliable AWS Lambda Functions

            13/01/2025

            97

            Bao Dang D. Q.

            Customize software background

            Want to customize a software for your business?

            Meet with us! Schedule a meeting with us!