Header image

Giới Thiệu Về API Là Gì?

22/04/2022

650

Giới Thiệu Về API

Xin chào các bạn, mình là Thắng, thành viên team QC của SupremeTech. Trong bài viết này, mình sẽ giải thích cho các bạn về một khái niệm rất quen thuộc trong kiểm thử nói riêng mà còn trong ngành IT nói chung, đó là API.

Mình nhớ khoảng thời gian đầu tiên khi mình bắt đầu nhận việc trong một dự án với yêu cầu chỉ có API; lúc đó mình còn chưa có đủ kiến thức và kinh nghiệm cùng với sự tự tin về mảng này. Có rất nhiều câu hỏi trong đầu mình như phải tìm hiểu thế nào? Kiểm thử ra sao? Và sau đó mình đã cố gắng học hỏi và thực hành rất nhiều, sau cùng mình nhận ra API không quá khó như lúc đầu mình nghĩ, ít nhất mình đã có được kinh nghiệm và kiến thức để tự tin áp dụng vào trong dự án.

Ở đây, mình sẽ chia sẻ lại cho các bạn những gì mình đã tìm hiểu, đã áp dụng vào thực tế, để mọi người có góc nhìn khác khi một tester nhìn vào API thì sẽ như thế nào nhé.

API là gì?

API là viết tắt của cụm từ Giao diện lập trình ứng dụng (Application Programming Interface). API cung cấp khả năng truy xuất đến một tập các hàm hay dùng. Và từ đó có thể trao đổi dữ liệu giữa các ứng dụng. Một cách dễ hiểu thì API là một trung gian phần mềm cho phép hai ứng dụng giao tiếp với nhau.

Ví dụ về API trong thực tế

Tưởng tượng bạn bước vào một nhà hàng, bạn đặt món, nhân viên phục vụ sẽ tiếp nhận yêu cầu của bạn và đưa vào nhà bếp, sau đó sẽ mang ra món ăn đúng với yêu cầu của bạn. Trong ví dụ trên, API là nhân viên phục vụ, đã giúp bạn và đầu bếp giao tiếp với nhau.

Bây giờ hãy nghĩ về một trường hợp ứng dụng API trong thực tế nhé. Giả sử bạn đi du lịch, bạn sẽ vào trang web của các hãng hàng không nhằm kiểm tra chuyến bay, giá cả, số ghế,… Nhưng vấn đề ở đây là có quá nhiều hãng hàng không và bạn lại không muốn mất thời gian cho những việc thế này, thay vào đó, bạn có thể sử dụng các dịch vụ trực tuyến trung gian nhiều tiện ích như Traveloka hay Expedia. Những dịch vụ đó sẽ tương tác với API của các hãng hàng không để hiển thị cho bạn các thông tin liên quan không chỉ của một mà còn của nhiều hãng bay khác nhau, từ đó giúp cho bạn tiết kiệm được rất nhiều gian và công sức. API thật tuyệt vời đúng không!
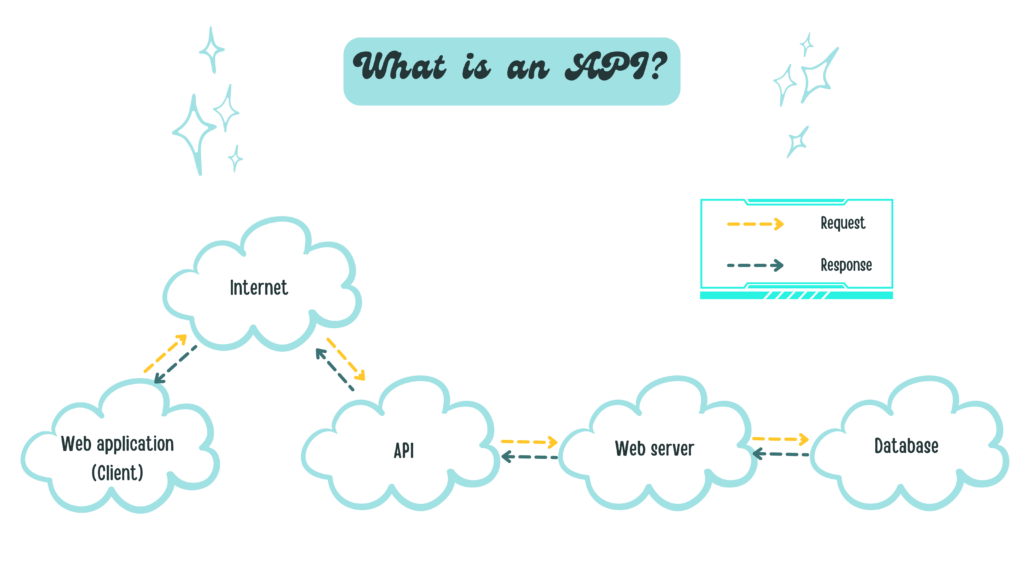
what is an API

HTML là gì?

Khoảng thời gian sau khi World Wide Web (WWW) được ra đời vào cuối những năm 1980, nhu cầu trao đổi dữ liệu giữa các thiết bị điện tử trở nên phát triển hơn bao giờ hết. Vào thời điểm đó, các tập tin siêu văn bản HTML được đưa lên web và người sử dụng có thể đọc được nội dung một cách dễ dàng.

HTML là viết tắt của từ HyperText Markup Language – Ngôn ngữ Đánh dấu Siêu văn bản. Đây là một loại ngôn ngữ nhằm định dạng trang web thông qua các thẻ (tag) nhằm giúp cho máy tính hiểu được bố cục và cấu trúc của trang web và hiển thị trang web đó. Tuy nhiên lập trình viên chỉ có thể sử dụng những tag được quy định sẵn trong HTML khiến cho việc mở rộng hay tạo ra những nội dung mới trên website khá khó khăn.

Một vấn đề khác nữa là HTML chỉ đơn thuần là ngôn ngữ trình bày nội dung, nó không có chức năng lưu trữ hay trao đổi dữ liệu giữa các máy tính với nhau, nghĩa là các hệ thống không thể tương tác với nhau như cập nhật giá cả hàng ngày chẳng hạn.

XML là gì?

Do đó XML – Extensible Markup Language được ra đời với sứ mệnh tạo ra các tài liệu web cho cả người và máy tính đều có thể dễ dàng đọc được, khiến Internet thực sự trở thành một mạng lưới liên kết đúng nghĩa thật sự. XML được phát triển bởi mười một người đóng góp tại W3C vào năm 1997.

XML, đúng như tên gọi của nó (Extensible – mở rộng), đã giải quyết được một vài vấn đề của HTML như thay vì sử dụng các tag có sẵn thì XML cho phép các lập trình viên tự tạo ra các tag của chính mình, từ đó cho phép họ thể hiện được nhiều nội dung hơn trên website, và đặc biệt là XML cho phép gói dữ liệu vào trong nội dung văn bản và trao đổi giữa các hệ thống với nhau.

Trước khi XML ra đời thì các hệ thống vẫn có thể trao đổi dữ liệu với nhau nhưng đó là một quy trình rất phức tạp và phải thống nhất rất nhiều quy tắc, dẫn tới việc nếu trao đổi dữ liệu lớn thì sẽ xảy ra tình trạng bị mất dữ liệu trong lúc chuyển đổi. Với XML, lập trình viên có thể khai báo trước các tag của mình và các hệ thống đều có thể đọc được và tương tác với nhau dễ dàng hơn.

Mình sẽ lấy một ví dụ đơn giản cho bạn dễ hiểu nhé. Trong HTML có một thẻ tag là <title> nhằm khai báo tiêu đề trang web. Cấu trúc sẽ như thế này:

<!DOCTYPE html>
<html>
  <head>
    <title>Supremetech blog</title>
  </head>
  <body>
  </body>
</html>

Trong khi đó, với XML bạn có thể tự khai báo thẻ tag <title> với nhiều mục đích khác nhau như tiêu đề trang web và tiêu đề một quyển sách hiển thị trên trang web đó mà không lo bị lỗi:

<?xml version="1.0" encoding="UTF-8"?>
<page>
  <head>
     <title>Book store</title>
  </head>
  <body>
    <library>
      <book>
        <title>Harry Potter</title>
        <author>J.K Rowling</author>
      </book>
      <book>
        <title>Sherlock Holmes</title>
        <author>Conan Doyle</author>
      </book>
    </library>
  </body>
</page>

Các bạn có thể thấy thẻ tag <title> nằm trong thẻ <head> sẽ được máy tính hiểu là tiêu đề của trang, còn thẻ <title> nằm trong thẻ <book> sẽ được hiểu là tiêu đề của quyển sách.

SOAP và RESTful

Sau khi hiểu được API là gì, các bạn sẽ thấy API vô cùng quan trọng trong thời đại số như hiện nay. Và như một điều hiển nhiên, mọi thứ sau khi phát triển một thời gian sẽ hình thành những quy tắc chung. Sau đây mình sẽ giới thiệu 2 chuẩn phổ biến là SOAP là RESTful.

SOAP

Sau khi XML ra đời, một vài kỹ sư tại Microsoft đã phát triển SOAP. SOAP là một tiêu chuẩn dựa hoàn toàn vào XML để chuẩn hóa việc giao tiếp giữa server và thiết bị (client), từ đó giúp cho việc phát triển API tốt hơn. Sau khi SOAP xuất hiện, đặc biệt vào năm 2000, SOAP đã được Microsoft và IBM thúc đẩy và trở nên phổ biến. Một số công ty và các tập đoàn lớn đã sử dụng SOAP như HP hay Oracle cho các chương trình của họ.

Một vấn đề khá lớn của SOAP là có quá nhiều quy tắc phải tuân thủ khiến cho lập trình viên thấy nó quá khó để sử dụng. Mặc dù việc có nhiều quy tắc cũng là một ưu điểm của SOAP bởi vì nhờ đó các lập trình viên có thể tạo ra các hệ thống độc lập nhưng vẫn giao tiếp tốt với nhau. Từ khả năng giao tiếp tốt đó, các hệ thống lớn gồm nhiều hệ thống liên quan sẽ được quản lý và phát triển một cách dễ dàng hơn.

RESTful

Một nhà khoa học máy tính tên Roy Fielding đã nhìn ra vấn đề đó và giới thiệu tiêu chuẩn REST trong luận văn tiến sĩ của mình với mục đích duy nhất: tạo ra tiêu chuẩn giúp cho các server đều có thể giao tiếp được với nhau. Nếu như SOAP sử dụng XML để tạo request và response thì RESTful có thể tạo request với một URL đơn giản đi cùng với các phương thức (method) như GET, POST, PUT, DELETE và response trả về cũng được viết ở nhiều dạng như JSON hay CSV. Bạn hãy nhìn vào ví dụ dưới đây về request và response của API dùng để xem giá cả nếu được viết dưới dạng XML theo tiêu chuẩn SOAP:

  • Request
<?xml version="1.0"?>

<soap:Envelope
xmlns:soap="http://www.w3.org/2003/05/soap-envelope/"
soap:encodingStyle="http://www.w3.org/2003/05/soap-encoding">

<soap:Body>
  <m:GetPrice xmlns:m="https://www.w3schools.com/prices">
    <m:Item>Apples</m:Item>
  </m:GetPrice>
</soap:Body>

</soap:Envelope>
  • Response:
<?xml version="1.0"?>

<soap:Envelope
xmlns:soap="http://www.w3.org/2003/05/soap-envelope/"
soap:encodingStyle="http://www.w3.org/2003/05/soap-encoding">

<soap:Body>
  <m:GetPriceResponse xmlns:m="https://www.w3schools.com/prices">
    <m:Price>1.90</m:Price>
  </m:GetPriceResponse>
</soap:Body>

</soap:Envelope>

Source: W3C

Rất là rắc rối và phức tạp đúng không nào. Trong khi đó nếu ta cũng dùng API gọi thông tin về giá sản phẩm theo RESTful thì chỉ cần gửi request tới URL (https://www.w3schools.com/prices), chọn method là GET thì sẽ có response dưới dạng JSON như sau:

{
    "Apple": "1.90"
}

Nhìn vào API theo tiêu chuẩn RESTful bạn cũng nhận ra nó đơn giản và dễ dùng hơn SOAP đúng không? Đó là lí do mà vì sao RESTful được sử dụng rất nhiều vào ngày nay.

Một lí do khác là vào thời điểm những năm 2000, Internet phát triển cực kì mạnh mẽ, đặc biệt là mảng thương mại điện tử. Rất nhiều tập đoàn lớn lúc đó đã phát triển API của mình để nhiều bên có thể truy cập vào dữ liệu sản phẩm của họ. Lúc đó Salesforce là một trong những người tiên phong cung cấp API của mình dưới tiêu chuẩn SOAP nhưng lại không được nhiều lập trình viên ưa chuộng vì tài liệu hướng dẫn sử dụng hơn 400 trang.

Trong khi đó, Ebay, mặt khác lại cung cấp API theo chuẩn RESTful và đã đạt được sự thành công đáng kể so với đối thủ là Salesforce lúc bấy giờ khi mà nhiều bên cảm thấy API theo chuẩn RESTful dễ truy cập và dễ sử dụng. Kể từ đó là thời kì phát triển mạnh mẽ của RESTful API, nhiều ông lớn đã đi theo Ebay như Amazon, Flickr,… Dưới đây là sơ đồ thống kê mức độ phổ biến các chuẩn API vào năm 2014:

API

Source

Dưới góc độ kiểm thử và sự phổ biến của RESTful nên mình sẽ nói kỹ hơn về chuẩn này nhé.
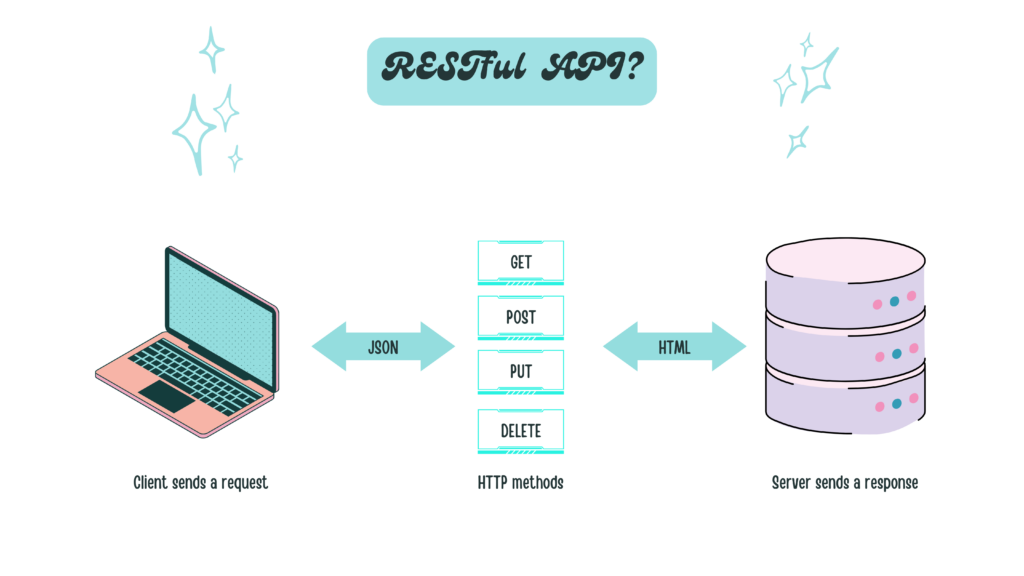
RESTful API

Hình ví dụ ở trên minh họa một cách đơn giản về nguyên lý hoạt động của API theo tiêu chuẩn RESTful. Hãy lấy lại ví dụ ở phần trước đó về việc bạn sử dụng Traveloka để xem thông tin về chuyến bay nhé. Bạn vào mục tra cứu chuyến bay trên web Traveloka, sau bước này thì website – client sẽ gửi request theo giao thức HTTP tới server của hãng bay. Tùy thuộc vào phương thức – method bạn gửi thì server sẽ có những xử lý tương ứng. Trong RESTful sẽ có 4 phương thức cơ bản sau đây:

  • GET (SELECT): Trả về một Resource hoặc một danh sách Resource.
  • POST (CREATE): Tạo mới một Resource.
  • PUT (UPDATE): Cập nhật thông tin cho Resource.
  • DELETE (DELETE): Xoá một Resource.

Những phương thức hay hoạt động này thường được gọi là CRUD tương ứng với Create – Tạo, Read – Đọc, Update – Sửa, Delete – Xóa.

Ví dụ ở đây bạn muốn xem thông tin về chuyến bay thì method client dùng sẽ là GET nhằm lấy về danh sách các chuyến bay theo yêu cầu của bạn. Sau khi server nhận được request của Client sẽ tiến hành trả về dữ liệu phù hợp response. Dữ liệu trả về thường được viết dưới dạng JSON hoặc XML tùy thuộc vào tính chất của dự án. Dữ liệu trả về gồm có cấu trúc như sau (mình sẽ để dưới dạng JSON nhé):

{
    "status_code": 200,
    "data": [
        {
            "name": "LH370",
            "Time": "Mar 29, 2022",
            "City": "DNG"
        },
        {
            "name": "LH370",
            "Time": "Mar 29, 2022",
            "City": "HCM"
        }
    ],
}

Các bạn có thể thấy ở response có dòng “status_code”, biến này sẽ cho chúng ta biết được trạng thái của response trả về. Các mã sẽ được phân thành các nhóm như sau:

  • 2xx: Successful responses / Phản hồi thành công:
  • 200 OK – Trả về thành công cho những phương thức GET, PUT, PATCH hoặc DELETE.
  • 201 Created – Trả về khi một Resource vừa được tạo thành công.
  • 204 No Content – Trả về khi Resource xoá thành công.
  • 3xx: Redirects / Điều hướng
  • 304 Not Modified – Client có thể sử dụng dữ liệu cache.
  • 4xx: Client errors / Lỗi phía client
  • 400 Bad Request – Request không hợp lệ
  • 401 Unauthorized – Request cần có auth.
  • 403 Forbidden – bị từ chối không cho phép.
  • 404 Not Found – Không tìm thấy resource từ URL
  • 5xx: Server errors / Lỗi phía máy chủ
  • 500 Server Error: domain, hosting hết hạn, hoặc dừng server đột ngột để test
  • 502 Bad Gateway
  • 503 Service Unavailable

Web services là gì? Phân biệt API và web services

Và lúc này khái niệm web services trở nên phổ biến. Giờ chúng ta tìm hiểu thêm một khái niệm mới nhé.

Nói một cách khái quát, web services là những tài nguyên có sẵn trên internet, là dịch vụ cung cấp một số chức năng mà các ứng dụng khác có thể sử dụng. Chức năng này có thể bao gồm xử lý thanh toán, đăng nhập và lưu trữ cơ sở dữ liệu. Cả API và web services đều đóng vai trò giúp cho các ứng dụng giao tiếp được với nhau. Điểm khác biệt cơ bản giữa API và web services đó là web services giúp các ứng dụng giao tiếp với nhau trên Internet nhưng API có thể giúp các ứng dụng giao tiếp với nhau mà không cần Internet. Chúng ta có thể nói tất cả web services là API nhưng không phải API nào cũng là web services.

Hơi rắc rối đúng không nào, mình sẽ lấy một ví dụ cho bạn dễ hình dung nhé:

Hầu như trong cuộc sống ngày nay chúng ta luôn có sẵn ứng dụng Facebook trên điện thoại của mình. Khi bạn bắt gặp một khoảnh khắc nào đó và muốn chụp một bức hình để chia sẻ cho bạn bè cũng xem, bạn sẽ bấm vào biểu tượng máy ảnh trên Facebook và nó sẽ mở màn hình chụp ảnh cho bạn. Lúc này Facebook sẽ gọi API máy ảnh của điện thoại để sử dụng máy ảnh ngay trên ứng dụng mà không cần phải mở app chụp ảnh mặc định của điện thoại, và việc gọi API này thì không cần mạng. Ở một trường hợp khác, khi bạn vào xem thông tin một địa điểm nào đó trên Facebook thì sẽ thấy bản đồ chỉ đường tới địa điểm đó đúng không? Lúc đó Facebook sẽ gọi API (web services) từ Google Map để lấy thông tin bản đồ về và thao tác này chắc chắn cần mạng mới có thể làm được.

Cho tới hiện tại, việc tranh cãi SOAP hay RESTful tốt hơn vẫn chưa hề kết thúc. Tùy thuộc vào tính chất của dự án và sở thích của lập trình viên mà chúng ta sẽ lựa chọn chuẩn phù hợp. SOAP có thể phức tạp, phải tuân thủ nhiều quy tắc nhưng đôi khi nó lại dễ sử dụng trong một số trường hợp, còn đàn em của nó là RESTful nổi lên như một giải pháp thay thế mới mẻ song vẫn có những vấn đề của riêng nó.

Bài viết giới thiệu về API của mình đến đây là hết, mình rất vui vì một phần nào đó đã giúp các bạn có thêm những kiến thức mới. API theo chuẩn RESTful rất phổ biến, do đó kĩ năng kiểm thử API theo chuẩn này rất cần thiết với tester. Những bài viết tiếp theo mình sẽ giới thiệu cho các bạn về những công cụ thường được sử dụng trong việc test API như Postman, Charles,… Hẹn gặp lại các bạn lần sau!

Reference

  • W3schools (no date) W3schools.com, W3Schools Online Web Tutorials. Available at: https://www.w3schools.com/xml/xml_soap.asp (Accessed: 04 October 2024).
  • Jay (2023) Soap and rest at odds, The History of the Web. Available at: https://thehistoryoftheweb.com/soap-rest-odds/ (Accessed: 04 October 2024).
  • Harrington, D. (2024) The history of rest apis – readme: Resource library, ReadMe. Available at: https://readme.com/resources/the-history-of-rest-apis (Accessed: 04 October 2024).

Author: Thang Tran

Related Blog

Knowledge

Software Development

+0

    Mastering AWS Lambda: An Introduction to Serverless Computing

    Imagine this: you have a system that sends emails to users to notify them about certain events at specific times of the day or week. During peak hours, the system demands a lot of resources, but it barely uses any for the rest of the time. If you were to dedicate a server just for this task, managing resources efficiently and maintaining the system would be incredibly complex. This is where AWS Lambda comes in as a solution to these challenges. Its ability to automatically scale, eliminate server management, and, most importantly, charge you only for the resources you use simplifies everything. Hello everyone! I’m Đang Đo Quang Bao, a Software Engineer at SupremeTech. Today, I’m excited to introduce the series' first episode, “Mastering AWS Lambda: An Introduction to Serverless Computing.” In this episode, we’ll explore: The definition of AWS Lambda and how it works.The benefits of serverless computing.Real-world use cases. Let’s dive in! What is AWS Lambda? AWS Lambda is a serverless computing service that Amazon Web Services (AWS) provides. It executes your code in response to specific triggers and scales automatically, charging you only for the compute time you use. How Does AWS Lambda Work? AWS Lambda operates on an event-driven model, reacting to specific actions or events. In simple terms, it executes code in response to particular triggers. Let’s explore this model further to gain a more comprehensive understanding. The above is a simplified workflow for sending emails to many users simultaneously, designed to give you a general understanding of how AWS Lambda works. The workflow includes: Amazon EventBridge:Role: EventBridge acts as the starting point of the workflow. It triggers the first AWS Lambda function at a specific time each day based on a cron schedule.How It Works:Configured to run automatically at 00:00 UTC or any desired time.Ensures the workflow begins consistently without manual intervention.Amazon DynamoDB:Role: DynamoDB is the primary database for user information. It holds the email addresses and other relevant metadata for all registered users.How It Works:The first Lambda function queries DynamoDB to fetch the list of users who need to receive emails.AWS Lambda (1st Function):Role: This Lambda function prepares the user data for email sending by fetching it from DynamoDB, batching it, and sending it to Amazon SQS.How It Works:Triggered by EventBridge at the scheduled time.Retrieves user data from DynamoDB in a single query or multiple paginated queries.Split the data into smaller batches (e.g., 100 users per batch) for efficient processing.Pushes each batch as a separate message into Amazon SQS.Amazon SQS (Simple Queue Service).Role: SQS serves as a message queue, temporarily storing user batches and decoupling the data preparation process from email-sending.How It Works:Each message in SQS represents one batch of users (e.g., 100 users).Messages are stored reliably and are processed independently by the second Lambda function.AWS Lambda (2nd Function):Role: This Lambda function processes each user batch from SQS and sends emails to the users in that batch.How It Works:Triggered by SQS for every new message in the queue.Reads the batch data (e.g., 100 users) from the message.Sends individual emails to each user in the batch using Amazon SES.Amazon SES (Simple Email Service).Role: SES handles the actual email delivery, reliably ensuring messages reach users’ inboxes.How It Works:Receives the email content (recipient address, subject, body) from the second Lambda function.Delivers emails to the specified users.Provides feedback on delivery status, including successful deliveries, bounces, and complaints. As you can see, AWS Lambda is triggered by external events or actions (AWS EventBridge schedule) and only "lives" for the duration of its execution. >>> Maybe you are interested: The Rise of Serverless CMS Solutions Benefits of AWS Lambda No Server Management:Eliminate the need to provision, configure, and maintain servers. AWS handles the underlying infrastructure, allowing developers to focus on writing code.Cost Efficiency:Pay only for the compute time used (measured in milliseconds). There are no charges when the function isn’t running.Scalability:AWS Lambda automatically scales horizontally to handle thousands of requests per second.Integration with AWS Services:Lambda integrates seamlessly with services like S3, DynamoDB, and SQS, enabling event-driven workflows.Improved Time-to-Market:Developers can deploy and iterate applications quickly without worrying about managing infrastructure. Real-World Use Cases for AWS Lambda AWS Lambda is versatile and can be applied in various scenarios. Here are some of the most common and impactful use cases: Real-Time File ProcessingExample: Automatically resizing images uploaded to an Amazon S3 bucket.How It Works:An upload to S3 triggered a Lambda function.The function processes the file (e.g., resizing or compressing an image).The processed file is stored back in S3 or another storage system.Why It’s Useful:Eliminates the need for a dedicated server to process files.Automatically scales based on the number of uploads.Building RESTful APIsExample: Creating a scalable backend for a web or mobile application.How It Works:Amazon API Gateway triggers AWS Lambda in response to HTTP requests.Lambda handles the request, performs necessary logic (e.g., CRUD operations), and returns a response.Why It’s Useful:Enables fully serverless APIs.Simplifies backend management and scaling.IoT ApplicationsExample: Processing data from IoT devices.How It Works:IoT devices publish data to AWS IoT Core, which triggers Lambda.Lambda processes the data (e.g., analyzing sensor readings) and stores results in DynamoDB or ElasticSearch.Why It’s Useful:Handles bursts of incoming data without requiring a dedicated server.Integrates seamlessly with other AWS IoT services.Real-Time Streaming and AnalyticsExample: Analyzing streaming data for fraud detection or stock market trends.How It Works:Events from Amazon Kinesis or Kafka trigger AWS Lambda.Lambda processes each data stream in real time and outputs results to an analytics service like ElasticSearch.Why It’s Useful:Allows real-time data insights without managing complex infrastructure.Scheduled TasksExample: Running daily tasks/reports or cleaning up expired data.How It Works:Amazon EventBridge triggers Lambda at scheduled intervals (e.g., midnight daily).Lambda performs tasks like querying a database, generating reports, or deleting old records.Why It’s Useful:Replaces traditional cron jobs with a scalable, serverless solution. Conclusion AWS Lambda is a powerful service that enables developers to build highly scalable, event-driven applications without managing infrastructure. Lambda simplifies workflows and accelerates time-to-market by automating tasks and seamlessly integrating with other AWS services like EventBridge, DynamoDB, SQS, and SEStime to market. We’ve explored the fundamentals of AWS Lambda, including its definition, how it works, its benefits, and its application in real-world use cases. It offers an optimized and cost-effective solution for many scenarios, making it a vital tool in modern development. At SupremeTech, we’re committed to harnessing innovative technologies to deliver impactful solutions. This is just the beginning of our journey with AWS Lambda. In upcoming episodes, we’ll explore implementing AWS Lambda in different programming languages and uncover best practices for building efficient serverless applications. Stay tuned, and let’s continue mastering AWS Lambda together!

    25/12/2024

    26

    Bao Dang D. Q.

    Knowledge

    +1

    • Software Development

    Mastering AWS Lambda: An Introduction to Serverless Computing

    25/12/2024

    26

    Bao Dang D. Q.

    Automate your git flow with git hooks

    Knowledge

    +0

      Automate Your Git Workflow with Git Hooks for Efficiency

      Have you ever wondered how you can make your Git workflow smarter and more efficient? What if repetitive tasks like validating commit messages, enforcing branch naming conventions, or preventing sensitive data leaks could happen automatically? Enter Git Hooks—a powerful feature in Git that enables automation at every step of your development process. If you’ve worked with webhooks, the concept of Git Hooks might already feel familiar. Like API events trigger webhooks, Git Hooks are scripts triggered by Git actions such as committing, pushing, or merging. These hooks allow developers to automate tasks, enforce standards, and improve the overall quality of their Git workflows. By integrating Git Hooks into your project, you can gain numerous benefits, including clearer commit histories, fewer human errors, and smoother team collaboration. Developers can also define custom rules tailored to their Git flow, ensuring consistency and boosting productivity. In this SupremeTech blog, I, Đang Đo Quang Bao, will introduce you to Git Hooks, explain how they work, and guide you through implementing them to transform your Git workflow. Let’s dive in! What Are Git Hooks? Git Hooks are customizable scripts that automatically execute when specific events occur in a Git repository. These events might include committing code, pushing changes, or merging branches. By leveraging Git Hooks, you can tailor Git's behavior to your project's requirements, automate repetitive tasks, and reduce the likelihood of human errors. Imagine validating commit messages, running tests before a push, or preventing large file uploads—all without manual intervention. Git Hooks makes this possible, enabling developers to integrate useful automation directly into their workflows. Type of Git Hooks Git Hooks come in two main categories, each serving distinct purposes: Client-Side Hooks These hooks run on the user’s local machine and are triggered by actions like committing or pushing changes. They are perfect for automating tasks like linting, testing, or enforcing commit message standards. Examples:pre-commit: Runs before a commit is finalized.pre-push: Executes before pushing changes to a remote repository.post-merge: Triggers after merging branches. Server-Side Hooks These hooks operate on the server hosting the repository and are used to enforce project-wide policies. They are ideal for ensuring consistent workflows across teams by validating changes before they’re accepted into the central repository. Examples: pre-receive: Runs before changes are accepted by the remote repository.update: Executes when a branch or tag is updated on the server. My Journey to Git Hooks When I was working on personal projects, Git management was fairly straightforward. There were no complex workflows, and mistakes were easy to spot and fix. However, everything changed when I joined SupremeTech and started collaborating on larger projects. Adhering to established Git flows across a team introduced new challenges. Minor missteps—like inconsistent commit messages, improper branch naming, accidental force pushes, or forgetting to run unit tests—quickly led to inefficiencies and avoidable errors. That’s when I discovered the power of Git Hooks. By combining client-side Git Hooks with tools like Husky, ESLint, Jest, and commitlint, I could automate and streamline our Git processes. Some of the tasks I automated include: Enforcing consistent commit message formats.Validating branch naming conventions.Automating testing and linting.Preventing accidental force pushes and large file uploads.Monitoring and blocking sensitive data in commits. This level of automation was a game-changer. It improved productivity, reduced human errors, and allowed developers to focus on their core tasks while Git Hooks quietly enforced the rules in the background. It transformed Git from a version control tool into a seamless system for maintaining best practices. Getting Started with Git Hooks Setting up Git Hooks manually can be dull, especially in team environments where consistency is critical. Tools like Husky simplify the process, allowing you to manage Git Hooks and integrate them into your workflows easily. By leveraging Husky, you can unlock the full potential of Git Hooks with minimal setup effort. I’ll use Bun as the JavaScript runtime and package manager in this example. If you’re using npm or yarn, replace Bun-specific commands with their equivalents. Setup Steps 1. Initialize Git: Start by initializing a Git repository if one doesn’t already exist git init 2. Install Husky: Use Bun to add Husky as a development dependency bun add -D husky 3. Enable Husky Hooks: Initialize Husky to set up Git Hooks for your project bunx husky init 4. Verify the Setup: At this point, a folder named .husky will be created, which already includes a sample of pre-commit hook. With this, the setup for Git Hooks is complete. Now, let’s customize it to optimize some simple processes. Examples of Git Hook Automation Git Hooks empowers you to automate tedious yet essential tasks and enforce team-wide best practices. Below are four practical examples of how you can leverage Git Hooks to improve your workflow: Commit Message Validation Ensuring consistent and clear commit messages improves collaboration and makes Git history easier to understand. For example, enforce the following format: pbi-203 - refactor - [description…] [task-name] - [scope] - [changes] Setup: Install Commitlint: bun add -D husky @commitlint/{config-conventional,cli} Configure rules in commitlint.config.cjs: module.exports = {     rules: {         'task-name-format': [2, 'always', /^pbi-\d+ -/],         'scope-type-format': [2, 'always', /-\s(refactor|fix|feat|docs|test|chore|style)\s-\s[[^\]]+\]$/]     },     plugins: [         {             rules: {                 'task-name-format': ({ raw }) => {                     const regex = /^pbi-\d+ -/;                     return [regex.test(raw),                         `❌ Commit message must start with "pbi-<number> -". Example: "pbi-1234 - refactor - [optimize function]"`                     ];                 },                 'scope-type-format': ({ raw}) => {                     const regex = /-\s(refactor|fix|feat|docs|test|chore|style)\s-\s[[^\]]+\]$/;                     return [regex.test(raw),                         `❌ Commit message must include a valid scope and description. Example: "pbi-1234 - refactor - [optimize function]".                         \nValid scopes: refactor, fix, feat, docs, test, chore, style`                     ];                 }             }         }     ] } Add Commitlint to the commit-msg hook: echo "bunx commitlint --edit \$1" >> .husky/commit-msg With this, we have completed the commit message validation setup. Now, let’s test it to see how it works. Now, developers will be forced to follow this committing rule, which increases the readability of the Git History. Automate Branch Naming Conventions Enforce branch names like feature/pbi-199/add-validation. First, we will create a script in the project directory named scripts/check-branch-name.sh. #!/bin/bash # Define allowed branch naming pattern branch_pattern="^(feature|bugfix|hotfix|release)/pbi-[0-9]+/[a-zA-Z0-9._-]+$" # Get the current branch name current_branch=$(git symbolic-ref --short HEAD) # Check if the branch name matches the pattern if [[ ! "$current_branch" =~ $branch_pattern ]]; then   echo "❌ Branch name '$current_branch' is invalid!"   echo "✅ Branch names must follow this pattern:"   echo "   - feature/pbi-<number>/<description>"   echo "   - bugfix/pbi-<number>/<description>"   echo "   - hotfix/pbi-<number>/<description>"   echo "   - release/pbi-<number>/<description>"   exit 1 fi echo "✅ Branch name '$current_branch' is valid." Add the above script execution command into the pre-push hook. echo "bash ./scripts/check-branch-name.sh" >> .husky/pre-push Grant execute permissions to the check-branch-name.sh file. chmod +x ./scripts/check-branch-name.sh Let’s test the result by pushing our code to the server. Invalid case: git checkout main git push Output: ❌ Branch name 'main' is invalid! ✅ Branch names must follow this pattern:   - feature/pbi-<number>/<description>   - bugfix/pbi-<number>/<description>   - hotfix/pbi-<number>/<description>   - release/pbi-<number>/<description> husky - pre-push script failed (code 1) Valid case: git checkout -b feature/pbi-100/add-new-feature git push Output: ✅ Branch name 'feature/pbi-100/add-new-feature' is valid. Prevent Accidental Force Pushes Force pushes can overwrite shared branch history, causing significant problems in collaborative projects. We will implement validation for the prior pre-push hook to prevent accidental force pushes to critical branches like main or develop. Create a script named scripts/prevent-force-push.sh. #!/bin/bash # Define the protected branches protected_branches=("main" "develop") # Get the current branch name current_branch=$(git symbolic-ref --short HEAD) # Check if the current branch is in the list of protected branches if [[ " ${protected_branches[@]} " =~ " ${current_branch} " ]]; then # Check if the push is a force push for arg in "$@"; do   if [[ "$arg" == "--force" || "$arg" == "-f" ]]; then     echo "❌ Force pushing to the protected branch '${current_branch}' is not allowed!"     exit 1   fi done fi echo "✅ Push to '${current_branch}' is valid." Add the above script execution command into the pre-push hook. echo "bash ./scripts/prevent-force-push.sh" >> .husky/pre-push Grant execute permissions to the check-branch-name.sh file. chmod +x ./scripts/prevent-force-push.sh Result: Invalid case: git checkout main git push -f Output: ❌ Force pushing to the protected branch 'main' is not allowed! husky - pre-push script failed (code 1) Valid case: git checkout main git push Output: ✅ Push is valid. Monitor for Secrets in Commits Developers sometimes unexpectedly include sensitive data in commits. We will set up a pre-commit hook to scan files for sensitive patterns before committing to prevent accidental commits containing sensitive information (such as API keys, passwords, or other secrets). Create a script named scripts/monitor-secrets-with-values.sh. #!/bin/bash # Define sensitive value patterns patterns=( # Base64-encoded strings "([A-Za-z0-9+/]{40,})={0,2}" # PEM-style private keys "-----BEGIN RSA PRIVATE KEY-----" "-----BEGIN OPENSSH PRIVATE KEY-----" "-----BEGIN PRIVATE KEY-----" # AWS Access Key ID "AKIA[0-9A-Z]{16}" # AWS Secret Key "[a-zA-Z0-9/+=]{40}" # Email addresses (optional) "[a-zA-Z0-9._%+-]+@[a-zA-Z0-9.-]+\.[a-zA-Z]{2,}" # Others (e.g., passwords, tokens) ) # Scan staged files for sensitive patterns echo "🔍 Scanning staged files for sensitive values..." # Get the list of staged files staged_files=$(git diff --cached --name-only) # Initialize a flag to track if any sensitive data is found found_sensitive_data=false # Loop through each file and pattern for file in $staged_files; do # Skip binary files if [[ $(file --mime-type -b "$file") == "application/octet-stream" ]]; then   continue fi # Scan each pattern using grep -E (extended regex) for pattern in "${patterns[@]}"; do   if grep -E -- "$pattern" "$file"; then     echo "❌ Sensitive value detected in file '$file': Pattern '$pattern'"     found_sensitive_data=true     break   fi done done # If sensitive data is found, prevent the commit if $found_sensitive_data; then echo "❌ Commit aborted. Please remove sensitive values before committing." exit 1 fi echo "✅ No sensitive values detected. Proceeding with committing." Add the above script execution command into the pre-commit hook. echo "bash ./scripts/monitor-secrets-with-values.sh" >> .husky/pre-commit Grant execute permissions to the monitor-secrets-with-values.sh file. chmod +x ./scripts/monitor-secrets-with-values.sh Result: Invalid case: git add private git commit -m “pbi-002 - chore - add unexpected private file” Result: 🔍 Scanning staged files for sensitive values... -----BEGIN OPENSSH PRIVATE KEY----- ❌ Sensitive value detected in file 'private': Pattern '-----BEGIN OPENSSH PRIVATE KEY-----' ❌ Commit aborted. Please remove sensitive values before committing. husky - pre-commit script failed (code 1) Valid case: git reset private git commit -m “pbi-002 - chore - remove unexpected private file” Result: 🔍 Scanning staged files for sensitive values... ✅ No sensitive values detected. Proceeding with commit. [main c575028] pbi-002 - chore - remove unexpected private file 4 files changed, 5 insertions(+) create mode 100644 .env.example create mode 100644 .husky/commit-msg create mode 100644 .husky/pre-commit create mode 100644 .husky/pre-push Conclusion "Humans make mistakes" in software development; even minor errors can disrupt workflows or create inefficiencies. That’s where Git Hooks come in. By automating essential checks and enforcing best practices, Git Hooks reduces the chances of errors slipping through and ensures a smoother, more consistent workflow. Tools like Husky make it easier to set up Git Hooks, allowing developers to focus on writing code instead of worrying about process compliance. Whether it’s validating commit messages, enforcing branch naming conventions, or preventing sensitive data from being committed, Git Hooks acts as a safety net that ensures quality at every step. If you want to optimize your Git workflow, now is the time to start integrating Git Hooks. With the proper setup, you can make your development process reliable but also effortless and efficient. Let automation handle the rules so your team can focus on building great software.

      24/12/2024

      35

      Bao Dang D. Q.

      Knowledge

      +0

        Automate Your Git Workflow with Git Hooks for Efficiency

        24/12/2024

        35

        Bao Dang D. Q.

        Knowledge

        Software Development

        +0

           Exploring API Performance Testing with Postman

          Hello, tech enthusiasts and creative developers! I’m Vu, the author of SupremeTech’s performance testing series. In the article “The Ultimate Guide to JMeter Performance Testing Tool,” we explored JMeter's strengths and critical role in performance testing. Today, I’m introducing an exciting and straightforward way to do API performance testing using Postman. What is Postman? Postman is a robust API (Application Programming Interface) platform that empowers developers to quickly design, test, document, and interact with APIs. It is a widely used tool for testing APIs, which is valuable in software development, primarily web or mobile app development. Why Use Postman for API Testing? Postman is favored by software developers, testers, and API specialists because of its many advantages: User-Friendly Interface: Postman’s intuitive design makes it easy to use.Supports Diverse HTTP Methods: It handles requests such as GET, POST, PUT, DELETE, PATCH, OPTIONS, and more.Flexible Configuration: Easily manage API request headers, parameters, and body settings.Test Automation with Scripts: Write JavaScript code within the Tests tab to automate API response validation.Integration with CI/CD: Postman's CLI tool, Newman, seamlessly integrates with CI/CD pipelines, enabling automated API testing in development workflows.API Documentation and Sharing: Create and share API documentation with team members or clients effortlessly. Performance API Testing on Postman As of mid-2024, Postman introduced a new feature allowing users to perform API performance testing quickly and conveniently. With just a few simple steps, you can evaluate your API’s performance under high load and ensure its strength. Step 1: Select the Collection for Performance Testing Open Postman and navigate to the Collections tab on the left sidebar.Choose the Collection or Folder you want to test. Step 2: Launch the Collection Runner After selecting your desired Collection or Folder, click Run Collection to open the Collection Runner window.In the Runner, select the APIs you want to include in the performance test.Switch to the Performance tab and choose a simulation method:Fixed: Simulates a fixed number of users.Ramp Up: Starts with a few users and gradually increases.Spike: Introduces a sudden surge in traffic followed by a reduction.Peak: Increases traffic to a high level and sustains it for a period. Step 3: Adjust Virtual Users and Test Duration Configure the Virtual Users and Test Duration settings to simulate the desired load.Start with smaller values, then gradually increase them to gain a clear understanding of your API's performance under varying conditions. Step 4: Run the Test Click Run to start the performance test.During the test, Postman will send API requests and provide real-time data on:Response Time: The API's duration to respond to a request.Error Rate: The percentage of failed requests.Throughput: The number of API requests the system can handle per second. Step 5: Analyze the Report Once the test is complete, Postman generates a detailed report, including: Response Time: Tracks the duration it takes for APIs to process requests.Error Rate: Highlights any issues encountered during testing.Throughput: Measures the system's capacity to process requests under load. Use these metrics to evaluate whether your API performs efficiently under heavy traffic. These insights will guide you in optimizing your API for better performance. Leverage Customization for Realistic User Simulation Postman allows you to customize request data for each virtual user. You can upload a CSV or JSON file with unique datasets if you want different data for each user. This feature enables a more accurate simulation of real-world user behavior. After each test run, Postman provides an easy-to-understand report highlighting the areas for improvement. You can track performance changes and compare test results to identify weaknesses and refine your API. Test and Optimize Your API with Postman With Postman’s new performance testing feature, API optimization has never been easier. It helps you quickly identify and address potential issues to ensure your system is always ready to handle user demands effectively and reliably.   For more details and step-by-step guidance, check out the following resources on the Postman website:   OverviewRun a performance testView performance test metricsDebug performance test errorsInject data into virtual users Start your API performance optimization journey with Postman and prepare your system to meet every demand seamlessly. >>> Explore more articles about performance testing: SupremeTech’s Expertise in the Process of Performance Testing

          23/12/2024

          29

          Vu Nguyen Q.

          Knowledge

          +1

          • Software Development

           Exploring API Performance Testing with Postman

          23/12/2024

          29

          Vu Nguyen Q.

          Knowledge

          Software Development

          +0

            From Raw Data to Perfect API Responses: Serialization in NestJS

            Hello, My name is Dzung. I am a developer who has been in this game for approximately 6 years. I've just started exploring NestJS and am excited about this framework's capabilities. In this blog, I want to share the knowledge I’ve gathered and practiced in NestJS. Today's topic is serialization! As you know, APIs are like the messengers of your application, delivering data from the backend to the client side. Without proper control, they might spill too much information, such as passwords or internal settings. This is where serialization in NestJS steps in, turning messy, raw data into polished, purposeful API responses. With the power of serialization, you can control exactly what your users see, hide sensitive fields, format nested objects, and deliver secure, efficient, and downright beautiful responses. In this blog, we’ll explore how serialization in NestJS works, why it’s a must-have skill for any developer, and how to implement it step by step. Your APIs will go from raw and unrefined to clean and professional by the end. Let’s dive in! What Happens Without Serialization? Let’s look at what happens when you don’t use serialization in your NestJS application. Imagine you’re building a user management system, and you create an API endpoint to fetch user details. Here’s your User entity: Now, you write a simple endpoint to fetch a user: What happens when you call this endpoint? The API sends the entire user object straight to the client—every single field included: The consequences of lacking Serialization in the NestJS application Security Risks: Sensitive data, like passwords, should never be exposed in API responses.Data Overload: Users and clients don’t need internal flags or timestamps—they just add noise.Lack of Professionalism: Messy, unfiltered responses make your API look unpolished and unreliable. Next, we’ll see how to clean up this mess and craft polished API responses using NestJS serialization techniques. The Differences in Applying Serialization By implementing serialization in your NestJS application, you can take full control over what data is exposed in your API responses. Let’s revisit the previous example and clean it up. Step 1: Install class-transformer To get started with serialization, you need the class-transformer package. Install it with: Step 2: Update the User Entity with Exposed or Excluded Decorator Use class-transformer decorators to specify which fields should be exposed or excluded. Only the ID and email fields will be included in the response. Step 3: Apply the Serializer Interceptor NestJS provides a built-in ClassSerializerInterceptor to handle serialization. You can apply it at different levels: Per-Controller Globally To apply serialization to all controllers, add the interceptor to the application setup: When the Get User Endpoint is called, this is what your API will now return: Why Serialization Makes a Difference Security: Sensitive fields are automatically excluded, keeping your data safe.Clarity: Only the necessary fields are sent, reducing noise and improving usability.Professionalism: Clean and consistent responses give your API a polished look. Dynamic Serialization with Group What if you want to show different data to users, such as admins versus regular users? The class-transformer package supports groups, allowing you to expose fields based on context. Example: In the controller, specify the group for the transformation: When the Get User Endpoint is called, this is what your API will now return: By incorporating serialization into your NestJS application, you not only improve security but also enhance the user experience by providing streamlined, predictable, and professional API responses. Now that you know how serialization works in NestJS, you can apply these techniques to your projects, creating safer, cleaner, and more maintainable APIs. SupremeTech has lots of experience and produces web or app services. Let’s schedule a call now if you want to work with us. Also, now we are hiring! Please check open positions for career opportunities.

            20/12/2024

            38

            Dung Nguyen Q.

            Knowledge

            +1

            • Software Development

            From Raw Data to Perfect API Responses: Serialization in NestJS

            20/12/2024

            38

            Dung Nguyen Q.

            Customize software background

            Want to customize a software for your business?

            Meet with us! Schedule a meeting with us!