Header image

Explore all articles in Software Development

Knowledge

Software Development

+0

    Mastering AWS Lambda: An Introduction to Serverless Computing

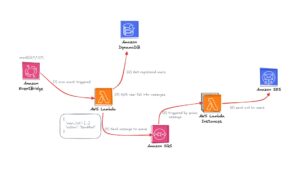
    Imagine this: you have a system that sends emails to users to notify them about certain events at specific times of the day or week. During peak hours, the system demands a lot of resources, but it barely uses any for the rest of the time. If you were to dedicate a server just for this task, managing resources efficiently and maintaining the system would be incredibly complex. This is where AWS Lambda comes in as a solution to these challenges. Its ability to automatically scale, eliminate server management, and, most importantly, charge you only for the resources you use simplifies everything. Hello everyone! I’m Đang Đo Quang Bao, a Software Engineer at SupremeTech. Today, I’m excited to introduce the series' first episode, “Mastering AWS Lambda: An Introduction to Serverless Computing.” In this episode, we’ll explore: The definition of AWS Lambda and how it works.The benefits of serverless computing.Real-world use cases. Let’s dive in! What is AWS Lambda? AWS Lambda is a serverless computing service that Amazon Web Services (AWS) provides. It executes your code in response to specific triggers and scales automatically, charging you only for the compute time you use. How Does AWS Lambda Work? AWS Lambda operates on an event-driven model, reacting to specific actions or events. In simple terms, it executes code in response to particular AWS lambda triggers. Let’s explore this model further to gain a more comprehensive understanding. The above is a simplified workflow1 for sending emails to many users simultaneously, designed to give you a general understanding of how AWS Lambda works. The workflow includes: Amazon EventBridge:Role: EventBridge acts as the starting point of the workflow. It triggers the first AWS Lambda function at a specific time each day based on a cron schedule.How It Works:Configured to run automatically at 00:00 UTC or any desired time.Ensures the workflow begins consistently without manual intervention.Amazon DynamoDB:Role: DynamoDB is the primary database for user information. It holds the email addresses and other relevant metadata for all registered users.How It Works:The first Lambda function queries DynamoDB to fetch the list of users who need to receive emails.AWS Lambda (1st Function):Role: This Lambda function prepares the user data for email sending by fetching it from DynamoDB, batching it, and sending it to Amazon SQS.How It Works:Triggered by EventBridge at the scheduled time.Retrieves user data from DynamoDB in a single query or multiple paginated queries.Split the data into smaller batches (e.g., 100 users per batch) for efficient processing.Pushes each batch as a separate message into Amazon SQS.Amazon SQS (Simple Queue Service).Role: SQS serves as a message queue, temporarily storing user batches and decoupling the data preparation process from email-sending.How It Works:Each message in SQS represents one batch of users (e.g., 100 users).Messages are stored reliably and are processed independently by the second Lambda function.AWS Lambda (2nd Function):Role: This Lambda function processes each user batch from SQS and sends emails to the users in that batch.How It Works:Triggered by SQS for every new message in the queue.Reads the batch data (e.g., 100 users) from the message.Sends individual emails to each user in the batch using Amazon SES.Amazon SES (Simple Email Service).Role: SES handles the actual email delivery, reliably ensuring messages reach users’ inboxes.How It Works:Receives the email content (recipient address, subject, body) from the second Lambda function.Delivers emails to the specified users.Provides feedback on delivery status, including successful deliveries, bounces, and complaints. As you can see, AWS Lambda is triggered by external events or actions (AWS EventBridge schedule) and only "lives" for the duration of its execution. >>> Maybe you are interested: The Rise of Serverless CMS SolutionsCreate Your First AWS Lambda Function (Node.js, Python, and Go) Benefits of AWS Lambda No Server Management:Eliminate the need to provision, configure, and maintain servers. AWS handles the underlying infrastructure, allowing developers to focus on writing code.Cost Efficiency:Pay only for the compute time used (measured in milliseconds). There are no charges when the function isn’t running.Scalability:AWS Lambda automatically scales horizontally to handle thousands of requests per second.Integration with AWS Services:Lambda integrates seamlessly with services like S3, DynamoDB, and SQS, enabling event-driven workflows.Improved Time-to-Market:Developers can deploy and iterate applications quickly without worrying about managing infrastructure. Real-World Use Cases for AWS Lambda AWS Lambda is versatile and can be applied in various scenarios. Here are some of the most common and impactful use cases: Real-Time File ProcessingExample: Automatically resizing images uploaded to an Amazon S3 bucket.How It Works:An upload to S3 triggered a Lambda function.The function processes the file (e.g., resizing or compressing an image).The processed file is stored back in S3 or another storage system.Why It’s Useful:Eliminates the need for a dedicated server to process files.Automatically scales based on the number of uploads.Building RESTful APIsExample: Creating a scalable backend for a web or mobile application.How It Works:Amazon API Gateway triggers AWS Lambda in response to HTTP requests.Lambda handles the request, performs necessary logic (e.g., CRUD operations), and returns a response.Why It’s Useful:Enables fully serverless APIs.Simplifies backend management and scaling.IoT ApplicationsExample: Processing data from IoT devices.How It Works:IoT devices publish data to AWS IoT Core, which triggers Lambda.Lambda processes the data (e.g., analyzing sensor readings) and stores results in DynamoDB or ElasticSearch.Why It’s Useful:Handles bursts of incoming data without requiring a dedicated server.Integrates seamlessly with other AWS IoT services.Real-Time Streaming and AnalyticsExample: Analyzing streaming data for fraud detection or stock market trends.How It Works:Events from Amazon Kinesis or Kafka trigger AWS Lambda.Lambda processes each data stream in real time and outputs results to an analytics service like ElasticSearch.Why It’s Useful:Allows real-time data insights without managing complex infrastructure.Scheduled TasksExample: Running daily tasks/reports or cleaning up expired data.How It Works:Amazon EventBridge triggers Lambda at scheduled intervals (e.g., midnight daily).Lambda performs tasks like querying a database, generating reports, or deleting old records.Why It’s Useful:Replaces traditional cron jobs with a scalable, serverless solution. Conclusion AWS Lambda is a powerful service that enables developers to build highly scalable, event-driven applications without managing infrastructure. Lambda simplifies workflows and accelerates time-to-market by automating tasks and seamlessly integrating with other AWS services like EventBridge, DynamoDB, SQS, and SEStime to market. We’ve explored the fundamentals of AWS Lambda, including its definition, how it works, its benefits, and its application in real-world use cases. It offers an optimized and cost-effective solution for many scenarios, making it a vital tool in modern development. At SupremeTech, we’re committed to harnessing innovative technologies to deliver impactful solutions. This is just the beginning of our journey with AWS Lambda. In upcoming episodes, we’ll explore hơ to optimize AWS Lambda functions in different programming languages and uncover best practices for building efficient serverless applications. Stay tuned, and let’s continue mastering AWS Lambda together! Note: 1.  This workflow is for reference purposes only and is not an optimized solution.

    25/12/2024

    141

    Bao Dang D. Q.

    Knowledge

    +1

    • Software Development

    Mastering AWS Lambda: An Introduction to Serverless Computing

    25/12/2024

    141

    Bao Dang D. Q.

    Knowledge

    Software Development

    +0

       Exploring API Performance Testing with Postman

      Hello, tech enthusiasts and creative developers! I’m Vu, the author of SupremeTech’s performance testing series. In the article “The Ultimate Guide to JMeter Performance Testing Tool,” we explored JMeter's strengths and critical role in performance testing. Today, I’m introducing an exciting and straightforward way to do API performance testing using Postman. What is Postman? Postman is a robust API (Application Programming Interface) platform that empowers developers to quickly design, test, document, and interact with APIs. It is a widely used tool for testing APIs, which is valuable in software development, primarily web or mobile app development. Why Use Postman for API Testing? Postman is favored by software developers, testers, and API specialists because of its many advantages: User-Friendly Interface: Postman’s intuitive design makes it easy to use.Supports Diverse HTTP Methods: It handles requests such as GET, POST, PUT, DELETE, PATCH, OPTIONS, and more.Flexible Configuration: Easily manage API request headers, parameters, and body settings.Test Automation with Scripts: Write JavaScript code within the Tests tab to automate API response validation.Integration with CI/CD: Postman's CLI tool, Newman, seamlessly integrates with CI/CD pipelines, enabling automated API testing in development workflows.API Documentation and Sharing: Create and share API documentation with team members or clients effortlessly. Performance API Testing on Postman As of mid-2024, Postman introduced a new feature allowing users to perform API performance testing quickly and conveniently. With just a few simple steps, you can evaluate your API’s performance under high load and ensure its strength. Step 1: Select the Collection for Performance Testing Open Postman and navigate to the Collections tab on the left sidebar.Choose the Collection or Folder you want to test. Step 2: Launch the Collection Runner After selecting your desired Collection or Folder, click Run Collection to open the Collection Runner window.In the Runner, select the APIs you want to include in the performance test.Switch to the Performance tab and choose a simulation method:Fixed: Simulates a fixed number of users.Ramp Up: Starts with a few users and gradually increases.Spike: Introduces a sudden surge in traffic followed by a reduction.Peak: Increases traffic to a high level and sustains it for a period. Step 3: Adjust Virtual Users and Test Duration Configure the Virtual Users and Test Duration settings to simulate the desired load.Start with smaller values, then gradually increase them to gain a clear understanding of your API's performance under varying conditions. Step 4: Run the Test Click Run to start the performance test.During the test, Postman will send API requests and provide real-time data on:Response Time: The API's duration to respond to a request.Error Rate: The percentage of failed requests.Throughput: The number of API requests the system can handle per second. Step 5: Analyze the Report Once the test is complete, Postman generates a detailed report, including: Response Time: Tracks the duration it takes for APIs to process requests.Error Rate: Highlights any issues encountered during testing.Throughput: Measures the system's capacity to process requests under load. Use these metrics to evaluate whether your API performs efficiently under heavy traffic. These insights will guide you in optimizing your API for better performance. Leverage Customization for Realistic User Simulation Postman allows you to customize request data for each virtual user. You can upload a CSV or JSON file with unique datasets if you want different data for each user. This feature enables a more accurate simulation of real-world user behavior. After each test run, Postman provides an easy-to-understand report highlighting the areas for improvement. You can track performance changes and compare test results to identify weaknesses and refine your API. Test and Optimize Your API with Postman With Postman’s new performance testing feature, API optimization has never been easier. It helps you quickly identify and address potential issues to ensure your system is always ready to handle user demands effectively and reliably.   For more details and step-by-step guidance, check out the following resources on the Postman website:   OverviewRun a performance testView performance test metricsDebug performance test errorsInject data into virtual users Start your API performance optimization journey with Postman and prepare your system to meet every demand seamlessly. >>> Explore more articles about performance testing: SupremeTech’s Expertise in the Process of Performance Testing

      23/12/2024

      90

      Vu Nguyen Q.

      Knowledge

      +1

      • Software Development

       Exploring API Performance Testing with Postman

      23/12/2024

      90

      Vu Nguyen Q.

      Knowledge

      Software Development

      +0

        From Raw Data to Perfect API Responses: Serialization in NestJS

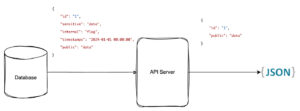
        Hello, My name is Dzung. I am a developer who has been in this game for approximately 6 years. I've just started exploring NestJS and am excited about this framework's capabilities. In this blog, I want to share the knowledge I’ve gathered and practiced in NestJS. Today's topic is serialization! As you know, APIs are like the messengers of your application, delivering data from the backend to the client side. Without proper control, they might spill too much information, such as passwords or internal settings. This is where serialization in NestJS steps in, turning messy, raw data into polished, purposeful API responses. With the power of serialization, you can control exactly what your users see, hide sensitive fields, format nested objects, and deliver secure, efficient, and downright beautiful responses. In this blog, we’ll explore how serialization in NestJS works, why it’s a must-have skill for any developer, and how to implement it step by step. Your APIs will go from raw and unrefined to clean and professional by the end. Let’s dive in! What Happens Without Serialization? Let’s look at what happens when you don’t use serialization in your NestJS application. Imagine you’re building a user management system, and you create an API endpoint to fetch user details. Here’s your User entity: Now, you write a simple endpoint to fetch a user: What happens when you call this endpoint? The API sends the entire user object straight to the client—every single field included: The consequences of lacking Serialization in the NestJS application Security Risks: Sensitive data, like passwords, should never be exposed in API responses.Data Overload: Users and clients don’t need internal flags or timestamps—they just add noise.Lack of Professionalism: Messy, unfiltered responses make your API look unpolished and unreliable. Next, we’ll see how to clean up this mess and craft polished API responses using NestJS serialization techniques. The Differences in Applying Serialization By implementing serialization in your NestJS application, you can take full control over what data is exposed in your API responses. Let’s revisit the previous example and clean it up. Step 1: Install class-transformer To get started with serialization, you need the class-transformer package. Install it with: Step 2: Update the User Entity with Exposed or Excluded Decorator Use class-transformer decorators to specify which fields should be exposed or excluded. Only the ID and email fields will be included in the response. Step 3: Apply the Serializer Interceptor NestJS provides a built-in ClassSerializerInterceptor to handle serialization. You can apply it at different levels: Per-Controller Globally To apply serialization to all controllers, add the interceptor to the application setup: When the Get User Endpoint is called, this is what your API will now return: Why Serialization Makes a Difference Security: Sensitive fields are automatically excluded, keeping your data safe.Clarity: Only the necessary fields are sent, reducing noise and improving usability.Professionalism: Clean and consistent responses give your API a polished look. Dynamic Serialization with Group What if you want to show different data to users, such as admins versus regular users? The class-transformer package supports groups, allowing you to expose fields based on context. Example: In the controller, specify the group for the transformation: When the Get User Endpoint is called, this is what your API will now return: By incorporating serialization into your NestJS application, you not only improve security but also enhance the user experience by providing streamlined, predictable, and professional API responses. Now that you know how serialization works in NestJS, you can apply these techniques to your projects, creating safer, cleaner, and more maintainable APIs. SupremeTech has lots of experience and produces web or app services. Let’s schedule a call now if you want to work with us. Also, now we are hiring! Please check open positions for career opportunities.

        20/12/2024

        117

        Dung Nguyen Q.

        Knowledge

        +1

        • Software Development

        From Raw Data to Perfect API Responses: Serialization in NestJS

        20/12/2024

        117

        Dung Nguyen Q.

        How-to

        Knowledge

        Software Development

        +0

          How to Undo Commits Safely in Git: Git Reset and Git Revert Explained

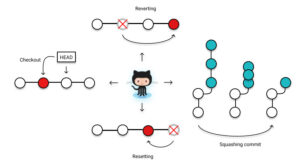
          Introduction In software development, mistakes in commits happen more frequently than we would prefer. Imagine you are working on a feature branch and accidentally commit sensitive information, like an API key, or commit in the wrong branch. You quickly realize the need to undo these changes, but as you search for solutions, you come across two common commands: git reset and git revert. Each offers a way to return, but which is right for your situation? In this article, SupremeTech will explore both commands, how they work, when to use them, and how to decide which approach best addresses your specific needs. Three trees in Git Before getting started, it’s important to understand Git's internal state management systems, called “Git’s three-tree”: Working Directory: This is the workspace on your local machine, it reflects the current state of your files and any changes made that have not yet been staged or committed. You can see changes in the Working Directory with git status.Staging Index: This space holds a snapshot of changes ready to be committed. After you’ve made changes in the Working Directory, you can add them to the Staging Index with git add.Commit History: This is the timeline of saved changes in your project. When you use the git commit command, it takes the changes from the Staging Index and adds them to this history as a new commit. Figure 1. The Git’s three-tree The animation above demonstrates Git's three-tree structure by showing the creation of file1.js and committing it as C1. We add two more examples: file2.js as a C2 commit and file3.js as a C3 commit. These three commits will be used throughout the article as we explore git reset and git revert commands. Figure 2. Visualizing Git's three-tree with three commits Undoing commits with git reset The git reset command allows you to undo changes in your working directory by moving the branch tip back to a specific commit and discarding all commits made after that point. Figure 3. Visualizing the git reset command After running the command git reset HEAD~1, you’ll notice two changes: The branch tip has moved to the commit C2.The latest commit (C3) has been discarded from the commit history. The HEAD~1 is a way to reference the commit before the current HEAD. You can use similar syntax to go back further, like HEAD~2 to go back two commits from HEAD. Alternatively, you can specify a particular commit using its hash ID. The next question is where did the changes from C3 commit go? (the file3.js in this example). Did it delete permanently, or is it saved somewhere? This is where the git reset flags come into play. Bypassing one of the following flags, you can control the changes: --soft: It undoes the commits in the history and places the changes back in the Staging Index, ready to be committed again if needed. Figure 4. Visualizing git reset command with --soft flag -—mixed (this is the default option): It is similar to—-soft but also clears the Staging Index. This means any changes from the discarded commits are left unstaged in the Working Directory, requiring you to re-add them before re-committing. Figure 5. Visualizing git reset command with --mixed flag --hard: This option clears all changes from both the Staging Index and Working Directory and resets the codebase to match the specified commit without making any modifications. Figure 6. Visualizing git reset command with --hard flag By using git reset, you've successfully undone a specific commit. However, try to push these changes to the remote repository with a regular git push. You’ll get an error because the local commit history no longer matches the remote. To push these changes, you need to use a force push (git push --force). While this command will update the remote branch, it comes with risks - it can overwrite the remote history, creating potential issues for other developers. To avoid these problems, let’s explore a safer alternative: Undoing public commits with git revert The git revert command is an undo command, but it doesn’t work like the git reset. Instead of removing a commit from the project history, it creates a new one containing the inverse of the original changes. Figure 7. Visualizing the git revert command The result of running the command git revert HEAD is a new commit that undoes the changes made in the C3 commit. Since the C3 commit added file3.js, the revert will effectively delete this file. In short, running git revert HEAD will bring your code back to its state at the C2 commit. You can prevent git revert from automatically creating a new commit by using the -n or --no-commit flag. With this option, the inverse changes are placed in the Staging Index and Working Directory, allowing you to review or modify them before committing. Figure 8. Visualizing git revert command with --no-commit flag The git revert command allows you to go back to previous commits without removing any mistake commits. It doesn’t re-write the project history. Because of this, this command should be used to undo changes on a public branch. What is the difference between Git Reset vs. Git Revert? The difference between git reset and git revert is that git reset should be used to undo changes in your local history, while git revert should be recommended for undoing changes on a shared or public branch. Both git reset and git revert are commands for undoing changes, but they work differently in key ways: git resetgit revertHow it worksReverts to a previous state by removing the specified commit.Reverts to a previous state by creating a new commit with inverse changes.OptionsOffers --mixed, --soft, and --hard flags to control how changes are handled.Offers --no-commit to add inverse changes without automatically committing them.UsageRecommended for undoing changes in your local history.Recommended for undoing changes on a shared or public branch. Conclusion By now, you should clearly understand how to undo changes in a Git repository using git reset and git revert. In short, use git reset for local-only history changes, and use git revert to undo changes on a shared branch safely. Choosing the right command for your situation lets you keep your project history clean and ensures smoother collaboration with your teammates.

          25/11/2024

          367

          Huy Nguyen K.

          How-to

          +2

          • Knowledge
          • Software Development

          How to Undo Commits Safely in Git: Git Reset and Git Revert Explained

          25/11/2024

          367

          Huy Nguyen K.

          ionic vs react native

          Software Development

          +0

            Ionic vs. React Native: A Comprehensive Comparison

            Ionic vs. React Native is a common debate when choosing a framework for cross-platform app development. Both frameworks allow developers to create apps for multiple platforms from a single codebase. However, they take different approaches and excel in different scenarios. Here’s a detailed comparison. Check out for more comparisons like this with React Native React Native vs. Kotlin Platform Native Script vs. React Native The origin of Ionic Framework Ionic Framework was first released in 2013 by Max Lynch, Ben Sperry, and Adam Bradley, founders of the software company Drifty Co., based in Madison, Wisconsin, USA. What's the idea behind Ionic? The creators of Ionic saw a need for a tool that could simplify the development of hybrid mobile apps. At the time, building apps for multiple platforms like iOS and Android required separate codebases, which was time-consuming and resource-intensive. Therefore, the goal was to create a framework that allowed developers to use web technologies—HTML, CSS, and JavaScript—to build apps that could run on multiple platforms with a single codebase. Its release and evolution over time The first version of Ionic was released in 2013 and was built on top of AngularJS. It leveraged Apache Cordova (formerly PhoneGap) to package web apps into native containers, allowing access to device features like cameras and GPS. 2016: With the rise of Angular 2, the team rebuilt Ionic to work with modern Angular. The renovation improved performance and functionality. 2018: Ionic introduced Ionic 4, which decoupled the framework from Angular, making it compatible with other frameworks like React, Vue, or even plain JavaScript. 2020: The company developed Capacitor, a modern alternative to Cordova. It provides better native integrations and supports Progressive Web Apps (PWAs) seamlessly. Key innovations of Ionic First of all, Ionic popularized the use of web components for building mobile apps. In addition, it focused on design consistency, offering pre-built UI components that mimic native app designs on iOS and Android. Thirdly, its integration with modern frameworks (React, Vue) made it appealing to a broader developer audience. Today, Ionic remains a significant player in the hybrid app development space. It's an optimal choice for projects prioritizing simplicity, web compatibility, and fast development cycles. It has a robust ecosystem with tools like Ionic Studio. Ionic Studio is a development environment for building Ionic apps. The origin of React Native React Native originated at Facebook in 2013 as an internal project to solve challenges in mobile app development. Its public release followed in March 2015 at Facebook’s developer conference, F8. Starting from the problem of scaling mobile development In the early 2010s, Facebook faced a significant challenge in scaling its mobile app development. They were maintaining separate native apps for iOS and Android. It made up duplicate effort and slowed down development cycles. Additionally, their initial solution—a hybrid app built with HTML5—failed to deliver the performance and user experience of native apps. This failure prompted Facebook to seek a new approach. The introduction of React for Mobile React Native was inspired by the success of React, Facebook’s JavaScript library for building user interfaces, introduced in 2013. React allowed developers to create fast, interactive UIs for the web using a declarative programming model. The key innovation was enabling JavaScript to control native UI components instead of relying on WebView rendering. Its adoption and growth React Native quickly gained popularity due to its: Single codebase for iOS and Android.Performance comparable to native apps.Familiarity for web developers already using React.Active community and support from Facebook. Prominent companies like Instagram, Airbnb, and Walmart adopted React Native early on for their apps. Today, React Native remains a leading framework for cross-platform app development. While it has faced competition from newer frameworks like Flutter, it continues to evolve with strong community support and regular updates from Meta (formerly Facebook). Ionic vs. React Native: What's the key differences? Core Technology and Approach React Native Uses JavaScript and React to build mobile apps.Renders components using native APIs, resulting in apps that feel closer to native experiences.Follows a “native-first” approach, meaning the UI and performance mimic native apps. Ionic Uses HTML, CSS, and JavaScript with frameworks like Angular, React, or Vue.Builds apps as Progressive Web Apps (PWAs) or hybrid mobile apps.Renders UI components in a WebView instead of native APIs. Performance React Native: Better performance for apps that require complex animations or heavy computations.Direct communication with native modules reduces lag, making it suitable for performance-intensive apps. Ionic: Performance depends on the capabilities of the WebView.Works well for apps with simpler UI and functionality, but may struggle with intensive tasks or animations. User Interface (UI) React Native: Leverages native components, resulting in a UI that feels consistent with the platform (e.g., iOS or Android).Offers flexibility to customize designs to match platform guidelines. Ionic: Uses a single, web-based design system that runs consistently across all platforms.While flexible, it may not perfectly match the native look and feel of iOS or Android apps. Development Experience React Native: Ideal for teams familiar with React and JavaScript.Offers tools like Hot Reloading, making development faster.Requires setting up native environments (Xcode, Android Studio), which can be complex for beginners. Ionic: Easier to get started for web developers, as it uses familiar web technologies (HTML, CSS, JavaScript).Faster setup without needing native development environments initially. Ecosystem and Plugins React Native: Extensive library of third-party packages and community-driven plugins.Can access native features directly but may require writing custom native modules for some functionalities. Ionic: Has a wide range of plugins via Capacitor or Cordova for accessing native features.Some plugins may have limitations in terms of performance or compatibility compared to native implementations. Conclusion: Which One to Choose? Choose React Native if:You want high performance and a native-like user experience.Your app involves complex interactions, animations, or heavy processing.You’re building an app specifically for mobile platforms.Choose Ionic if:You need a simple app that works across mobile, web, and desktop.You have a team of web developers familiar with HTML, CSS, and JavaScript.You’re on a tight budget and want to maximize code reusability. Both frameworks are excellent in their own right. Your choice depends on your project’s specific needs, the skill set of your development team, and your long-term goals.

            19/11/2024

            173

            Linh Le

            Software Development

            +0

              Ionic vs. React Native: A Comprehensive Comparison

              19/11/2024

              173

              Linh Le

              authentication in react native

              Software Development

              +0

                Getting Started with Authentication in React Native

                Authentication is a critical part of most mobile applications. It helps verify user identity and control access to data and features. There are several libraries that make it easier to set up authentication in React Native. This guide will walk you through the basics of authentication, using the popular libraries react-native-app-auth and Auth0. Why Use an Authentication Library? Using an authentication library simplifies the process of managing user credentials, tokens, and permissions. It also adds security, as these libraries follow the latest standards and best practices. Here, we’ll explore react-native-app-auth for OAuth 2.0 authentication and Auth0 for a more comprehensive identity management solution. Setting Up Authentication with react-native-app-auth react-native-app-auth is a library that supports OAuth 2.0 and OpenID Connect. It’s suitable for apps that need to connect with Google, Facebook, or other providers that support OAuth 2.0. Installation Start by installing the library with: npm install react-native-app-auth If you’re using Expo, you’ll need to use expo-auth-session instead, as react-native-app-auth is not compatible with Expo. Basic Setup To set up react-native-app-auth, configure it with the provider's details (e.g., Google): import { authorize } from 'react-native-app-auth'; const config = { issuer: 'https://accounts.google.com', // Google as OAuth provider clientId: 'YOUR_GOOGLE_CLIENT_ID', redirectUrl: 'com.yourapp:/oauthredirect', scopes: ['openid', 'profile', 'email'], }; In this configuration: issuer is the URL of the OAuth provider.clientId is the ID you receive from the provider.redirectUrl is the URL your app redirects to after authentication.scopes defines what data you’re requesting (e.g., user profile and email). Implementing the Login Function With the configuration done, create a function to handle login: const login = async () => { try { const authState = await authorize(config); console.log('Logged in successfully', authState); // Use authState.accessToken for secure requests } catch (error) { console.error('Failed to log in', error); } }; Here: authorize(config) triggers the authentication flow.If successful, authState contains the access token, ID token, and expiration date.Use the accessToken to make requests to the API on behalf of the user. Logging Out To log users out, clear their tokens: const logout = async () => { try { await authorize.revoke(config, { tokenToRevoke: authState.accessToken }); console.log('Logged out'); } catch (error) { console.error('Failed to log out', error); } }; This will remove the access token and effectively log out the user. Setting Up Authentication in React Native with Auth0 Auth0 is a widely used identity provider that offers a more comprehensive authentication setup. It supports multiple login methods, such as social login, username/password, and enterprise authentication. Installation Install the Auth0 SDK for React Native: npm install react-native-auth0 Basic Setup Initialize the Auth0 client by providing your domain and client ID: import Auth0 from 'react-native-auth0'; const auth0 = new Auth0({ domain: 'YOUR_AUTH0_DOMAIN', clientId: 'YOUR_CLIENT_ID', }); Implementing the Login Function Use Auth0’s web authentication method to start the login flow: const login = async () => { try { const credentials = await auth0.webAuth.authorize({ scope: 'openid profile email', audience: 'https://YOUR_AUTH0_DOMAIN/userinfo', }); console.log('Logged in successfully', credentials); // Store credentials.accessToken for API requests } catch (error) { console.error('Failed to log in', error); } }; Here: scope and audience define the permissions and data you request.credentials.accessToken will be used for secure API requests. Logging Out To log out with Auth0: const logout = async () => { try { await auth0.webAuth.clearSession(); console.log('Logged out'); } catch (error) { console.error('Failed to log out', error); } }; Storing Tokens Securely Tokens are sensitive data and should be stored securely. Use libraries like react-native-keychain or SecureStore in Expo to securely store tokens: import * as Keychain from 'react-native-keychain'; const storeToken = async (token) => { await Keychain.setGenericPassword('user', token); }; const getToken = async () => { const credentials = await Keychain.getGenericPassword(); return credentials ? credentials.password : null; }; Conclusion This guide covered setting up basic authentication in React Native with react-native-app-auth and Auth0. These libraries streamline the process of handling secure login and token management. After implementing, remember to handle token storage securely to protect user data. Streamline Authentication in React Native with SupremeTech’s Offshore Development Expertise Setting up authentication in a React Native app can be complex, but with the right libraries, it's achievable and secure. Whether using react-native-app-auth for OAuth 2.0 or Auth0 for comprehensive identity management, these tools help handle user authentication smoothly and securely. For businesses aiming to scale and streamline mobile app development, SupremeTech offers skilled offshore development services, including React Native expertise. Our teams are experienced in building secure, high-performance applications that meet industry standards. If you're looking to enhance your mobile development capabilities with a trusted partner, explore how SupremeTech can support your growth.

                11/11/2024

                173

                Linh Le

                Software Development

                +0

                  Getting Started with Authentication in React Native

                  11/11/2024

                  173

                  Linh Le

                  backend for react native apps

                  Knowledge

                  Software Development

                  +0

                    Choosing A Good Backend For React Native Apps

                    As a business owner looking to develop a React Native app, it’s natural to focus on the front end-the design, layout, and user experience. However, there’s another critical part: the backend. The backend powers the app’s functionality. It processes, stores, and delivers data behind the scenes. Think of it as the “engine” of your app. Therefore, choosing a good backend for React Native apps is no less important to foster your app performance. While the front end decides how the app looks, the backend controls what it can do. If you want dynamic features—like user accounts, order processing, or real-time updates—the backend is essential. Understanding the backend basics helps you make better development decisions. It influences costs, timelines, security, performance, and scalability. Do you need a backend for thousands or millions of users? Should the app integrate with your existing CRM or ERP systems? How will the app securely store customer data and meet privacy laws? All these questions depend on the backend. This guide explains the backend essentials from a business owner’s perspective. With this knowledge, you’ll make informed decisions about your app’s backend. Whether choosing a simple Backend-as-a-Service (BaaS) or a custom-built solution, understanding these points will help you pick the right approach. How To Choose A Suitable Backend for React Native Apps A good backend option depends greatly on the purpose of your React Native Apps. However, there are some key things to keep in mind. Choosing Between a Custom Backend or Backend-as-a-Service (BaaS) First of all, there are two main paths: a custom-built backend or using a Backend-as-a-Service (BaaS) like Firebase, AWS Amplify, or Supabase. A Custom Backend will allow more control and customization. You can build every feature to meet your exact needs, making it easy to handle unique workflows, custom data models, or complex business logic. However, it takes more time and resources to set up and maintain. In addition, a custom backend offers cost efficiency over time. Although upfront development costs are higher, a custom backend can reduce long-term costs by eliminating the need for ongoing subscription fees or third-party limitations. While a custom backed requires initial financial investment, Backend-as-a-Service (BaaS) can provide instant outcomes for business in early stage. It is faster and easier to set up, with out-of-the-box solutions for common needs (like user management and notifications). A lot of existing BaaS is designed to handle spikes in traffic automatically, so your app can grow without worrying about server capacity. Additionally, BaaS platforms typically offer strong security features and follow industry standards, which is beneficial for apps handling user data. Since the BaaS provider handles backend infrastructure, your team can focus on building and enhancing the app’s front end. BaaS is also ideal for prototypes or MVPs, where you need fast deployment without the commitment to a custom solution. However, customization might be limited, and costs can add up if the app scales quickly. It cannot be denied that BaaS gains its popularity due to many advantages. Which one is more popular? The choice between a custom backend and BaaS depends on the type of project, its complexity, and long-term goals. BaaS is more popular among startups, small businesses, or projects focused on getting to market quickly. Custom backends are more popular with enterprises, businesses with complex requirements, and apps with high customization needs. They’re common in industries where data control, security, and integration flexibility are paramount, such as finance, healthcare, and e-commerce. Some Common Backend Choices for React Native Apps Here are some common backend choices for React Native apps. Node.js with Express Why: Node.js is popular for mobile backends due to its non-blocking, event-driven architecture, which is great for handling multiple requests. Paired with Express, a flexible framework, it allows easy setup of RESTful APIs. Good for: Apps needing real-time data, like chat or collaborative tools. Firebase Why: Firebase, a Backend-as-a-Service (BaaS) by Google, provides pre-built features like authentication, real-time database, cloud storage, and analytics without needing custom server infrastructure. Good for: Quick prototypes, simple apps, or apps that need real-time data synchronization. AWS Amplify Why: AWS Amplify provides a BaaS-like approach, with cloud storage, authentication, APIs, and even machine learning integration, all managed by AWS services. Good for: Apps needing scalable infrastructure with support for advanced AWS services. GraphQL with Apollo Server Why: Unlike REST, GraphQL allows clients to request only the data they need, making it efficient and flexible for mobile apps. Apollo Server makes it easy to build a GraphQL API. Good for: Apps needing highly customized data queries, minimizing over-fetching or under-fetching of data. Strapi (Headless CMS) Why: Strapi is a customizable, open-source headless CMS that uses Node.js. It provides an easy interface to manage and serve content. Good for: Apps needing flexible content management, such as e-commerce or blogs. Each backend choice has its strengths depending on the app’s data needs, real-time requirements, and development speed. React Native apps commonly communicate with these backends via REST APIs or GraphQL, depending on the data structure and interaction required. Conclusion In conclusion, the decision comes down to your app’s goals, budget, and the complexity of features you need. BaaS solutions can be a quick, cost-effective option for businesses aiming to launch an MVP or a simple app with limited backend demands. However, for apps that require high customization, seamless integrations, or handle sensitive data, a custom backend offers the control, flexibility, and scalability needed for long-term success. If you’re ready to discuss your app’s backend needs, book a free consultation with SupremeTech. With extensive experience in building high-performance systems for applications serving millions of users, our team can guide you toward a backend solution designed to meet your unique goals.

                    09/11/2024

                    280

                    Linh Le

                    Knowledge

                    +1

                    • Software Development

                    Choosing A Good Backend For React Native Apps

                    09/11/2024

                    280

                    Linh Le

                    how to manage offshore development téams effectively

                    Software Development

                    Trending

                    +0

                      Tips for Product Owner: How to manage offshore development teams?

                      As product owners, you often struggle with balancing high-quality development and budget constraints. From the business owner's perspectives, offshoring has become a go-to strategy to reduce costs without compromising the quality of products. However, managing offshore teams effectively requires a thoughtful approach to bridge the gaps. Those gaps can be geographical, cultural, and operational differences. A dedicated team abroad, when managed well, however, can deliver outstanding results and provide insightful ideas. Here’s a quick guide to how to manage offshore development teams effectively. What is an offshore development team? An offshore development team refers to a group of professionals located in a different country, who work on software development projects for a company in another country. These teams are usually contracted to perform technical tasks such as coding, testing, and maintaining software. Offshore teams are typically hired to achieve cost savings, access a borderless talent pool, and scale resources more flexibly. Key characteristics of an offshore development team There are many types of offshore development team, but all of them should share some common characteristics: Geographic Separation: They operate in a different country, often in a different time zone.Lower Costs: Offshore teams are usually located in regions with lower wages compared to the company’s home country.Technical Expertise: Many offshore teams have specialized skills and experience in various tech stacks and development methodologies.Collaboration Models: Offshore teams may work under various engagement models, such as dedicated teams, project-based outsourcing, or staff augmentation, depending on the company’s needs. Though commonly mistaken, offshore development teams are distinct from nearshore teams. Nearshore teams are usually located in neighboring or nearby countries with closer time zones. Sometimes, they share the same cultures as well. How to Manage Offshore Development Teams Effectively? After deciding that offshoring can be a successful strategy for your project, you're entering a more challenging phase. That's how to onboard and manage an offshore team efficiently. The process should be as smooth as possible to avoid any unwanted collision with your existing product team. Let's deep dive into the guidelines for your streamlined offshoring experience. 1. Choose the Right Partner First and foremost, you should seek for an offshore partner with a solid reputation for quality and experience in your industry. What's the traits that you should take into consideration? A proven track record of successful projects.Domain expertise aligned with your product needs.Responsiveness and professional working manners.Established communication protocols and cultural fit. Conduct thorough due diligence, including reviews, testimonials, and a pilot project if possible. 2. Set Clear Expectations and Goals Secondly, you need to clearly define project goals, timelines, and quality standards are crucial. Here’s how: Document Specifications: Provide detailed documentation, mockups, or even interactive prototypes.Define Success Metrics: Quality benchmarks, key performance indicators (KPIs), and timelines need to be agreed upon from the outset.Establish Milestones: Use milestones to check progress and ensure alignment. 3. Prioritize Transparent Communication Open, consistent communication is fundamental in overcoming time zone and cultural differences. Implement these strategies to foster effective communication: Use Collaborative Tools: Tools like Slack, Zoom, and project management platforms (like Jira or Asana) keep everyone connected.Set Up Regular Meetings: Schedule regular check-ins that accommodate both time zones. These could be weekly sprints or bi-weekly reviews.Create Documentation: Ensure all project requirements, changes, and feedback are documented for easy reference. 4. Embrace Agile Development The Agile framework can provide a structured way to manage offshore teams. Moreover, Agile’s iterative approach allows for ongoing feedback and adjustments, keeping development on track: Conduct Daily Stand-Ups: Even brief virtual stand-ups can keep the team aligned.Use Shorter Sprints: Shorter sprints ensure regular deliverables, fostering a continuous feedback loop.Retrospectives: Post-sprint retrospectives allow the team to discuss improvements, helping to adapt and optimize workflows. 5. Invest in a Strong Onshore-Offshore Collaboration Model Building a hybrid team model, where some team members are onshore and others offshore, can improve collaboration and oversight. Having a product owner, project manager, or tech lead onshore helps maintain quality by providing immediate feedback and clarifying requirements. Likewise, the offshore development team should ensure project management roles to tackle issues promptly. Sometimes, the management roles of offshore team are not equally valued. And that can be a huge mistake right there. 6. Monitor Quality Assurance and Testing Ensure the offshore team has a robust QA process in place to catch issues before they reach production: Automated Testing: Implement automated testing to streamline quality checks.Regular Code Reviews: Encourage a culture of code reviews where team members cross-check each other’s work.Performance Metrics: Track performance metrics related to code quality, including bug count and resolution times. 7. Build Trust and Foster Team Culture Building rapport and trust is essential. Make efforts to: Celebrate Achievements: Recognize individual and team accomplishments.Encourage Openness: Create an environment where team members feel comfortable sharing feedback and challenges.Offer Learning Opportunities: Provide training resources to help your offshore team keep up with the latest technologies and methodologies.Frequent Visits: After all, face-to-face communication is irreplaceable to tie the bond. Do not underestimate the importance of business visits to your offshore team's country and vice versa. 8. Control Costs with Clear Budgeting and Transparent Billing Finally, while cost-saving is a significant driver for offshoring, keep an eye on the budget with: Fixed Price Milestones: Setting fixed price milestones helps control costs.Detailed Invoicing: Request detailed invoices to ensure you’re paying only for what’s necessary.Avoiding Scope Creep: Keep the project scope clear and tightly controlled. By taking a proactive approach to managing offshore development teams, you can balance cost savings with high-quality results. With the right planning, communication, and collaboration strategies, your offshore team can be a powerful asset in delivering quality products on time and within budget. Explore SupremeTech's offshore development team By following these best practices, you can leverage offshore development to deliver high-quality software while managing costs effectively. If you’re looking for a trusted partner with a proven track record, consider SupremeTech. Our offshore development team has experience working with Japanese corporations on multi-million-user products, ensuring a strong focus on quality, scalability, and reliability. We emphasize win-win collaboration, proactive problem-solving, and transparent communication to help you achieve your goals smoothly. For more insight, check out our case study on successful collaboration with Japanese enterprises. If you're interested in our services, book a free consultation with us now.

                      06/11/2024

                      123

                      Linh Le

                      Software Development

                      +1

                      • Trending

                      Tips for Product Owner: How to manage offshore development teams?

                      06/11/2024

                      123

                      Linh Le

                      Software Development

                      +0

                        A New Guide to Offshore Software Development in 2025

                        Once considered a mere trend, digitalization has become a vital requirement for companies. Consequently, there is a growing demand for IT services. According to Statista, the global IT consulting and implementation services market is projected to reach $82.44 billion by 2027. Due to its affordability and easy availability for tech experts, offshore software development is emerging as a software development option in the modern digital era. Many startups and small enterprises are exploring offshore software development for its numerous benefits, including reduced time, costs, and effort. This SupremeTech article aims to define offshore software development, provide potential benefits and challenges for your business, and introduce you to the most successful Vietnam offshore development company. What is offshore software development? Offshore software development involves outsourcing your software development needs to a third-party software provider in a foreign nation. After that, entrust them with the challenging programming responsibilities associated with your project. Consider a scenario in which a US-based business collaborates with a successful offshore software development company in Vietnam to develop a digital transformation system. This outsourcing model has recently gained popularity due to its numerous advantages. Specifically, it eliminates the geographical barrier to finding a suitable development team. Besides, the third-party vendor assumes full responsibility for the development process and product quality. Offshore software development services have become increasingly popular. They provide access to highly skilled employees at competitive prices, reducing the overall costs of managing a development team. Onshore vs. Nearshore vs. Offshore Outsourcing: Understanding the Differences Due to unique geographical and collaborative dynamics, offshore outsourcing distinguishes itself from onshore and nearshore outsourcing. In onshore and nearshore outsourcing, the IT vendor operates in the same country or a nearby region, fostering accessibility in managing cultural norms, language barriers, and time zone differences. Onshore Outsourcing Onshore or domestic software development outsourcing involves collaboration with local individuals or vendors within the same region. For example, a software development business in the United States might outsource a project to a service provider in the same, close, or neighboring state, ensuring the project's completion within the nation. Nearshore Outsourcing Nearshore outsourcing entails working with an IT partner in a neighboring country, typically for specialized needs like recruiting, consulting, or project-based services. Nearshore firms are located in the same time zone, on the same border, or in proximity. For instance, a U.S. corporation may outsource a software development project to a Canadian company, minimizing geographical distance despite being in a foreign country. Offshore Outsourcing In contrast, offshore development outsourcing introduces significant geographic distances, time zone differences, and often cultural or linguistic barriers between the client and the outsourcing partner. As proof, if a U.S.-based company delegated the project development process to Vietnam, an emerging IT destination, it engaged in offshore outsourcing. Which services can be outsourced? An offshore software companOutsourcing IT tasks to an offshore software company can be a strategic move for businesses looking to enhance efficiency and reduce costs. Here are some of the most frequently outsourced services that can significantly benefit from external management: Custom Software Development Custom software development is one of the primary services outsourced to offshore companies. This allows businesses to create tailored solutions that meet specific needs without the costs of hiring a full-time in-house development team. Offshore companies can provide the expertise to deliver high-quality software that aligns with business goals. Cloud Infrastructure Management Managing cloud infrastructure can be complicated and time-consuming. By outsourcing this function, companies can ensure that their cloud environments are optimized for performance, security, and scalability. Offshore providers often have the tools and expertise to manage cloud resources efficiently, allowing businesses to focus on their core operations. LINE MINI App Development Developing LINE MINI apps is essential for businesses targeting customers in Japan, Thailand, and Taiwan, as LINE is the leading messaging platform in these regions with millions of active users. Offshore software companies like SupremeTech specializing in this area can provide valuable insights and technical skills to create engaging applications that resonate with local users, enhancing customer interaction and satisfaction. Omnichannel Retail Solutions Today’s customers expect a smooth shopping experience across different shopping channels. Outsourcing the development of omnichannel retail solutions allows businesses to integrate their online stores, mobile apps, and physical shops, ensuring a cohesive customer journey. Software Quality Assurance (QA) and Testing Services Quality assurance and testing are vital components of the software development lifecycle. By outsourcing these services, companies can have experienced professionals thoroughly test their software before it goes live. This helps identify bugs and issues before deployment, ensuring a smooth user experience and reducing post-launch problems. UI/UX Design User Interface (UI) and User Experience (UX) design are crucial for making software easy to use and visually appealing. Offshore teams can provide specialized design services that focus on creating intuitive and visually appealing interfaces. This not only enhances user satisfaction but also increases engagement and retention rates. Dedicated Development Team Many businesses opt to outsource an entire dedicated development team. This model provides access to a pool of skilled professionals who work exclusively on a company's projects. It offers flexibility in scaling resources according to project demands while ensuring the team is aligned with the company’s goals and culture. Outsourcing has become the optimal solution for various business challenges. Beyond IT functions like cybersecurity, customer support, data storage, etc., businesses can outsource non-IT functions such as legal, tax, HR, finance, etc. The benefits of offshore software development Deciding between in-house software development and partnering with an offshore development team can be challenging. However, offshoring software development presents an enticing economic proposition due to its various benefits: 1. Cost savings Maintaining an in-house IT workforce with up-to-date technology knowledge is challenging and costly. Outsourcing software development eliminates the need to invest in IT infrastructure or spend time recruiting and training personnel. Many offshore software development centers, such as those in Central Europe, offer flexible pricing and high-quality services. Favorable factors like a skilled workforce, official support, and tax advantages make countries like Vietnam, India, China, and Ukraine cost-effective choices compared to US developers. Consequently, offshore software firms may provide similar services at a lower cost, enabling savings of up to 40% - 50% without compromising project quality or expertise. 2. Obtaining qualified talents Are you facing challenges in hiring IT professionals locally? Outsourcing development teams offers a perfect alternative, helping to resolve the shortage of IT professionals. Furthermore, when the project is completed, it can relieve the stress of managing and employing in-house development teams. Offshore development can attract many skilled software engineers. These engineers have extensive experience creating software applications that meet global standards. They also bring valuable insights from working on international projects, which helps them understand the challenges in custom software development. 3. Time savings Starting projects from scratch can be challenging. Hiring, training, and managing people takes a lot of time and resources, which can create stress due to tight deadlines. Offshore software development companies can help speed up this process. They have the expertise to deliver projects on time while keeping costs down. By using Agile methods and other development technologies, these companies ensure that projects are completed as planned, allowing for ongoing improvements and quick adjustments to any changes. 4. Approaching the latest technologies The high cost of adopting new technologies often challenges many organizations. However, by partnering with IT outsourcing service providers who are deeply invested in technology and consistently stay abreast of new developments, you can confidently rely on them to gain access to new tech stacks. Common offshore software development challenges 1. Time zone differences Time zone differences can significantly affect communication and may cause delays in product development. These time differences can slow decision-making if a business requires prompt response and approval on an important issue. At SupremeTech, we handle time zone differences by arranging work hours and clear communication. We schedule our meetings to fit your work hours so you get timely updates and quick responses to essential questions or approvals. This helps reduce delays and keeps your project on track without slowing development. 2. Lack of communication Communication challenges are common in offshore software development for several reasons. One major issue is language barriers, which can make effective communication difficult. To mitigate this, it is important to choose a software outsourcing partner who is fluent in English or your preferred language. Additionally, their work processes should align with yours throughout the development cycle. At SupremeTech, we address these challenges head-on. Our Business Analysts, or Proxy Product Owners, bridge the communication gap between the development and business teams. We not only communicate in your language but also enhance understanding of the various roles within the project, foster the development team's sense of ownership, and align everyone towards a common goal for project success. 3. Data security issues Data leakage is a pressing concern in offshore collaborations involving sensitive information. Address this issue by engaging a partner firm and establishing a Non-Disclosure Agreement (NDA). Additionally, inquire about the outsourcing vendor’s security measures, such as user privacy policies, secure data storage, encryption, and compliance with regulations like the General Data Protection Regulation (GDPR). 4. Quality assurance Maintaining quality control when working with an unfamiliar team can be difficult. Offshore developers might have different ideas about how business should be conducted and projects should be managed. This can lead to a final product that doesn’t match your expectations. Additionally, you might be collaborating with recent college graduates or less experienced developers. To address quality control issues, SupremeTech consistently follows global standards for quality and security. We have achieved ISO certification to guarantee the security, quality, and efficiency of our products, services, and systems. Our information security policies are audited by CyberGRX, ensuring we meet high standards. Additionally, we are proud to have been recognized as a Silver Partner of ISTQB in 2022 for our software testing practices. When should you work with an offshore development vendor? Offshore development provides clients substantial benefits, including cost and time savings, access to highly skilled engineers, and the latest technology. However, offshore outsourcing faces many challenges, including time zone differences, communication issues, data leakage, and quality assurance concerns. Offshore development becomes an excellent alternative when you aim to: Prioritize core business activities.Access industry professionals.Increase technological competence.Accelerate project completion.Control the software development costs.Reduce operational costs. In conclusion, offshore development provides firms various alternatives to save effort, time, and money. To keep your budget while getting decent results, you may hire offshore IT experts to create a versatile and successful new product. Contact us for a consultation on any queries about offshore software development. References: Statista Research Department and 14, M. (2024) Global: IT consulting & implementation market revenue 2018-2029, Statista. Available at: https://www.statista.com/forecasts/1079927/it-consulting-implementationservices-revenue (Accessed: 28 October 2024). 

                        05/11/2024

                        144

                        Ngan Phan

                        Software Development

                        +0

                          A New Guide to Offshore Software Development in 2025

                          05/11/2024

                          144

                          Ngan Phan

                          customer master data

                          Online-Merge-Offline Retail

                          Software Development

                          +0

                            What is Customer Master Data and Why It’s Vital for Retail Business

                            Are you a retailer with multi thousands, or even millions, of customers? How are you handling your customer data? Is it efficiently managed or fragmented? Furthermore, can you make any game-changing decision based on your customer data? That's exactly the questions we tend to ask our customers who are building an empire in retail industry. Data-driven customer relationship management is no longer an option, it's a must for any retail business that wants to go big. As a technology solution partner, we want to give a hand by raising a topic of customer master data, its definition and why it's importance for business. Customer Master Data What is Customer Master Data? Customer master data is a set of information that represents key details about customers. Customer master data is the key info that helps a business identify and connect with customers. It includes basics like names, contact info, demographics, purchase history, preferences, account details, and billing and shipping addresses—basically, everything that helps a company understand who their customers are and what they need. Managing this data well is essential. When customer data is consistent and accurate, it boosts customer relationship management (CRM), makes marketing more effective, smooths out operations, and helps meet regulatory standards. Usually, this data lives in CRM systems, enterprise resource planning (ERP) tools, or a Master Data Management (MDM) platform. Having one central system ensures data quality and keeps everything in sync across the company. Types of Customer Master Data Customer master data generally falls into several key types, each serving different aspects of customer interactions and business operations. Here are the main types: 1. Basic Identifying Information This includes foundational details that identify a customer, such as name, date of birth, contact information. It’s essential for any communication, billing, or delivery purposes. 2. Demographic Data Demographic data provides context about who the customer is, including attributes like age, gender, income, marital status, and education level. It’s often used for segmentation, targeted marketing, and understanding customer preferences. 3. Behavioral Data Behavioral data captures customer interactions, such as browsing history, purchase patterns, frequency, and recency of purchases. This type of data is valuable for predicting future behavior, personalizing offers, and improving the customer experience. 4. Transactional Data Transactional data is a record of all purchases and transactions a customer has made. This includes details like transaction dates, products purchased, order value, payment methods, and delivery information. Transactional data is essential for analytics, financial reporting, and assessing customer lifetime value. 5. Engagement Data Engagement data includes information about how customers interact with the brand across various touchpoints. It can be website visits, email opens and clicks, social media interactions, customer service inquiries, and loyalty program activity. This helps businesses understand customer engagement and loyalty. 6. Preferences and Interests This type of data captures what customers prefer or are interested in. It can vary from favorite product categories, preferred communication channels, to interests based on previous purchases. It’s particularly useful for personalization and customer experience management. 7. Account and Membership For businesses with loyalty programs or membership systems, this includes information related to membership tiers, reward points, account status, and customer preferences within the loyalty program. It’s used to manage customer rewards and retention. 8. Customer Feedback This data includes customer reviews, feedback, survey responses, and sentiment analysis from social media or other platforms. It provides insights into customer satisfaction, product improvement needs, and brand perception. 9. Customer Service and Support Data This type of data includes records of past interactions with customer service, such as inquiries, complaints, resolutions, and support tickets. It helps in managing customer relationships and ensuring that customers receive consistent and effective support. Why Customer Master Data is vital for retail business? For a retail business with a large customer base, customer master data is vital for several reasons: First of all, retail businesses can personalize marketing and customer experience based on data. For example, knowing a customer's purchase history or preferences allows the business to tailor recommendations and offers. A personalized experience would subsequently result in improved loyalty. Secondly, customer master data enables retail businesses to manage relationships effectively by consolidating all customer interactions and information in one place. This centralized view helps customer service teams respond to inquiries quickly. As a result, customer wait time will decrease significantly. For large retailers, streamlined operations are essential. Consistent and accurate customer data allows for more efficient processes like order processing, shipping, billing, and returns. An optimized data pipeline reduces errors, enhances operational efficiency, and can save the business significant time and money. With a well-maintained customer database, a retail business can analyze data to uncover trends, buying patterns, and customer segments. This insight supports more informed decision-making on inventory management, product development, and marketing strategies. Last but not least, customer master data ensures that customers receive consistent experiences across channels. For instance, customers expect seamless interactions whether they are purchasing online, in-store, or via mobile apps. Accurate data enables the retailer to recognize the customer across channels, delivering a cohesive experience. What's on trend for customer master data management? Managing customer master data effectively is more critical than ever, and several trends are shaping how businesses approach it today. Here are the key current trends: Moving to the Cloud Cloud-based MDM (Master Data Management) solutions have taken off, and for good reason. With cloud, businesses can scale up (or down) as needed, access data from anywhere, and reduce costs. Plus, it’s easier to keep data updated in real-time, which is a game-changer for fast-paced retail environments. Using AI to Clean and Understand Data Artificial intelligence is helping clean up messy customer data by catching duplicates, filling in blanks, and finding patterns that we humans might miss. Machine learning tools analyze behavior trends and even predict what a customer might want next, making personalization a lot more intuitive. Real-Time Data Updates Today’s customers expect immediate responses, and for that, real-time data updates are essential. Integrating systems so that customer data refreshes instantly allows businesses to provide relevant offers or support as soon as it’s needed. In other words, no more outdated data holding back customer experience. Customer Data Platforms (CDPs) for a Clearer View CDPs pull customer data from multiple sources into one spot, creating a single, reliable profile for each customer. This unified view allows teams across sales, support, and marketing to deliver a consistent experience. As CDPs become more accessible, even smaller businesses can leverage this organized approach. In short, companies are aiming to make data more accessible, accurate, and actionable, with a focus on real-time updates, privacy, and smarter, AI-powered insights. The result? Better customer experiences, more efficient operations, and a competitive edge. Seeking ways to manage customer data effectively? Knowing the importance of data sometimes does not mean knowing where to start. Even our clients who built an empire in retail struggle in managing data efficiently. The common pain point, as we translated, is how to build a data pipeline that works stably and responsively. Furthermore, trust and security are also the head-wrenching problem, especially when seeking for external help. We proudly offer the best of both. Schedule a meeting with us to know how we are able to proclaim with such a confidence.

                            04/11/2024

                            169

                            Linh Le

                            Online-Merge-Offline Retail

                            +1

                            • Software Development

                            What is Customer Master Data and Why It’s Vital for Retail Business

                            04/11/2024

                            169

                            Linh Le

                            Customize software background

                            Want to customize a software for your business?

                            Meet with us! Schedule a meeting with us!