Header image

Best Practices for Building Reliable AWS Lambda Functions

13/01/2025

33

Bao Dang D. Q.

Welcome back to the “Mastering AWS Lambda with Bao” series! The previous episode explored how AWS Lambda connects to the world through AWS Lambda triggers and events. Using S3 and DynamoDB Streams triggers, we demonstrated how Lambda automates workflows by processing events from multiple sources. This example provided a foundation for understanding Lambda’s event-driven architecture.

However, building reliable Lambda functions requires more than understanding how triggers work. To create AWS lambda functions that can handle real-world production workloads, you need to focus on optimizing performance, implementing robust error handling, and enforcing strong security practices. These steps optimize your Lambda functions to be scalable, efficient, and secure.

In this episode, SupremeTech will explore the best practices for building reliable AWS Lambda functions, covering two essential areas:

  1. Optimizing Performance: Reducing latency, managing resources, and improving runtime efficiency.
  2. Error Handling and Logging: Capturing meaningful errors, logging effectively with CloudWatch, and setting up retries.

Adopting these best practices, you’ll be well-equipped to optimize Lambda functions that thrive in production environments. Let’s dive in!

Optimizing Performance

Optimize the Lambda function’s performance to run efficiently with minimal latency and cost. Let’s focus first on Cold Starts, a critical area of concern for most developers.
how to optimize lambda functions

Understanding Cold Starts

What Are Cold Starts?

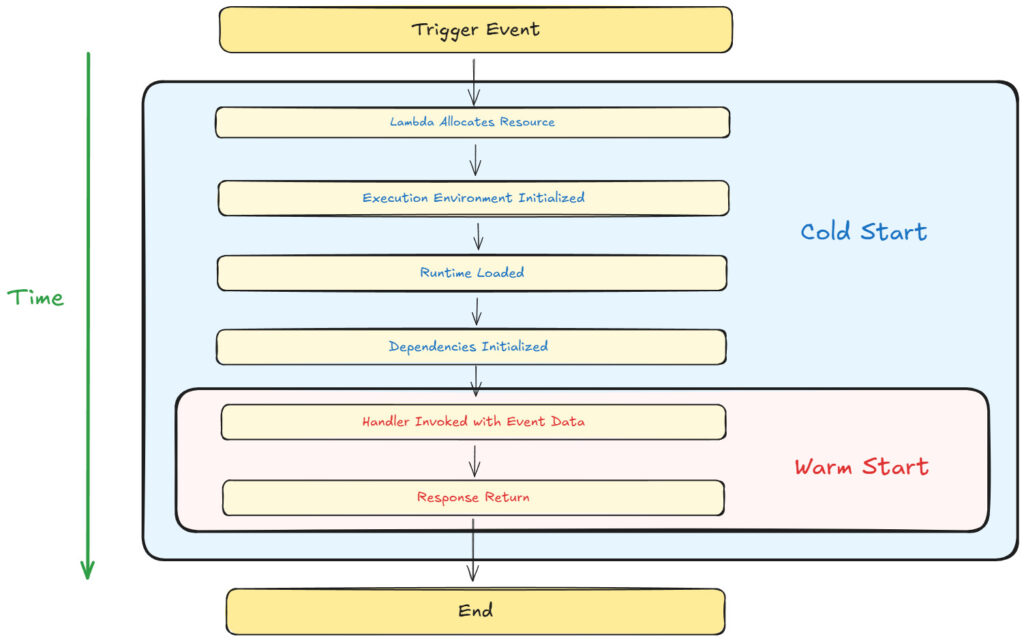
A Cold Start occurs when AWS Lambda initializes a new execution environment to handle an incoming request. This happens under the following circumstances:

  • When the Lambda function is invoked for the first time.
  • After a period of inactivity (execution environments are garbage collected after a few minutes of no activity – meaning it will be shut down automatically).
  • When scaling up to handle additional concurrent requests.

Cold starts introduce latency because AWS needs to set up a new execution environment from scratch.

Steps Involved in a Cold Start:

  1. Resource Allocation:
    • AWS provisions a secure and isolated container for the Lambda function.
    • Resources like memory and CPU are allocated based on the function’s configuration.
  2. Execution Environment Initialization:
    • AWS sets up the sandbox environment, including:
      • The /tmp directory is for temporary storage.
      • Networking configurations, such as Elastic Network Interfaces (ENI), for VPC-based Lambdas.
  3. Runtime Initialization:
    • The specified runtime (e.g., Node.js, Python, Java) is initialized.
    • For Node.js, this involves loading the JavaScript engine (V8) and runtime APIs.
  4. Dependency Initialization:
    • AWS loads the deployment package (your Lambda code and dependencies).
    • Any initialization code in your function (e.g., database connections, library imports) is executed.
  5. Handler Invocation:
    • Once the environment is fully set up, AWS invokes your Lambda function’s handler with the input event.

Cold Start Latency

Cold start latency varies depending on the runtime, deployment package size, and whether the function runs inside a VPC:

  • Node.js and Python: ~200ms–500ms for non-VPC functions.
  • Java or .NET: ~500ms–2s due to heavier runtime initialization.
  • VPC-Based Functions: Add ~500ms–1s due to ENI initialization.

Warm Starts

In contrast to cold starts, Warm Starts reuse an already-initialized execution environment. AWS keeps environments “warm” for a short time after a function is invoked, allowing subsequent requests to bypass initialization steps.

Key Differences:

  • Cold Start: New container setup → High latency.
  • Warm Start: Reused container → Minimal latency (~<100ms).

Reducing Cold Starts

Cold starts can significantly impact the performance of latency-sensitive applications. Below are some actionable strategies to reduce cold starts, each with good and bad practice examples for clarity.

1. Use Smaller Deployment Packages to optimize lambda function

Good Practice:

  • Minimize the size of your deployment package by including only the required dependencies and removing unnecessary files.
  • Use bundlers like Webpack, ESBuild, or Parcel to optimize your package size.
  • Example:
const DynamoDB = require('aws-sdk/clients/dynamodb'); // Only loads DynamoDB, not the entire SDK

Bad Practice:

  • Bundling the entire AWS SDK or other large libraries without considering modular imports.
  • Example:
const AWS = require('aws-sdk'); // Loads the entire SDK, increasing package size

Why It Matters: Smaller deployment packages load faster during the initialization phase, reducing cold start latency.

2. Move Heavy Initialization Outside the Handler

Good Practice:

  • Place resource-heavy operations, such as database or SDK client initialization, outside the handler function so they are executed only once per container lifecycle – a cold start.
  • Example:
const DynamoDB = new AWS.DynamoDB.DocumentClient();

exports.handler = async (event) => {
    const data = await DynamoDB.get({ Key: { id: '123' } }).promise();
    return data;
};

Bad Practice:

  • Reinitializing resources inside the handler for every invocation.
  • Example:
exports.handler = async (event) => {
    const DynamoDB = new AWS.DynamoDB.DocumentClient(); // Initialized on every call
    const data = await DynamoDB.get({ Key: { id: '123' } }).promise();
    return data;
};

Why It Matters: Reinitializing resources for every invocation increases latency and consumes unnecessary computing power.

3. Enable Provisioned Concurrency1

Good Practice:

  • Use Provisioned Concurrency to pre-initialize a set number of environments, ensuring they are always ready to handle requests.
  • Example:
    • AWS CLI:
aws lambda put-provisioned-concurrency-config \
    --function-name myFunction \
    --provisioned-concurrent-executions 5
  • AWS Management Console:

Why It Matters: Provisioned concurrency ensures a constant pool of pre-initialized environments, eliminating cold starts entirely for latency-sensitive applications.

4. Reduce Dependencies to optimize the lambda function

Good Practice:

  • Evaluate your libraries and replace heavy frameworks with lightweight alternatives or native APIs.
  • Example:
console.log(new Date().toISOString()); // Native JavaScript API

Bad Practice:

  • Using heavy libraries for simple tasks without considering alternatives.
  • Example:
const moment = require('moment');
console.log(moment().format());

Why It Matters: Large dependencies increase the deployment package size, leading to slower initialization during cold starts.

5. Avoid Unnecessary VPC Configurations

Good Practice:

  • Place Lambda functions outside a VPC unless necessary. If a VPC is required (e.g., to access private resources like RDS), optimize networking using VPC endpoints.
  • Example:
    • Use DynamoDB and S3 directly without placing the Lambda inside a VPC.

Bad Practice:

  • Deploying Lambda functions inside a VPC unnecessarily, such as accessing services like DynamoDB or S3, which do not require VPC access.
  • Why It’s Bad: Placing Lambda in a VPC introduces additional latency due to ENI setup during cold starts.

Why It Matters: Functions outside a VPC initialize faster because they skip ENI setup.

6. Choose Lightweight Runtimes to optimize lambda function

Good Practice:

  • Use lightweight runtimes like Node.js or Python for faster initialization than heavier runtimes like Java or .NET.
  • Why It’s Good: Lightweight runtimes require fewer initialization resources, leading to lower cold start latency.

Why It Matters: Heavier runtimes have higher cold start latency due to the complexity of their initialization process.

Summary of Best Practices for Cold Starts

AspectGood PracticeBad Practice
Deployment PackageUse small packages with only the required dependencies.Bundle unused libraries, increasing the package size.
InitializationPerform heavy initialization (e.g., database connections) outside the handler.Initialize resources inside the handler for every request.
Provisioned ConcurrencyEnable provisioned concurrency for latency-sensitive applications.Ignore provisioned concurrency for high-traffic functions.
DependenciesUse lightweight libraries or native APIs for simple tasks.Use heavy libraries like moment.js without evaluating lightweight alternatives.
VPC ConfigurationAvoid unnecessary VPC configurations; use VPC endpoints when required.Place all Lambda functions inside a VPC, even when accessing public AWS services.
Runtime SelectionChoose lightweight runtimes like Node.js or Python for faster initialization.Use heavy runtimes like Java or .NET for simple, lightweight workloads.

Error Handling and Logging

Error handling and logging are critical for optimizing your Lambda functions are reliable and easy to debug. Effective error handling prevents cascading failures in your architecture, while good logging practices help you monitor and troubleshoot issues efficiently.

Structured Error Responses

Errors in Lambda functions can occur due to various reasons: invalid input, AWS service failures, or unhandled exceptions in the code. Properly structured error handling ensures that these issues are captured, logged, and surfaced effectively to users or downstream services.

1. Define Consistent Error Structures

Good Practice:

  • Use a standard error format so all errors are predictable and machine-readable.
  • Example:
{
  "errorType": "ValidationError",
  "message": "Invalid input: 'email' is missing",
  "requestId": "12345-abcd"
}

Bad Practice:

  • Avoid returning vague or unstructured errors that make debugging difficult.
{
  "message": "Something went wrong",
  "error": true
}

Why It Matters: Structured errors make debugging easier by providing consistent, machine-readable information. They also improve communication with clients or downstream systems by conveying what went wrong and how it should be handled.

2. Use Custom Error Classes

Good Practice:

  • In Node.js, define custom error classes for clarity:
class ValidationError extends Error {
  constructor(message) {
    super(message);
    this.name = "ValidationError";
    this.statusCode = 400; // Custom property
  }
}

// Throwing a custom error
if (!event.body.email) {
  throw new ValidationError("Invalid input: 'email' is missing");
}

Bad Practice:

  • Use generic errors for everything, making identifying or categorizing issues hard.
  • Example:
throw new Error("Error occurred");

Why It Matters: Custom error classes make error handling more precise and help segregate application errors (e.g., validation issues) from system errors (e.g., database failures).

3. Include Contextual Information in Logs

Good Practice:

  • Add relevant information like requestId, timestamp, and input data (excluding sensitive information) when logging errors.
  • Example:
console.error({
    errorType: "ValidationError",
    message: "The 'email' field is missing.",
    requestId: context.awsRequestId,
    input: event.body,
    timestamp: new Date().toISOString(),
});

Bad Practice:

  • Log errors without any context, making debugging difficult.
  • Example:
console.error("Error occurred");

Why It Matters: Contextual information in logs makes it easier to identify what triggered the error and where it happened, improving the debugging experience.

Retry Logic Across AWS SDK and Other Services

Retrying failed operations is critical when interacting with external services, as temporary failures (e.g., throttling, timeouts, or transient network issues) can disrupt workflows. Whether you’re using AWS SDK, third-party APIs, or internal services, applying retry logic effectively can ensure system reliability while avoiding unnecessary overhead.

1. Use Exponential Backoff and Jitter

Good Practice:

  • Apply exponential backoff with jitter to stagger retry attempts. This avoids overwhelming the target service, especially under high load or rate-limiting scenarios.
  • Example (General Implementation):
async function retryWithBackoff(fn, retries = 3, delay = 100) {
    for (let attempt = 1; attempt <= retries; attempt++) {
        try {
            return await fn();
        } catch (error) {
            if (attempt === retries) throw error; // Rethrow after final attempt
            const backoff = delay * 2 ** (attempt - 1) + Math.random() * delay; // Add jitter
            console.log(`Retrying in ${backoff.toFixed()}ms...`);
            await new Promise((res) => setTimeout(res, backoff));
        }
    }
}

// Usage Example
const result = await retryWithBackoff(() => callThirdPartyAPI());

Bad Practice:

  • Retrying without delays or jitter can lead to cascading failures and amplify the problem.
for (let i = 0; i < retries; i++) {
    try {
        return await callThirdPartyAPI();
    } catch (error) {
        console.log("Retrying immediately...");
    }
}

Why It Matters: Exponential backoff reduces pressure on the failing service, while jitter randomizes retry times, preventing synchronized retry storms from multiple clients.

2. Leverage Built-In Retry Mechanisms

Good Practice:

  • Use the built-in retry logic of libraries, SDKs, or APIs whenever available. These are typically optimized for the specific service.
  • Example (AWS SDK):
const DynamoDB = new AWS.DynamoDB.DocumentClient({
    maxRetries: 3, // Number of retries
    retryDelayOptions: { base: 200 }, // Base delay in ms
});
  • Example (Axios for Third-Party APIs):
    • Use libraries like axios-retry to integrate retry logic for HTTP requests.
const axios = require('axios');
const axiosRetry = require('axios-retry');

axiosRetry(axios, {
    retries: 3, // Retry 3 times
    retryDelay: (retryCount) => retryCount * 200, // Exponential backoff
    retryCondition: (error) => error.response.status >= 500, // Retry only for server errors
});

const response = await axios.get("https://example.com/api");

Bad Practice:

  • Writing your own retry logic unnecessarily when built-in mechanisms exist, risking suboptimal implementation.

Why It Matters: Built-in retry mechanisms are often optimized for the specific service or library, reducing the likelihood of bugs and configuration errors.

3. Configure Service-Specific Retry Limits

Good Practice:

  • Set retry limits based on the service’s characteristics and criticality.
  • Example (AWS S3 Upload):
const s3 = new AWS.S3({
    maxRetries: 5, // Allow more retries for critical operations
    retryDelayOptions: { base: 300 }, // Slightly longer base delay
});
  • Example (Database Queries):
async function queryDatabaseWithRetry(queryFn) {
    await retryWithBackoff(queryFn, 5, 100); // Retry with custom backoff logic
}

Bad Practice:

  • Allowing unlimited retries can cause resource exhaustion and increase costs.
while (true) {
    try {
        return await callService();
    } catch (error) {
        console.log("Retrying...");
    }
}

Why It Matters: Excessive retries can lead to runaway costs or cascading failures across the system. Always define a sensible retry limit.

4. Handle Transient vs. Persistent Failures

Good Practice:

  • Retry only transient failures (e.g., timeouts, throttling, 5xx errors) and handle persistent failures (e.g., invalid input, 4xx errors) immediately.
  • Example:
const isTransientError = (error) =>
    error.code === "ThrottlingException" || error.code === "TimeoutError";

async function callServiceWithRetry() {
    await retryWithBackoff(() => {
        if (!isTransientError(error)) throw error; // Do not retry persistent errors
        return callService();
    });
}

Bad Practice:

  • Retrying all errors indiscriminately, including persistent failures like ValidationException or 404 Not Found.

Why It Matters: Persistent failures are unlikely to succeed with retries and can waste resources unnecessarily.

5. Log Retry Attempts

Good Practice:

  • Log each retry attempt with relevant context, such as the retry count and delay.
async function retryWithBackoff(fn, retries = 3, delay = 100) {
    for (let attempt = 1; attempt <= retries; attempt++) {
        try {
            return await fn();
        } catch (error) {
            if (attempt === retries) throw error;
            console.log(`Attempt ${attempt} failed. Retrying in ${delay}ms...`);
            await new Promise((res) => setTimeout(res, delay));
        }
    }
}

Bad Practice:

  • Failing to log retries makes debugging or understanding the retry behavior difficult.

Why It Matters: Logs provide valuable insights into system behavior and help diagnose retry-related issues.

Summary of Best Practices for Retry logic

AspectGood PracticeBad Practice
Retry LogicUse exponential backoff with jitter to stagger retries.Retry immediately without delays, causing retry storms.
Built-In MechanismsLeverage AWS SDK retry options or third-party libraries like axios-retry.Write custom retry logic unnecessarily when optimized built-in solutions are available.
Retry LimitsDefine a sensible retry limit (e.g., 3–5 retries).Allow unlimited retries, risking resource exhaustion or runaway costs.
Transient vs PersistentRetry only transient errors (e.g., timeouts, throttling) and fail fast for persistent errors.Retry all errors indiscriminately, including persistent failures like validation or 404 errors.
LoggingLog retry attempts with context (e.g., attempt number, delay,  error) to aid debugging.Fail to log retries, making it hard to trace retry behavior or diagnose problems.

Logging Best Practices

Logs are essential for debugging and monitoring Lambda functions. However, unstructured or excessive logging can make it harder to find helpful information.

1. Mask or Exclude Sensitive Data

Good Practice:

  • Avoid logging sensitive information like:
    • User credentials
    • API keys, tokens, or secrets
    • Personally Identifiable Information (PII)
  • Use tools like AWS Secrets Manager for sensitive data management.
  • Example: Mask sensitive fields before logging:
const sanitizedInput = {
    ...event,
    password: "***",
};

console.log(JSON.stringify({
    level: "info",
    message: "User login attempt logged.",
    input: sanitizedInput,
}));

Bad Practice:

  • Logging sensitive data directly can cause security breaches or compliance violations (e.g., GDPR, HIPAA).
  • Example:
console.log(`User logged in with password: ${event.password}`);

Why It Matters: Logging sensitive data can expose systems to attackers, breach compliance rules, and compromise user trust.

2.  Set Log Retention Policies

Good Practice:

  • Set a retention policy for CloudWatch log groups to prevent excessive log storage costs.
  • AWS allows you to configure retention settings (e.g., 7, 14, or 30 days).

Bad Practice:

  • Using the default “Never Expire” retention policy unnecessarily stores logs indefinitely.

Why It Matters: Unmanaged logs increase costs and make it harder to find relevant data. Retaining logs only as long as needed reduces costs and keeps logs manageable.

3. Avoid Excessive Logging

Good Practice:

  • Log only what is necessary to monitor, troubleshoot, and analyze system behavior.
  • Use info, debug, and error levels to prioritize logs appropriately.
console.info("Function started processing...");
console.error("Failed to fetch data from DynamoDB: ", error.message);

Bad Practice:

  • Logging every detail (e.g., input payloads, execution steps) unnecessarily increases log volume.
  • Example:
console.log(`Received event: ${JSON.stringify(event)}`); // Avoid logging full payloads unnecessarily

Why It Matters: Excessive logging clutters log storage, increases costs, and makes it harder to isolate relevant logs.

4. Use Log Levels (Info, Debug, Error)

Good Practice:

  • Use different log levels to differentiate between critical and non-critical information.
    • info: For general execution logs (e.g., function start, successful completion).
    • debug: For detailed logs during development or troubleshooting.
    • error: For failure scenarios requiring immediate attention.

Bad Practice:

  • Using a single log level (e.g., console.log() everywhere) without prioritization.

Why It Matters: Log levels make it easier to filter logs based on severity and focus on critical issues in production.

Conclusion

In this episode of “Mastering AWS Lambda with Bao”, we explored critical best practices for building reliable AWS Lambda functions, focusing on optimizing performance, error handling, and logging.

  • Optimizing Performance: By reducing cold starts, using smaller deployment packages, lightweight runtimes, and optimizing VPC configurations, you can significantly lower latency and optimize Lambda functions. Strategies like moving initialization outside the handler and leveraging Provisioned Concurrency ensure smoother execution for latency-sensitive applications.
  • Error Handling: Implementing structured error responses and custom error classes makes troubleshooting easier and helps differentiate between transient and persistent issues. Handling errors consistently improves system resilience.
  • Retry Logic: Applying exponential backoff with jitter, using built-in retry mechanisms, and setting sensible retry limits optimizes that Lambda functions gracefully handle failures without overwhelming dependent services.
  • Logging: Effective logging with structured formats, contextual information, log levels, and appropriate retention policies enables better visibility, debugging, and cost control. Avoiding sensitive data in logs ensures security and compliance.

Following these best practices, you can optimize lambda function performance, reduce operational costs, and build scalable, reliable, and secure serverless applications with AWS Lambda.

In the next episode, we’ll dive deeper into “Handling Failures with Dead Letter Queues (DLQs)”, exploring how DLQs act as a safety net for capturing failed events and ensuring no data loss occurs in your workflows. Stay tuned!

Note:

1. Provisioned Concurrency is not a universal solution. While it eliminates cold starts, it also incurs additional costs since pre-initialized environments are billed regardless of usage.

  • When to Use:
    • Latency-sensitive workloads like APIs or real-time applications where even a slight delay is unacceptable.
  • When Not to Use:
    • Functions with unpredictable or low invocation rates (e.g., batch jobs, infrequent triggers). For such scenarios, on-demand concurrency may be more cost-effective.

Related Blog

Knowledge

+0

    Triggers and Events: How AWS Lambda Connects with the World

    Welcome back to the “Mastering AWS Lambda with Bao” series! In the previous episode, SupremeTech explored how to create an AWS Lambda function triggered by AWS EventBridge to fetch data from DynamoDB, process it, and send it to an SQS queue. That example gave you the foundational skills for building serverless workflows with Lambda. In this episode, we’ll dive deeper into AWS lambda triggers and events, the backbone of AWS Lambda’s event-driven architecture. Triggers enable Lambda to respond to specific actions or events from various AWS services, allowing you to build fully automated, scalable workflows. This episode will help you: Understand how triggers and events work.Explore a comprehensive list of popular AWS Lambda triggers.Implement a two-trigger example to see Lambda in action Our example is simplified for learning purposes and not optimized for production. Let’s get started! Prerequisites Before we begin, ensure you have the following prerequisites in place: AWS Account: Ensure you have access to create and manage AWS resources.Basic Knowledge of Node.js: Familiarity with JavaScript and Node.js will help you understand the Lambda function code. Once you have these prerequisites ready, proceed with the workflow setup. Understanding AWS Lambda Triggers and Events What are the Triggers in AWS Lambda? AWS lambda triggers are configurations that enable the Lambda function to execute in response to specific events. These events are generated by AWS services (e.g., S3, DynamoDB, API Gateway, etc) or external applications integrated through services like Amazon EventBridge. For example: Uploading a file to an S3 bucket can trigger a Lambda function to process the file.Changes in a DynamoDB table can trigger Lambda to perform additional computations or send notifications. How do Events work in AWS Lambda? When a trigger is activated, it generates an event–a structured JSON document containing details about what occurred Lambda receives this event as input to execute its function. Example event from an S3 trigger: { "Records": [ { "eventSource": "aws:s3", "eventName": "ObjectCreated:Put", "s3": { "bucket": { "name": "demo-upload-bucket" }, "object": { "key": "example-file.txt" } } } ] } Popular Triggers in AWS Lambda Here’s a list of some of the most commonly used triggers: Amazon S3:Use case: Process file uploads.Example: Resize images, extract metadata, or move files between buckets.Amazon DynamoDB Streams:Use case: React to data changes in a DynamoDB table.Example: Propagate updates or analyze new entries.Amazon API Gateway:Use case: Build REST or WebSocket APIs.Example: Process user input or return dynamic data.Amazon EventBridge:Use case: React to application or AWS service events.Example: Trigger Lambda for scheduled jobs or custom events. Amazon SQS:Use case: Process messages asynchronously.Example: Decouple microservices with a message queue.Amazon Kinesis:Use case: Process real-time streaming data.Example: Analyze logs or clickstream data.AWS IoT Core:Use case: Process messages from IoT devices.Example: Analyze sensor readings or control devices. By leveraging triggers and events, AWS Lambda enables you to automate complex workflows seamlessly. Setting Up IAM Roles (Optional) Before setting up Lambda triggers, we need to configure an IAM role with the necessary permissions. Step 1: Create an IAM Role Go to the IAM Console and click Create role.Select AWS Service → Lambda and click Next.Attach the following managed policies: AmazonS3ReadOnlyAccess: For reading files from S3.AmazonDynamoDBFullAccess: For writing metadata to DynamoDB and accessing DynamoDB Streams.AmazonSNSFullAccess: For publishing notifications to SNS.CloudWatchLogsFullAccess: For logging Lambda function activity.Click Next and enter a name (e.g., LambdaTriggerRole).Click Create role. Setting Up the Workflow For this episode, we’ll create a simplified two-trigger workflow: S3 Trigger: Processes uploaded files and stores metadata in DynamoDB.DynamoDB Streams Triggers: Sends a notification via SNS when new metadata is added. Step 1: Create an S3 Bucket Open the S3 Console in AWS.Click Create bucket and configure:Bucket name: Enter a unique name (e.g., upload-csv-lambda-st)Region: Choose your preferred region. (I will go with ap-southeast-1)Click Create bucket. Step 2: Create a DynamoDB Table Navigate to the DynamoDB Console.Click Create table and configure:Table name: DemoFileMetadata.Partition key: FileName (String).Sort key: UploadTimestamp (String). Click Create table.Enable DynamoDB Streams with the option New and old images. Step 3: Create an SNS Topic Navigate to the SNS Console.Click Create topic and configure: Topic type: Standard.Name: DemoFileProcessingNotifications. Click Create topic. Create a subscription. Confirm (in my case will be sent to my email). Step 4: Create a Lambda Function Navigate to the Lambda Console and click Create function.Choose Author from scratch and configure:Function name: DemoFileProcessing.Runtime: Select Node.js 20.x (Or your preferred version).Execution role: Select the LambdaTriggerRole you created earlier. Click Create function. Step 5: Configure Triggers Add S3 Trigger:Scroll to the Function overview section and click Add trigger. Select S3 and configure:Bucket: Select upload-csv-lambda-st.Event type: Choose All object create events.Suffix: Specify .csv to limit the trigger to CSV files. Click Add. Add DynamoDB Streams Trigger:Scroll to the Function overview section and click Add trigger. Select DynamoDB and configure:Table: Select DemoFileMetadata. Click Add. Writing the Lambda Function Below is the detailed breakdown of the Node.js Lambda function that handles events from S3 and DynamoDB Streams triggers (Source code). const AWS = require("aws-sdk"); const S3 = new AWS.S3(); const DynamoDB = new AWS.DynamoDB.DocumentClient(); const SNS = new AWS.SNS(); const SNS_TOPIC_ARN = "arn:aws:sns:region:account-id:DemoFileProcessingNotifications"; exports.handler = async (event) => { console.log("Event Received:", JSON.stringify(event, null, 2)); try { if (event.Records[0].eventSource === "aws:s3") { // Process S3 Trigger for (const record of event.Records) { const bucketName = record.s3.bucket.name; const objectKey = decodeURIComponent(record.s3.object.key.replace(/\+/g, " ")); console.log(`File uploaded: ${bucketName}/${objectKey}`); // Save metadata to DynamoDB const timestamp = new Date().toISOString(); await DynamoDB.put({ TableName: "DemoFileMetadata", Item: { FileName: objectKey, UploadTimestamp: timestamp, Status: "Processed", }, }).promise(); console.log(`Metadata saved for file: ${objectKey}`); } } else if (event.Records[0].eventSource === "aws:dynamodb") { // Process DynamoDB Streams Trigger for (const record of event.Records) { if (record.eventName === "INSERT") { const newItem = record.dynamodb.NewImage; // Construct notification message const message = `File ${newItem.FileName.S} uploaded at ${newItem.UploadTimestamp.S} has been processed.`; console.log("Sending notification:", message); // Send notification via SNS await SNS.publish({ TopicArn: SNS_TOPIC_ARN, Message: message, }).promise(); console.log("Notification sent successfully."); } } } return { statusCode: 200, body: "Event processed successfully!", }; } catch (error) { console.error("Error processing event:", error); throw error; } }; Detailed Explanation Importing Required AWS SDK Modules const AWS = require("aws-sdk"); const S3 = new AWS.S3(); const DynamoDB = new AWS.DynamoDB.DocumentClient(); const SNS = new AWS.SNS(); AWS SDK: Provides tools to interact with AWS services.S3 Module: Used to interact with the S3 bucket and retrieve file details.DynamoDB Module: Used to store metadata in the DynamoDB table.SNS Module: Used to publish messages to the SNS topic. Defining the SNS Topic ARN const SNS_TOPIC_ARN = "arn:aws:sns:region:account-id:DemoFileProcessingNotifications"; This is the ARN of the SNS topic where notification will be sent. Replace it with the ARN of your actual topic. Handling the Lambda Event exports.handler = async (event) => { console.log("Event Received:", JSON.stringify(event, null, 2)); The event parameter contains information about the trigger that activated the Lambda function.The event can be from S3 or DynamoDB Streams.The event is logged for debugging purposes. Processing the S3 Trigger if (event.Records[0].eventSource === "aws:s3") { for (const record of event.Records) { const bucketName = record.s3.bucket.name; const objectKey = decodeURIComponent(record.s3.object.key.replace(/\+/g, " ")); console.log(`File uploaded: ${bucketName}/${objectKey}`); Condition: Checks if the event source is S3.Loop: Iterates over all records in the S3 event.Bucket Name and Object Key: Extracts the bucket name and object key from the event.decodeURIComponent() is used to handle special characters in the object key. Saving Metadata to DynamoDB const timestamp = new Date().toISOString(); await DynamoDB.put({ TableName: "DemoFileMetadata", Item: { FileName: objectKey, UploadTimestamp: timestamp, Status: "Processed", }, }).promise(); console.log(`Metadata saved for file: ${objectKey}`); Timestamp: Captures the current time as the upload timestamp.DynamoDB Put Operation:Writes the file metadata to the DemoFileMetadata table.Includes the FileName, UploadTimestamp, and Status.Promise: The put method returns a promise, which is awaited to ensure the operation is completed. Processing the DynamoDB Streams Trigger } else if (event.Records[0].eventSource === "aws:dynamodb") { for (const record of event.Records) { if (record.eventName === "INSERT") { const newItem = record.dynamodb.NewImage; Condition: Checks if the event source is DynamoDB Streams.Loop: Iterates over all records in the DynamoDB Streams event.INSERT Event: Filters only for INSERT operations in the DynamoDB table. Constructing and Sending the SNS Notification const message = `File ${newItem.FileName.S} uploaded at ${newItem.UploadTimestamp.S} has been processed.`; console.log("Sending notification:", message); await SNS.publish({ TopicArn: SNS_TOPIC_ARN, Message: message, }).promise(); console.log("Notification sent successfully."); Constructing the Message:Uses the file name and upload timestamp from the DynamoDB Streams event.SNS Publish Operation:Send the constructed message to the SNS topic.Promise: The publish method returns a promise, which is awaited. to ensure the message is sent. Error Handling } catch (error) { console.error("Error processing event:", error); throw error; } Any errors during event processing are caught and logged.The error is re-thrown to ensure it’s recorded in CloudWatch Logs. Lambda Function Response return {     statusCode: 200,     body: "Event processed successfully!", }; After processing all events, the function returns a successful response. Test The Lambda Function Upload the code into AWS Lambda. Navigate to the S3 Console and choose the bucket you linked to the Lambda Function. Upload a random.csv file to the bucket. Check the result:DynamoDB Table Entry SNS Notifications CloudWatch Logs So, we successfully created a Lambda function that triggered based on 2 triggers. It's pretty simple. Just remember to delete any services after use to avoid incurring unnecessary costs! Conclusion In this episode, we explored AWS Lambda's foundational concepts of triggers and events. Triggers allow Lambda functions to respond to specific actions or events, such as file uploads to S3 or changes in a DynamoDB table. In contrast, events are structured data passed to the Lambda function containing details about what triggered it. We also implemented a practical example to demonstrate how a single Lambda function can handle multiple triggers: An S3 trigger processed uploaded files by extracting metadata and saving it to DynamoDB.A DynamoDB Streams trigger sent notifications via SNS when new metadata was added to the table. This example illustrated the flexibility of Lambda’s event-driven architecture and how it integrates seamlessly with AWS services to automate workflows. In the next episode, we’ll discuss Best practices for Optimizing AWS Lambda Functions, optimizing performance, handling errors effectively, and securing your Lambda functions. Stay tuned to continue enhancing your serverless expertise!

    10/01/2025

    39

    Bao Dang D. Q.

    Knowledge

    +0

      Triggers and Events: How AWS Lambda Connects with the World

      10/01/2025

      39

      Bao Dang D. Q.

      Knowledge

      +0

        Create Your First AWS Lambda Function (Node.js, Python, and Go)

        Welcome back to the “Mastering AWS Lambda with Bao” series! In the previous episode, we explored the fundamentals of AWS Lambda, including its concept, how it works, its benefits, and its real-world applications. In this SupremeTech blog episode, we’ll dive deeper into the example we discussed earlier. We’ll create an AWS Lambda function triggered by AWS EventBridge, fetch data from AWS DynamoDB, batch it into manageable chunks, and send it to Amazon SQS for further processing. We’ll implement this example in Node.js, Python, and Go to provide a comprehensive perspective. If you’re unfamiliar with these AWS services, don’t worry! I’ll guide you through it, like creating sample data for DynamoDB step-by-step, so you’ll have everything you need to follow along. By the end of this episode, you’ll have a fully functional AWS Lambda workflow triggered by EventBridge, interacts with DynamoDB to retrieve data, and pushes it to SQS. This will give you a clear demonstration of the power of serverless architecture. Let’s get started! >>> Maybe you are interested: Best Practices for Optimizing AWS Lambda Functions Prerequisites Before diving into how to create an AWS lambda function, make sure you have the following: AWS Account: Ensure you have access to create and manage AWS resources.Programming Environment: Install the following based on your preferred language:Node.js (https://nodejs.org/)Python (https://www.python.org/)Go (https://golang.org/)IAM Role for Lambda Execution: Create an IAM role with the following permissions:AWSLambdaBasicExecutionRoleAmazonDynamoDBReadOnlyAccessAmazonSQSFullAccess Setting Up AWS Services We’ll configure the necessary AWS services (EventBridge, DynamoDB, and SQS) and permissions (IAM Role) to support the Lambda function. Using AWS Management Console: Step 1: Create an IAM Role Navigate to IAM Console:Open the IAM Console from the AWS Management Console.Create a Role:Click Roles in the left-hand menu, then click Create Role. Under Trusted Entity Type, select AWS Service, and then choose Lambda. Click Next to attach permissions. Attach Policies:Add the following managed policies to the role:AWSLambdaBasicExecutionRole: Allows Lambda to write logs to CloudWatch.AmazonDynamoDBReadOnlyAccess: Grants read access to the DynamoDB table.AmazonSQSFullAccess: Allows full access to send messages to and read from SQS queues. Review and Create:Give the role a name (we’ll use LambdaExecutionRole).Review the permissions and click Create Role. Copy the Role ARN:Once the role is created, copy its ARN (Amazon Resource Name) when creating the Lambda function. Step 2: Create a DynamoDB Table This table will store user data for the example Navigate to DynamoDB and click Create Table. Set the table name to UsersTable.Use userId (String) as the partition key. Leave other settings as default and click Create. Step 3: Add data sample to UsersTable (DynamoDB) Click on Explore items on the left-hand menu, then click Create item. Input sample data to create items, then click Create item to submit (Create at least 10 items for better experience). Step 4: Create an Amazon SQS Queue Go to Amazon SQS and click Create Queue. Name the queue UserProcessedQueue. Leave the defaults and click Create Queue. Create the AWS Lambda Function Now, we’ll create a Lambda function in AWS to fetch data from DynamoDB, validate it, batch it, and push it to SQS. Examples are provided for Node.js, Python, and Go. Lambda Function Logic: Fetch all users with emailEnabled = true from DynamoDB.Validate user data (e.g., ensure email exists and is valid).Batch users into groups of 5.Send each batch to SQS. Node.js Implementation Init & Install dependencies (if needed) (Sample code): npm init npm install aws-sdk Create a file named index.js with the below code: const AWS = require('aws-sdk'); const dynamoDB = new AWS.DynamoDB.DocumentClient(); const sqs = new AWS.SQS(); const emailRegex = /^[^\s@]+@[^\s@]+\.[^\s@]+$/; exports.handler = async () => {   try {       // Fetch data from DynamoDB       let params = {           TableName: "UsersTable", // Replace with your DynamoDB table name           FilterExpression: "emailEnabled = :enabled",           ExpressionAttributeValues: { ":enabled": true }       };       let users = [];       let data;       do {           data = await dynamoDB.scan(params).promise();           users = users.concat(data.Items);           params.ExclusiveStartKey = data.LastEvaluatedKey;       } while (params.ExclusiveStartKey);       // Validate and batch data       const batches = [];       for (let i = 0; i < users.length; i += 100) {           const batch = users.slice(i, i + 100).filter(user => user.email && emailRegex.test(user.email)); // Validate email           if (batch.length > 0) {               batches.push(batch);           }       }       // Send batches to SQS       for (const batch of batches) {           const sqsParams = {               QueueUrl: "https://sqs.ap-southeast-1.amazonaws.com/account-id/UserProcessedQueue", // Replace with your SQS URL               MessageBody: JSON.stringify(batch)           };           await sqs.sendMessage(sqsParams).promise();       }       return { statusCode: 200, body: "Users batched and sent to SQS!" };   } catch (error) {       console.error(error);       return { statusCode: 500, body: "Error processing users." };   } }; Package the code into a zip file: zip -r function.zip . Python Implementation Init & Install dependencies (if needed) (Sample code): pip install boto3 -t . Create a file named index.js with the below code: import boto3 import json dynamodb = boto3.resource('dynamodb') table = dynamodb.Table('UsersTable') # Replace with your table name sqs = boto3.client('sqs') def lambda_handler(event, context):   try:       # Fetch data from DynamoDB       response = table.scan(           FilterExpression="emailEnabled = :enabled",           ExpressionAttributeValues={":enabled": True}       )       users = response['Items']       # Validate and batch data       batches = []       for i in range(0, len(users), 100):           batch = [user for user in users[i:i + 100] if 'email' in user]           if batch:               batches.append(batch)       # Send batches to SQS       for batch in batches:           sqs.send_message(               QueueUrl="https://sqs.ap-southeast-1.amazonaws.com/account-id/UserProcessedQueue", # Replace with your SQS URL               MessageBody=json.dumps(batch)           )       return {"statusCode": 200, "body": "Users batched and sent to SQS!"}   except Exception as e:       print(e)       return {"statusCode": 500, "body": "Error processing users."} Package the code into a zip file: zip -r function.zip . Go Implementation Init & Install dependencies (if needed) (Sample Code): go mod init setup-aws-lambda go get github.com/aws/aws-lambda-go/lambda go get github.com/aws/aws-sdk-go/aws go get github.com/aws/aws-sdk-go/aws/sessiongo get github.com/aws/aws-sdk-go/service/dynamodbgo get github.com/aws/aws-sdk-go/service/sqs Create a file named main.go with the code below: package main import ( "context" "encoding/json" "log" "github.com/aws/aws-lambda-go/lambda" "github.com/aws/aws-sdk-go/aws" "github.com/aws/aws-sdk-go/aws/session" "github.com/aws/aws-sdk-go/service/dynamodb" "github.com/aws/aws-sdk-go/service/dynamodb/dynamodbattribute" "github.com/aws/aws-sdk-go/service/sqs" ) type User struct { UserId string `json:"userId"` Email string `json:"email"` EmailEnabled bool `json:"emailEnabled"` } func handler(ctx context.Context) (string, error) { sess := session.Must(session.NewSession()) dynamo := dynamodb.New(sess) sqsSvc := sqs.New(sess) // Fetch users from DynamoDB params := &dynamodb.ScanInput{ TableName: aws.String("UsersTable"), // Replace with your DynamoDB table name FilterExpression: aws.String("emailEnabled = :enabled"), ExpressionAttributeValues: map[string]*dynamodb.AttributeValue{ ":enabled": {BOOL: aws.Bool(true)}, }, } var users []User err := dynamo.ScanPages(params, func(page *dynamodb.ScanOutput, lastPage bool) bool { for _, item := range page.Items { var user User err := dynamodbattribute.UnmarshalMap(item, &user) if err == nil && user.Email != "" { users = append(users, user) } } return !lastPage }) if err != nil { return "", err } // Batch users and send to SQS for i := 0; i < len(users); i += 100 { end := i + 100 if end > len(users) { end = len(users) } batch := users[i:end] message, _ := json.Marshal(batch) _, err := sqsSvc.SendMessage(&sqs.SendMessageInput{ QueueUrl: aws.String("https://sqs.ap-southeast-1.amazonaws.com/account-id/UserProcessedQueue"), // Replace with your SQS URL MessageBody: aws.String(string(message)), }) if err != nil { log.Println(err) } } return "Users batched and sent to SQS!", nil } func main() { lambda.Start(handler) } Build the code into binary: GOOS=linux GOARCH=amd64 go build -o bootstrap main.go Package the binary: zip function.zip bootstrap Deploy to AWS Lambda Function Navigate to the Lambda Service and click the “Create function” button: Choose “Author from scratch” and provide the following details:Function name: Enter a unique name for your function (e.g., FetchUsersNode, FetchUsersPython, or FetchUsersGo).Runtime: Select the runtime that matches your code:Node.js: Choose Node.js 18.x or a compatible version (“node –version”). Python: Choose Python 3.9 or a compatible version (“python3 –version”).Go: Choose Amazon Linux 2023, architecture x86_64, and handler bootstrap (if available).Execution role:Choose "Use an existing role", and select the IAM role you created (e.g., LambdaExecutionRole). Click Create function to submit: A redirect will be performed, scroll down to the Code Source section and choose upload from .zip file: Click “Upload” and choose the destination .zip file to upload, then “Save”. Now we’ll attach the EventBridge rule by scrolling to the “Function overview” section and clicking the “Add trigger” button. Select the “Trigger configuration” to EventBridge (CloudWatch Events). Choose “Create a new rule” and add the schedule setting to the rule as below and Add: Test Our First Lambda Function Navigate to the Test tab in the Lambda function console.Create a new test event: Event name: Enter a name for the test (e.g., TestEvent). Click "Test" to run the function. Check the Execution results and the Logs section to verify the output: Check if the SQS has any message pushed in.  At this point, we've successfully created our first Lambda functions on AWS. It's pretty simple. Just remember to delete any services after use to avoid incurring unnecessary costs! Conclusion In this episode, we practiced creating an AWS Lambda function that automatically triggers at midnight daily, fetches a list of users, and pushes the data to a queue. Through this example, we clearly understood how AWS Lambda operates and integrates with other AWS services like DynamoDB and SQS. However, this is just the beginning! There’s still so much more to explore about the world of AWS Lambda and serverless architecture. In the next episode, we’ll dive into “AWS Lambda Triggers and Events: How AWS Lambda Connects with the World”. Stay tuned for more exciting insights!

        10/01/2025

        34

        Bao Dang D. Q.

        Knowledge

        +0

          Create Your First AWS Lambda Function (Node.js, Python, and Go)

          10/01/2025

          34

          Bao Dang D. Q.

          Knowledge

          Software Development

          +0

            Mastering AWS Lambda: An Introduction to Serverless Computing

            Imagine this: you have a system that sends emails to users to notify them about certain events at specific times of the day or week. During peak hours, the system demands a lot of resources, but it barely uses any for the rest of the time. If you were to dedicate a server just for this task, managing resources efficiently and maintaining the system would be incredibly complex. This is where AWS Lambda comes in as a solution to these challenges. Its ability to automatically scale, eliminate server management, and, most importantly, charge you only for the resources you use simplifies everything. Hello everyone! I’m Đang Đo Quang Bao, a Software Engineer at SupremeTech. Today, I’m excited to introduce the series' first episode, “Mastering AWS Lambda: An Introduction to Serverless Computing.” In this episode, we’ll explore: The definition of AWS Lambda and how it works.The benefits of serverless computing.Real-world use cases. Let’s dive in! What is AWS Lambda? AWS Lambda is a serverless computing service that Amazon Web Services (AWS) provides. It executes your code in response to specific triggers and scales automatically, charging you only for the compute time you use. How Does AWS Lambda Work? AWS Lambda operates on an event-driven model, reacting to specific actions or events. In simple terms, it executes code in response to particular AWS lambda triggers. Let’s explore this model further to gain a more comprehensive understanding. The above is a simplified workflow1 for sending emails to many users simultaneously, designed to give you a general understanding of how AWS Lambda works. The workflow includes: Amazon EventBridge:Role: EventBridge acts as the starting point of the workflow. It triggers the first AWS Lambda function at a specific time each day based on a cron schedule.How It Works:Configured to run automatically at 00:00 UTC or any desired time.Ensures the workflow begins consistently without manual intervention.Amazon DynamoDB:Role: DynamoDB is the primary database for user information. It holds the email addresses and other relevant metadata for all registered users.How It Works:The first Lambda function queries DynamoDB to fetch the list of users who need to receive emails.AWS Lambda (1st Function):Role: This Lambda function prepares the user data for email sending by fetching it from DynamoDB, batching it, and sending it to Amazon SQS.How It Works:Triggered by EventBridge at the scheduled time.Retrieves user data from DynamoDB in a single query or multiple paginated queries.Split the data into smaller batches (e.g., 100 users per batch) for efficient processing.Pushes each batch as a separate message into Amazon SQS.Amazon SQS (Simple Queue Service).Role: SQS serves as a message queue, temporarily storing user batches and decoupling the data preparation process from email-sending.How It Works:Each message in SQS represents one batch of users (e.g., 100 users).Messages are stored reliably and are processed independently by the second Lambda function.AWS Lambda (2nd Function):Role: This Lambda function processes each user batch from SQS and sends emails to the users in that batch.How It Works:Triggered by SQS for every new message in the queue.Reads the batch data (e.g., 100 users) from the message.Sends individual emails to each user in the batch using Amazon SES.Amazon SES (Simple Email Service).Role: SES handles the actual email delivery, reliably ensuring messages reach users’ inboxes.How It Works:Receives the email content (recipient address, subject, body) from the second Lambda function.Delivers emails to the specified users.Provides feedback on delivery status, including successful deliveries, bounces, and complaints. As you can see, AWS Lambda is triggered by external events or actions (AWS EventBridge schedule) and only "lives" for the duration of its execution. >>> Maybe you are interested: The Rise of Serverless CMS SolutionsCreate Your First AWS Lambda Function (Node.js, Python, and Go) Benefits of AWS Lambda No Server Management:Eliminate the need to provision, configure, and maintain servers. AWS handles the underlying infrastructure, allowing developers to focus on writing code.Cost Efficiency:Pay only for the compute time used (measured in milliseconds). There are no charges when the function isn’t running.Scalability:AWS Lambda automatically scales horizontally to handle thousands of requests per second.Integration with AWS Services:Lambda integrates seamlessly with services like S3, DynamoDB, and SQS, enabling event-driven workflows.Improved Time-to-Market:Developers can deploy and iterate applications quickly without worrying about managing infrastructure. Real-World Use Cases for AWS Lambda AWS Lambda is versatile and can be applied in various scenarios. Here are some of the most common and impactful use cases: Real-Time File ProcessingExample: Automatically resizing images uploaded to an Amazon S3 bucket.How It Works:An upload to S3 triggered a Lambda function.The function processes the file (e.g., resizing or compressing an image).The processed file is stored back in S3 or another storage system.Why It’s Useful:Eliminates the need for a dedicated server to process files.Automatically scales based on the number of uploads.Building RESTful APIsExample: Creating a scalable backend for a web or mobile application.How It Works:Amazon API Gateway triggers AWS Lambda in response to HTTP requests.Lambda handles the request, performs necessary logic (e.g., CRUD operations), and returns a response.Why It’s Useful:Enables fully serverless APIs.Simplifies backend management and scaling.IoT ApplicationsExample: Processing data from IoT devices.How It Works:IoT devices publish data to AWS IoT Core, which triggers Lambda.Lambda processes the data (e.g., analyzing sensor readings) and stores results in DynamoDB or ElasticSearch.Why It’s Useful:Handles bursts of incoming data without requiring a dedicated server.Integrates seamlessly with other AWS IoT services.Real-Time Streaming and AnalyticsExample: Analyzing streaming data for fraud detection or stock market trends.How It Works:Events from Amazon Kinesis or Kafka trigger AWS Lambda.Lambda processes each data stream in real time and outputs results to an analytics service like ElasticSearch.Why It’s Useful:Allows real-time data insights without managing complex infrastructure.Scheduled TasksExample: Running daily tasks/reports or cleaning up expired data.How It Works:Amazon EventBridge triggers Lambda at scheduled intervals (e.g., midnight daily).Lambda performs tasks like querying a database, generating reports, or deleting old records.Why It’s Useful:Replaces traditional cron jobs with a scalable, serverless solution. Conclusion AWS Lambda is a powerful service that enables developers to build highly scalable, event-driven applications without managing infrastructure. Lambda simplifies workflows and accelerates time-to-market by automating tasks and seamlessly integrating with other AWS services like EventBridge, DynamoDB, SQS, and SEStime to market. We’ve explored the fundamentals of AWS Lambda, including its definition, how it works, its benefits, and its application in real-world use cases. It offers an optimized and cost-effective solution for many scenarios, making it a vital tool in modern development. At SupremeTech, we’re committed to harnessing innovative technologies to deliver impactful solutions. This is just the beginning of our journey with AWS Lambda. In upcoming episodes, we’ll explore hơ to optimize AWS Lambda functions in different programming languages and uncover best practices for building efficient serverless applications. Stay tuned, and let’s continue mastering AWS Lambda together! Note: 1.  This workflow is for reference purposes only and is not an optimized solution.

            25/12/2024

            132

            Bao Dang D. Q.

            Knowledge

            +1

            • Software Development

            Mastering AWS Lambda: An Introduction to Serverless Computing

            25/12/2024

            132

            Bao Dang D. Q.

            Automate your git flow with git hooks

            Knowledge

            +0

              Automate Your Git Workflow with Git Hooks for Efficiency

              Have you ever wondered how you can make your Git workflow smarter and more efficient? What if repetitive tasks like validating commit messages, enforcing branch naming conventions, or preventing sensitive data leaks could happen automatically? Enter Git Hooks—a powerful feature in Git that enables automation at every step of your development process. If you’ve worked with webhooks, the concept of Git Hooks might already feel familiar. Like API events trigger webhooks, Git Hooks are scripts triggered by Git actions such as committing, pushing, or merging. These hooks allow developers to automate tasks, enforce standards, and improve the overall quality of their Git workflows. By integrating Git Hooks into your project, you can gain numerous benefits, including clearer commit histories, fewer human errors, and smoother team collaboration. Developers can also define custom rules tailored to their Git flow, ensuring consistency and boosting productivity. In this SupremeTech blog, I, Đang Đo Quang Bao, will introduce you to Git Hooks, explain how they work, and guide you through implementing them to transform your Git workflow. Let’s dive in! What Are Git Hooks? Git Hooks are customizable scripts that automatically execute when specific events occur in a Git repository. These events might include committing code, pushing changes, or merging branches. By leveraging Git Hooks, you can tailor Git's behavior to your project's requirements, automate repetitive tasks, and reduce the likelihood of human errors. Imagine validating commit messages, running tests before a push, or preventing large file uploads—all without manual intervention. Git Hooks makes this possible, enabling developers to integrate useful automation directly into their workflows. Type of Git Hooks Git Hooks come in two main categories, each serving distinct purposes: Client-Side Hooks These hooks run on the user’s local machine and are triggered by actions like committing or pushing changes. They are perfect for automating tasks like linting, testing, or enforcing commit message standards. Examples:pre-commit: Runs before a commit is finalized.pre-push: Executes before pushing changes to a remote repository.post-merge: Triggers after merging branches. Server-Side Hooks These hooks operate on the server hosting the repository and are used to enforce project-wide policies. They are ideal for ensuring consistent workflows across teams by validating changes before they’re accepted into the central repository. Examples: pre-receive: Runs before changes are accepted by the remote repository.update: Executes when a branch or tag is updated on the server. My Journey to Git Hooks When I was working on personal projects, Git management was fairly straightforward. There were no complex workflows, and mistakes were easy to spot and fix. However, everything changed when I joined SupremeTech and started collaborating on larger projects. Adhering to established Git flows across a team introduced new challenges. Minor missteps—like inconsistent commit messages, improper branch naming, accidental force pushes, or forgetting to run unit tests—quickly led to inefficiencies and avoidable errors. That’s when I discovered the power of Git Hooks. By combining client-side Git Hooks with tools like Husky, ESLint, Jest, and commitlint, I could automate and streamline our Git processes. Some of the tasks I automated include: Enforcing consistent commit message formats.Validating branch naming conventions.Automating testing and linting.Preventing accidental force pushes and large file uploads.Monitoring and blocking sensitive data in commits. This level of automation was a game-changer. It improved productivity, reduced human errors, and allowed developers to focus on their core tasks while Git Hooks quietly enforced the rules in the background. It transformed Git from a version control tool into a seamless system for maintaining best practices. Getting Started with Git Hooks Setting up Git Hooks manually can be dull, especially in team environments where consistency is critical. Tools like Husky simplify the process, allowing you to manage Git Hooks and integrate them into your workflows easily. By leveraging Husky, you can unlock the full potential of Git Hooks with minimal setup effort. I’ll use Bun as the JavaScript runtime and package manager in this example. If you’re using npm or yarn, replace Bun-specific commands with their equivalents. Setup Steps 1. Initialize Git: Start by initializing a Git repository if one doesn’t already exist git init 2. Install Husky: Use Bun to add Husky as a development dependency bun add -D husky 3. Enable Husky Hooks: Initialize Husky to set up Git Hooks for your project bunx husky init 4. Verify the Setup: At this point, a folder named .husky will be created, which already includes a sample of pre-commit hook. With this, the setup for Git Hooks is complete. Now, let’s customize it to optimize some simple processes. Examples of Git Hook Automation Git Hooks empowers you to automate tedious yet essential tasks and enforce team-wide best practices. Below are four practical examples of how you can leverage Git Hooks to improve your workflow: Commit Message Validation Ensuring consistent and clear commit messages improves collaboration and makes Git history easier to understand. For example, enforce the following format: pbi-203 - refactor - [description…] [task-name] - [scope] - [changes] Setup: Install Commitlint: bun add -D husky @commitlint/{config-conventional,cli} Configure rules in commitlint.config.cjs: module.exports = {     rules: {         'task-name-format': [2, 'always', /^pbi-\d+ -/],         'scope-type-format': [2, 'always', /-\s(refactor|fix|feat|docs|test|chore|style)\s-\s[[^\]]+\]$/]     },     plugins: [         {             rules: {                 'task-name-format': ({ raw }) => {                     const regex = /^pbi-\d+ -/;                     return [regex.test(raw),                         `❌ Commit message must start with "pbi-<number> -". Example: "pbi-1234 - refactor - [optimize function]"`                     ];                 },                 'scope-type-format': ({ raw}) => {                     const regex = /-\s(refactor|fix|feat|docs|test|chore|style)\s-\s[[^\]]+\]$/;                     return [regex.test(raw),                         `❌ Commit message must include a valid scope and description. Example: "pbi-1234 - refactor - [optimize function]".                         \nValid scopes: refactor, fix, feat, docs, test, chore, style`                     ];                 }             }         }     ] } Add Commitlint to the commit-msg hook: echo "bunx commitlint --edit \$1" >> .husky/commit-msg With this, we have completed the commit message validation setup. Now, let’s test it to see how it works. Now, developers will be forced to follow this committing rule, which increases the readability of the Git History. Automate Branch Naming Conventions Enforce branch names like feature/pbi-199/add-validation. First, we will create a script in the project directory named scripts/check-branch-name.sh. #!/bin/bash # Define allowed branch naming pattern branch_pattern="^(feature|bugfix|hotfix|release)/pbi-[0-9]+/[a-zA-Z0-9._-]+$" # Get the current branch name current_branch=$(git symbolic-ref --short HEAD) # Check if the branch name matches the pattern if [[ ! "$current_branch" =~ $branch_pattern ]]; then   echo "❌ Branch name '$current_branch' is invalid!"   echo "✅ Branch names must follow this pattern:"   echo "   - feature/pbi-<number>/<description>"   echo "   - bugfix/pbi-<number>/<description>"   echo "   - hotfix/pbi-<number>/<description>"   echo "   - release/pbi-<number>/<description>"   exit 1 fi echo "✅ Branch name '$current_branch' is valid." Add the above script execution command into the pre-push hook. echo "bash ./scripts/check-branch-name.sh" >> .husky/pre-push Grant execute permissions to the check-branch-name.sh file. chmod +x ./scripts/check-branch-name.sh Let’s test the result by pushing our code to the server. Invalid case: git checkout main git push Output: ❌ Branch name 'main' is invalid! ✅ Branch names must follow this pattern:   - feature/pbi-<number>/<description>   - bugfix/pbi-<number>/<description>   - hotfix/pbi-<number>/<description>   - release/pbi-<number>/<description> husky - pre-push script failed (code 1) Valid case: git checkout -b feature/pbi-100/add-new-feature git push Output: ✅ Branch name 'feature/pbi-100/add-new-feature' is valid. Prevent Accidental Force Pushes Force pushes can overwrite shared branch history, causing significant problems in collaborative projects. We will implement validation for the prior pre-push hook to prevent accidental force pushes to critical branches like main or develop. Create a script named scripts/prevent-force-push.sh. #!/bin/bash # Define the protected branches protected_branches=("main" "develop") # Get the current branch name current_branch=$(git symbolic-ref --short HEAD) # Check if the current branch is in the list of protected branches if [[ " ${protected_branches[@]} " =~ " ${current_branch} " ]]; then # Check if the push is a force push for arg in "$@"; do   if [[ "$arg" == "--force" || "$arg" == "-f" ]]; then     echo "❌ Force pushing to the protected branch '${current_branch}' is not allowed!"     exit 1   fi done fi echo "✅ Push to '${current_branch}' is valid." Add the above script execution command into the pre-push hook. echo "bash ./scripts/prevent-force-push.sh" >> .husky/pre-push Grant execute permissions to the check-branch-name.sh file. chmod +x ./scripts/prevent-force-push.sh Result: Invalid case: git checkout main git push -f Output: ❌ Force pushing to the protected branch 'main' is not allowed! husky - pre-push script failed (code 1) Valid case: git checkout main git push Output: ✅ Push is valid. Monitor for Secrets in Commits Developers sometimes unexpectedly include sensitive data in commits. We will set up a pre-commit hook to scan files for sensitive patterns before committing to prevent accidental commits containing sensitive information (such as API keys, passwords, or other secrets). Create a script named scripts/monitor-secrets-with-values.sh. #!/bin/bash # Define sensitive value patterns patterns=( # Base64-encoded strings "([A-Za-z0-9+/]{40,})={0,2}" # PEM-style private keys "-----BEGIN RSA PRIVATE KEY-----" "-----BEGIN OPENSSH PRIVATE KEY-----" "-----BEGIN PRIVATE KEY-----" # AWS Access Key ID "AKIA[0-9A-Z]{16}" # AWS Secret Key "[a-zA-Z0-9/+=]{40}" # Email addresses (optional) "[a-zA-Z0-9._%+-]+@[a-zA-Z0-9.-]+\.[a-zA-Z]{2,}" # Others (e.g., passwords, tokens) ) # Scan staged files for sensitive patterns echo "🔍 Scanning staged files for sensitive values..." # Get the list of staged files staged_files=$(git diff --cached --name-only) # Initialize a flag to track if any sensitive data is found found_sensitive_data=false # Loop through each file and pattern for file in $staged_files; do # Skip binary files if [[ $(file --mime-type -b "$file") == "application/octet-stream" ]]; then   continue fi # Scan each pattern using grep -E (extended regex) for pattern in "${patterns[@]}"; do   if grep -E -- "$pattern" "$file"; then     echo "❌ Sensitive value detected in file '$file': Pattern '$pattern'"     found_sensitive_data=true     break   fi done done # If sensitive data is found, prevent the commit if $found_sensitive_data; then echo "❌ Commit aborted. Please remove sensitive values before committing." exit 1 fi echo "✅ No sensitive values detected. Proceeding with committing." Add the above script execution command into the pre-commit hook. echo "bash ./scripts/monitor-secrets-with-values.sh" >> .husky/pre-commit Grant execute permissions to the monitor-secrets-with-values.sh file. chmod +x ./scripts/monitor-secrets-with-values.sh Result: Invalid case: git add private git commit -m “pbi-002 - chore - add unexpected private file” Result: 🔍 Scanning staged files for sensitive values... -----BEGIN OPENSSH PRIVATE KEY----- ❌ Sensitive value detected in file 'private': Pattern '-----BEGIN OPENSSH PRIVATE KEY-----' ❌ Commit aborted. Please remove sensitive values before committing. husky - pre-commit script failed (code 1) Valid case: git reset private git commit -m “pbi-002 - chore - remove unexpected private file” Result: 🔍 Scanning staged files for sensitive values... ✅ No sensitive values detected. Proceeding with commit. [main c575028] pbi-002 - chore - remove unexpected private file 4 files changed, 5 insertions(+) create mode 100644 .env.example create mode 100644 .husky/commit-msg create mode 100644 .husky/pre-commit create mode 100644 .husky/pre-push Conclusion "Humans make mistakes" in software development; even minor errors can disrupt workflows or create inefficiencies. That’s where Git Hooks come in. By automating essential checks and enforcing best practices, Git Hooks reduces the chances of errors slipping through and ensures a smoother, more consistent workflow. Tools like Husky make it easier to set up Git Hooks, allowing developers to focus on writing code instead of worrying about process compliance. Whether it’s validating commit messages, enforcing branch naming conventions, or preventing sensitive data from being committed, Git Hooks acts as a safety net that ensures quality at every step. If you want to optimize your Git workflow, now is the time to start integrating Git Hooks. With the proper setup, you can make your development process reliable but also effortless and efficient. Let automation handle the rules so your team can focus on building great software.

              24/12/2024

              148

              Bao Dang D. Q.

              Knowledge

              +0

                Automate Your Git Workflow with Git Hooks for Efficiency

                24/12/2024

                148

                Bao Dang D. Q.

                Customize software background

                Want to customize a software for your business?

                Meet with us! Schedule a meeting with us!