Header image

Automate Your Git Workflow with Git Hooks for Efficiency

24/12/2024

430

Bao Dang D. Q.

Have you ever wondered how you can make your Git workflow smarter and more efficient? What if repetitive tasks like validating commit messages, enforcing branch naming conventions, or preventing sensitive data leaks could happen automatically? Enter Git Hooks—a powerful feature in Git that enables automation at every step of your development process.

If you’ve worked with webhooks, the concept of Git Hooks might already feel familiar. Like API events trigger webhooks, Git Hooks are scripts triggered by Git actions such as committing, pushing, or merging. These hooks allow developers to automate tasks, enforce standards, and improve the overall quality of their Git workflows.

By integrating Git Hooks into your project, you can gain numerous benefits, including clearer commit histories, fewer human errors, and smoother team collaboration. Developers can also define custom rules tailored to their Git flow, ensuring consistency and boosting productivity.

In this SupremeTech blog, I, Đang Đo Quang Bao, will introduce you to Git Hooks, explain how they work, and guide you through implementing them to transform your Git workflow. Let’s dive in!

What Are Git Hooks?

Git Hooks are customizable scripts that automatically execute when specific events occur in a Git repository. These events might include committing code, pushing changes, or merging branches. By leveraging Git Hooks, you can tailor Git’s behavior to your project’s requirements, automate repetitive tasks, and reduce the likelihood of human errors.

Imagine validating commit messages, running tests before a push, or preventing large file uploads—all without manual intervention. Git Hooks makes this possible, enabling developers to integrate useful automation directly into their workflows.
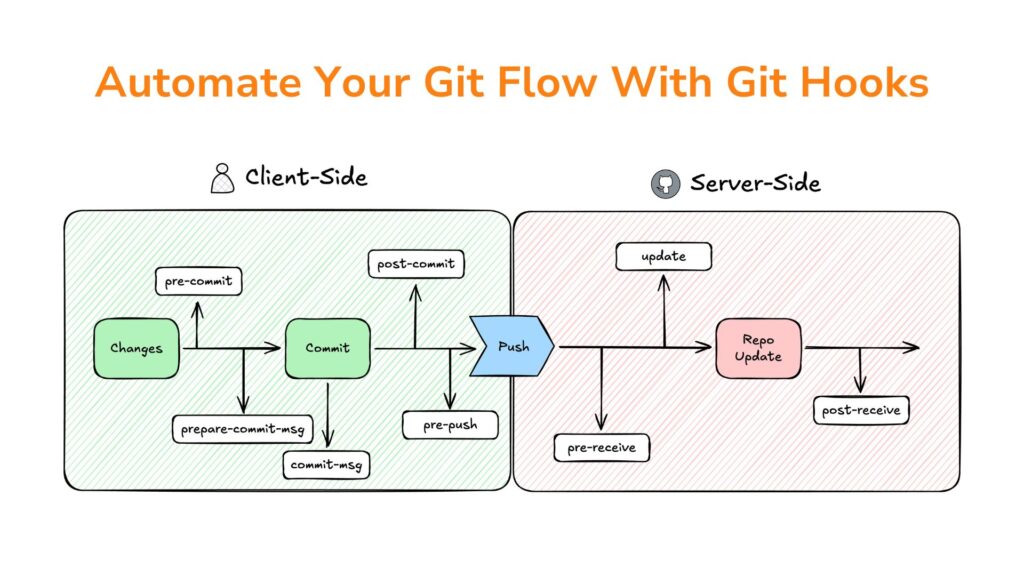
Type of Git Hooks

Git Hooks come in two main categories, each serving distinct purposes:

Client-Side Hooks

These hooks run on the user’s local machine and are triggered by actions like committing or pushing changes. They are perfect for automating tasks like linting, testing, or enforcing commit message standards.

  • Examples:
    • pre-commit: Runs before a commit is finalized.
    • pre-push: Executes before pushing changes to a remote repository.
    • post-merge: Triggers after merging branches.

Server-Side Hooks

These hooks operate on the server hosting the repository and are used to enforce project-wide policies. They are ideal for ensuring consistent workflows across teams by validating changes before they’re accepted into the central repository.

  • Examples:
  • pre-receive: Runs before changes are accepted by the remote repository.
  • update: Executes when a branch or tag is updated on the server.

My Journey to Git Hooks

When I was working on personal projects, Git management was fairly straightforward. There were no complex workflows, and mistakes were easy to spot and fix. However, everything changed when I joined SupremeTech and started collaborating on larger projects. Adhering to established Git flows across a team introduced new challenges. Minor missteps—like inconsistent commit messages, improper branch naming, accidental force pushes, or forgetting to run unit tests—quickly led to inefficiencies and avoidable errors.

That’s when I discovered the power of Git Hooks. By combining client-side Git Hooks with tools like Husky, ESLint, Jest, and commitlint, I could automate and streamline our Git processes. Some of the tasks I automated include:

  • Enforcing consistent commit message formats.
  • Validating branch naming conventions.
  • Automating testing and linting.
  • Preventing accidental force pushes and large file uploads.
  • Monitoring and blocking sensitive data in commits.

This level of automation was a game-changer. It improved productivity, reduced human errors, and allowed developers to focus on their core tasks while Git Hooks quietly enforced the rules in the background. It transformed Git from a version control tool into a seamless system for maintaining best practices.

Getting Started with Git Hooks

Setting up Git Hooks manually can be dull, especially in team environments where consistency is critical. Tools like Husky simplify the process, allowing you to manage Git Hooks and integrate them into your workflows easily. By leveraging Husky, you can unlock the full potential of Git Hooks with minimal setup effort.

I’ll use Bun as the JavaScript runtime and package manager in this example. If you’re using npm or yarn, replace Bun-specific commands with their equivalents.

Setup Steps

1. Initialize Git: Start by initializing a Git repository if one doesn’t already exist

git init

2. Install Husky: Use Bun to add Husky as a development dependency

bun add -D husky

3. Enable Husky Hooks: Initialize Husky to set up Git Hooks for your project

bunx husky init

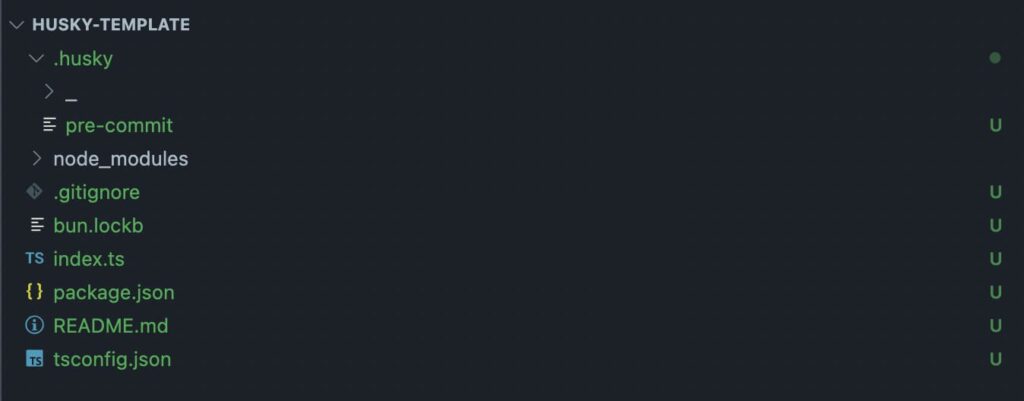
4. Verify the Setup: At this point, a folder named .husky will be created, which already includes a sample of pre-commit hook. With this, the setup for Git Hooks is complete. Now, let’s customize it to optimize some simple processes.

verify the setup of husky git hooks

Examples of Git Hook Automation

Git Hooks empowers you to automate tedious yet essential tasks and enforce team-wide best practices. Below are four practical examples of how you can leverage Git Hooks to improve your workflow:

Commit Message Validation

Ensuring consistent and clear commit messages improves collaboration and makes Git history easier to understand. For example, enforce the following format:

pbi-203 – refactor – [description…]
[task-name] – [scope] – [changes]

Setup:

  1. Install Commitlint:
bun add -D husky @commitlint/{config-conventional,cli}
  1. Configure rules in commitlint.config.cjs:
module.exports = {
    rules: {
        'task-name-format': [2, 'always', /^pbi-\d+ -/],
        'scope-type-format': [2, 'always', /-\s(refactor|fix|feat|docs|test|chore|style)\s-\s[[^\]]+\]$/]
    },
    plugins: [
        {
            rules: {
                'task-name-format': ({ raw }) => {
                    const regex = /^pbi-\d+ -/;
                    return [regex.test(raw),
                        `❌ Commit message must start with "pbi-<number> -". Example: "pbi-1234 - refactor - [optimize function]"`
                    ];
                },
                'scope-type-format': ({ raw}) => {
                    const regex = /-\s(refactor|fix|feat|docs|test|chore|style)\s-\s[[^\]]+\]$/;
                    return [regex.test(raw),
                        `❌ Commit message must include a valid scope and description. Example: "pbi-1234 - refactor - [optimize function]".
                        \nValid scopes: refactor, fix, feat, docs, test, chore, style`
                    ];
                }
            }
        }
    ]
}
  1. Add Commitlint to the commit-msg hook:
echo "bunx commitlint --edit \$1" >> .husky/commit-msg
  1. With this, we have completed the commit message validation setup. Now, let’s test it to see how it works.
husky template git hooks

Now, developers will be forced to follow this committing rule, which increases the readability of the Git History.

Automate Branch Naming Conventions

Enforce branch names like feature/pbi-199/add-validation.

  1. First, we will create a script in the project directory named scripts/check-branch-name.sh.
#!/bin/bash

# Define allowed branch naming pattern
branch_pattern="^(feature|bugfix|hotfix|release)/pbi-[0-9]+/[a-zA-Z0-9._-]+$"

# Get the current branch name
current_branch=$(git symbolic-ref --short HEAD)

# Check if the branch name matches the pattern
if [[ ! "$current_branch" =~ $branch_pattern ]]; then
  echo "❌ Branch name '$current_branch' is invalid!"
  echo "✅ Branch names must follow this pattern:"
  echo "   - feature/pbi-<number>/<description>"
  echo "   - bugfix/pbi-<number>/<description>"
  echo "   - hotfix/pbi-<number>/<description>"
  echo "   - release/pbi-<number>/<description>"
  exit 1
fi

echo "✅ Branch name '$current_branch' is valid."
  1. Add the above script execution command into the pre-push hook.
echo "bash ./scripts/check-branch-name.sh" >> .husky/pre-push
  1. Grant execute permissions to the check-branch-name.sh file.
chmod +x ./scripts/check-branch-name.sh
  1. Let’s test the result by pushing our code to the server.

Invalid case:

git checkout main
git push

Output:

❌ Branch name 'main' is invalid!
✅ Branch names must follow this pattern:
  - feature/pbi-<number>/<description>
  - bugfix/pbi-<number>/<description>
  - hotfix/pbi-<number>/<description>
  - release/pbi-<number>/<description>
husky - pre-push script failed (code 1)

Valid case:

git checkout -b feature/pbi-100/add-new-feature
git push

Output:

✅ Branch name 'feature/pbi-100/add-new-feature' is valid.

Prevent Accidental Force Pushes

Force pushes can overwrite shared branch history, causing significant problems in collaborative projects. We will implement validation for the prior pre-push hook to prevent accidental force pushes to critical branches like main or develop.

  1. Create a script named scripts/prevent-force-push.sh.
#!/bin/bash

# Define the protected branches
protected_branches=("main" "develop")

# Get the current branch name
current_branch=$(git symbolic-ref --short HEAD)

# Check if the current branch is in the list of protected branches
if [[ " ${protected_branches[@]} " =~ " ${current_branch} " ]]; then
# Check if the push is a force push
for arg in "$@"; do
  if [[ "$arg" == "--force" || "$arg" == "-f" ]]; then
    echo "❌ Force pushing to the protected branch '${current_branch}' is not allowed!"
    exit 1
  fi
done
fi

echo "✅ Push to '${current_branch}' is valid."
  1. Add the above script execution command into the pre-push hook.
echo "bash ./scripts/prevent-force-push.sh" >> .husky/pre-push
  1. Grant execute permissions to the check-branch-name.sh file.
chmod +x ./scripts/prevent-force-push.sh
  1. Result:

Invalid case:

git checkout main
git push -f

Output:

❌ Force pushing to the protected branch 'main' is not allowed!
husky - pre-push script failed (code 1)

Valid case:

git checkout main
git push

Output:

✅ Push is valid.

Monitor for Secrets in Commits

Developers sometimes unexpectedly include sensitive data in commits. We will set up a pre-commit hook to scan files for sensitive patterns before committing to prevent accidental commits containing sensitive information (such as API keys, passwords, or other secrets).

  1. Create a script named scripts/monitor-secrets-with-values.sh.
#!/bin/bash

# Define sensitive value patterns
patterns=(
# Base64-encoded strings
"([A-Za-z0-9+/]{40,})={0,2}"
# PEM-style private keys
"-----BEGIN RSA PRIVATE KEY-----"
"-----BEGIN OPENSSH PRIVATE KEY-----"
"-----BEGIN PRIVATE KEY-----"
# AWS Access Key ID
"AKIA[0-9A-Z]{16}"
# AWS Secret Key
"[a-zA-Z0-9/+=]{40}"
# Email addresses (optional)
"[a-zA-Z0-9._%+-]+@[a-zA-Z0-9.-]+\.[a-zA-Z]{2,}"
# Others (e.g., passwords, tokens)
)

# Scan staged files for sensitive patterns
echo "🔍 Scanning staged files for sensitive values..."

# Get the list of staged files
staged_files=$(git diff --cached --name-only)

# Initialize a flag to track if any sensitive data is found
found_sensitive_data=false

# Loop through each file and pattern
for file in $staged_files; do
# Skip binary files
if [[ $(file --mime-type -b "$file") == "application/octet-stream" ]]; then
  continue
fi

# Scan each pattern using grep -E (extended regex)
for pattern in "${patterns[@]}"; do
  if grep -E -- "$pattern" "$file"; then
    echo "❌ Sensitive value detected in file '$file': Pattern '$pattern'"
    found_sensitive_data=true
    break
  fi
done
done

# If sensitive data is found, prevent the commit
if $found_sensitive_data; then
echo "❌ Commit aborted. Please remove sensitive values before committing."
exit 1
fi

echo "✅ No sensitive values detected. Proceeding with committing."
  1. Add the above script execution command into the pre-commit hook.
echo "bash ./scripts/monitor-secrets-with-values.sh" >> .husky/pre-commit
  1. Grant execute permissions to the monitor-secrets-with-values.sh file.
chmod +x ./scripts/monitor-secrets-with-values.sh
  1. Result:

Invalid case:

git add private
git commit -m “pbi-002 - chore - add unexpected private file”

Result:

🔍 Scanning staged files for sensitive values...
-----BEGIN OPENSSH PRIVATE KEY-----
❌ Sensitive value detected in file 'private': Pattern '-----BEGIN OPENSSH PRIVATE KEY-----'
❌ Commit aborted. Please remove sensitive values before committing.
husky - pre-commit script failed (code 1)

Valid case:

git reset private
git commit -m “pbi-002 - chore - remove unexpected private file”

Result:

🔍 Scanning staged files for sensitive values...
✅ No sensitive values detected. Proceeding with commit.
[main c575028] pbi-002 - chore - remove unexpected private file
4 files changed, 5 insertions(+)
create mode 100644 .env.example
create mode 100644 .husky/commit-msg
create mode 100644 .husky/pre-commit
create mode 100644 .husky/pre-push

Conclusion

“Humans make mistakes” in software development; even minor errors can disrupt workflows or create inefficiencies. That’s where Git Hooks come in. By automating essential checks and enforcing best practices, Git Hooks reduces the chances of errors slipping through and ensures a smoother, more consistent workflow.

Tools like Husky make it easier to set up Git Hooks, allowing developers to focus on writing code instead of worrying about process compliance. Whether it’s validating commit messages, enforcing branch naming conventions, or preventing sensitive data from being committed, Git Hooks acts as a safety net that ensures quality at every step.

If you want to optimize your Git workflow, now is the time to start integrating Git Hooks. With the proper setup, you can make your development process reliable but also effortless and efficient. Let automation handle the rules so your team can focus on building great software.

Related Blog

Our culture

+0

    From Seeking The Path to Leading The Way: Phuoc’s Journey at SupremeTech

    Are you curious how someone with no IT background made a bold leap into tech and ended up leading a team? Starting with no formal IT background, Phuoc took a leap of faith into the world of Infrastructure at SupremeTech. What began as a fresh start during the pandemic has become an inspiring tech career journey from entry-level newcomer to the leader of our Infrastructure team. In this inspiring interview, Phuoc shares the lessons learned, the power of making mistakes, and how embracing challenges helped shape his career in tech. First Impressions That Last Hi Phuoc! What was your first impression when you joined SupremeTech?I still remember my first day at SupremeTech. What impressed me most… was the smell of a brand-new office! (laughs)It might sound funny, but that paint smell felt comforting. It reminded me of my first job after graduation, working at a new construction site—filled with excitement, hope, and anticipation. Whenever I catch that same scent, it brings back the feeling of a fresh start. From Tourism to Tech: A Career Switch Sparked by Fate We heard you used to work in the tourism industry. What made you switch to IT?Yes, I worked as an admin in the tourism sector. Shifting careers felt like fate. Honestly, it might sound silly, but I chose SupremeTech mainly because they offered a MacBook! (laughs).At the time, I was looking to change my career to IT Infrastructure and had passed interviews at two companies. But when I discovered SupremeTech would provide a MacBook, I was so excited I couldn’t say no.Back then, I felt like a blank sheet of paper. Starting in a completely new field was a huge challenge. But thanks to the support from my teammates, I slowly adapted and began to grow. Starting During COVID: Remote Work and Early Struggles Changing industries isn’t easy. What was the toughest challenge for you?I joined SupremeTech during the COVID pandemic, so the biggest challenge was starting remotely. I didn’t know anyone, and everything was done over Google Meet. Building connections, understanding the work, or communicating effectively was hard. When we finally returned to the office, I was so happy to meet my teammates, mentors, and colleagues in person. That’s when my real learning journey began.One of the most memorable challenges? Making mistakes. I’ve never been afraid of being wrong—in fact, I enjoy it. I made many mistakes initially, but each one taught me something. Most of them happened because I didn’t think far enough ahead. Over time, I learned to be more thoughtful and less overconfident. Lessons from Mistakes: Learning the Hard Way How did you manage to get through those mistakes?Mistakes are valuable lessons. Now, I even create small “traps” in internship assignments based on the mistakes I once made. It helps them encounter real problems and learn through hands-on experience. You remember things better when you figure them out yourself, rather than just reading about them. After every project, our team writes a retrospective report noting what could have been done better. One mistake equals one lifelong lesson. Facing Challenges with a Grateful Mindset You talk a lot about challenges—what does that word mean to you?To me, challenges are a kind of “fate”. They don’t just happen by chance. You have to find a way to overcome them when they show up.They might feel overwhelming at the moment, but when I look back, I feel grateful—even thankful for the people who gave me those challenges. Every company has its problems. What matters is how you deal with them and what you learn along the way. From Fresher to Team Leader: A Role Earned Through Action You’re a team leader now. How did that role come to you?Honestly, I didn’t expect to become a leader so soon. But I’ve never been the type to wait around for task assignment. At the associate level, I tried to help interns and share my experience. I focused on building strong communication and genuine connections.As a mentor, I always try to lead by example. So when I was promoted, I already felt ready. When you sincerely help others, good things naturally come your way. A Culture of Calm and Growth What’s something special about the work environment at SupremeTech?SupremeTech has a very peaceful work environment. There’s no office politics or unnecessary drama. It’s a safe and supportive place where people can grow. But that doesn’t mean the work is easy. During projects, it can feel like going into battle. Everyone has to stay sharp and take ownership to solve problems. It’s an outstanding balance—our culture is kind, but our work ethic is fierce. That reflects SupremeTech's core values: be kind in life and embrace Passion and Challenge at work. Words of Advice for Young IT Professionals What would you say to young people just starting their careers in IT?Make mistakes while you still can. Don’t be afraid to be wrong. You’ll learn more from your errors than from any books.Don’t be afraid to try. Don’t avoid difficult things, especially if you want to grow beyond your comfort zone. Looking Back: Any Regrets? Looking back at your tech career journey, do you have any regrets?Not at all. Every step I’ve taken has been worth it. Skills are essential, but the environment shapes who you become. I love investigating new problems and finding solutions. My curiosity has given me more experiences than most people at my level haven’t had, which helps me grow every day. Final thought Thank you, Phuoc, for sharing your honest and inspiring story. We wish you continued passion, positivity, and success on your tech career journey with SupremeTech!

    11/04/2025

    67

    Our culture

    +0

      From Seeking The Path to Leading The Way: Phuoc’s Journey at SupremeTech

      11/04/2025

      67

      Our success stories

      +0

        How to Upgrade Aurora MySQL Databases: Lessons Learned from SupremeTech

        Upgrading a critical database like Aurora MySQL can feel daunting. We want better performance and a smooth system, but downtime and data risks can loom large. At SupremeTech, we’ve tackled this challenge head-on and shared our proven approach.  This insight comes from Mr. Phuoc Pham, our Infrastructure Manager, who presented at the morning session of "Harnessing AI on AWS: Transforming Software Builders for the Future" event by AWS and MegazoneCloud. The event focused on giving software companies tools, strategies, and real-world solutions to innovate, boost performance, and grow globally with AI. In his talk, Mr. Phuoc revealed our 6-step process that minimizes risks, protects data, and increases efficiency. Here’s how we did it, key lessons learned, and how you can ensure a smooth and risk-free database upgrade. Mr. Phuoc Pham, our Infrastructure Manager, presented the lesson learned from Aurora MySQL upgrades SupremeTech’s contribution to the AWS and Megazone event SupremeTech partners with AWS and MegazoneCloud to share our expertise in tackling technical challenges. In the morning session, Mr. Phuoc Pham delivered a presentation on lessons learned from Aurora MySQL upgrades, offering practical tips for software companies to optimize their infrastructure. In the afternoon, our chairman, Mr. Truong Dinh Hoang, joined a panel discussion on future trends for ISVs, highlighting strategies for growth and innovation. These contributions underscored SupremeTech’s commitment to helping businesses enhance performance and scale smarter. In the afternoon panel discussion, Mr. Truong Dinh Hoang shared about the market expansion and future trends for ISVs. The Challenges of Upgrading Aurora MySQL Mr. Phuoc kicked off by sharing real-world challenges we faced with a client’s Aurora MySQL upgrades: Minimal downtime: We had to finish in under 2 hours, including rollback time if needed.System stability: Our database powers multiple services, so it had to stay reliable post-upgrade.Fast rollback: We needed a quick way to revert without losing data if something went wrong.User impact: Our process had to keep disruptions low and customer trust high. These hurdles might sound familiar if you’ve upgraded a system. The key to achieving this is a structured and well-tested upgrade process. Mr. Phuoc Pham presented the challenges of upgrades for our client’s system. The 6-Step Database Upgrade Process At SupremeTech, we follow a 6-step upgrade process to ensure a smooth transition. Step 1: Collect and Analyze Data Before the Upgrade Preparation is everything. Before making any changes, assessing your current database setup is essential. This helps identify potential risks and prepare for a smooth transition. Mr. Phuoc emphasized checking: Database Schema & Objects – Make sure there are no conflicts with the new version.Connected Applications – Identify all services using the database.Custom Database Settings – Compare parameter changes between versions.Performance Metrics – Monitor CPU, memory, query latency, and transaction speed. We gather this information using tools like database logs, security groups, and queries like SHOW FULL PROCESSLIST. This step prepares us for a smooth upgrade. Mr. Phuoc shared one of our 6-step upgrade processes. Step 2: Choose the Right Upgrade Method with C.I.D.D.E.R Framework Not all upgrade methods are the same. Depending on your system’s needs, you may choose one of the following: Snapshot Restore – Reliable but requires full backup and longer downtime.Clone Cluster – Fast rollback but requires additional storage.In-Place Upgrade – Minimal downtime but higher risk.Blue/Green Deployment – Safest rollback option but costly. At SupremeTech, we use the C.I.D.D.E.R framework to decide the best method based on: Complexity: How hard is the upgrade?Infrastructure Cost: What’s the budget hit?Downtime: How long will it take?Dependencies: What else relies on our database?Expertise: Do we have the skills?Rollback Strategy: How easy is it to undo? Choosing the right upgrade method can reduce risk and save time. For this case—a 10GB database, multiple services, and a team still building experience—we chose an in-place upgrade with a clone cluster backup for quick rollback by renaming the database cluster. It kept the endpoint intact and downtime under 2 hours. Step 3: Test with a Dry Run “There’s no place like production,” Mr. Phuoc quipped, stressing the need for practice.  A dry-run is a test upgrade performed in a staging environment to catch problems before they affect real users. We run dry runs on a cloned database and DEV/STG environments to: Detects issues before they impact production.Reduces unexpected downtime.Helps estimate the actual upgrade time. This extra step can save hours of troubleshooting later. Step 4: Fine-Tuning Based on Dry-Run Results After testing, we adjust the process: Adjust database settings.Fix errors from the dry run.Shorten execution time for less downtime.Refine rollback procedures.Update guides for our team. A few small tweaks before the upgrade can prevent major issues after it. Step 5: Deployment – The Actual Upgrade With everything tested and fine-tuned, it's time to execute the upgrade in production. How we ensure success: Perform the upgrade during low-traffic hours.Keep the rollback plan ready.Monitor logs in real time for any errors. Having a clear step-by-step deployment plan prevents last-minute surprises. Step 6: Monitor After the Upgrade Post-upgrade, we track key metrics like: Resources: CPU, memory, disk usage.Performance: Query response time, QPS, TPS.Errors: Any glitches or slow queries.Data Integrity: No data loss or corruption. Continuous monitoring after the upgrade helps us spot issues quickly, reducing troubleshooting time and minimizing the impact on our customers. We monitor key performance metrics for both the new and old databases to compare. We also watch the four golden signals—latency, traffic, errors, and saturation—to get a full picture of system health. At SupremeTech, we use AI-powered tools like Amazon Q to analyze database logs and detect anomalies faster than manual monitoring. Why post-upgrade monitoring matters: Quickly identifies hidden performance issues.Ensures the upgrade was 100% successful.Helps optimize for better database efficiency. Boosted performance and customer trust are critical criteria when we implement upgrades. Results & Lessons Learned Our Results By following this 6-step process, SupremeTech successfully upgraded Aurora MySQL with: Done in under 2 hours of downtime.Lowered infra costs with smarter planning.Boosted performance and customer trust. Key Takeaways Mr. Phuoc wrapped up with these gems: Prep is everything: Gathering and analyzing info before the upgrade is critical to spot risks early.Plan for data checks: We ensure data integrity with a solid verification plan.Pick the right approach: We choose deployment and rollback methods that fit our clients’ operations.Keep monitoring: Continuous tracking helps us stay ahead of issues.Automate with AI: Using AI and tools speeds us up and cuts errors. Wrapping Up Upgrading a database doesn’t have to be a risky, stressful process. You can confidently upgrade with the right preparation, testing, and monitoring. Thanks to Mr. Phuoc Pham’s presentation at the AWS and MegazoneCloud event, our 6-step process at SupremeTech proves you can keep risks low, protect data, and emerge stronger when doing Aurora MySQL upgrades. If your company is planning a database upgrade and needs expert guidance, contact our team at SupremeTech. We help businesses upgrade critical databases without disruption. Want to learn more about cloud database best practices? Stay tuned for more insights from our tech experts! Related articles about AWS: Mastering AWS Lambda: An Introduction to Serverless ComputingCreate Your First AWS Lambda Function (Node.js, Python, and Go)Triggers and Events: How AWS Lambda Connects with the WorldBest Practices for Building Reliable AWS Lambda Functions

        21/03/2025

        138

        Our success stories

        +0

          How to Upgrade Aurora MySQL Databases: Lessons Learned from SupremeTech

          21/03/2025

          138

          Our success stories

          +0

            SupremeTech Partners with AWS and MegazoneCloud to Drive AI-Powered Business Growth

            SupremeTech is pleased to announce our collaboration with AWS and MegazoneCloud for an upcoming event, Harnessing AI on AWS: Transforming Software Builders for the Future, scheduled for March 20, 2025, in Da Nang. This event is about giving software companies the tools, strategies, and real-world solutions they need to spark innovation, boost performance, and even take their businesses global with AI. The software world is changing fast, and Artificial Intelligence is leading the charge. Companies that tap into AI on AWS are finding new ways to grow, streamline their workflows, and stay ahead of the game. This event offers software firms in Da Nang and beyond the chance to see how AI can level up your business and prepare them for the future. SupremeTech’s Contribution to the Event In partnership with AWS and MegazoneCloud, SupremeTech will share valuable insights from our experience mastering complex technical challenges, such as Aurora MySQL upgrades. We will break it down into practical tips and solutions that software companies can use to fine-tune their infrastructure and grow smarter. The SupremeTech partners with AWS and MegazoneCloud event is structured into two key sessions: Morning Session: Accelerating Technical Performance Enhancing Product Value with AI/ML Services: Attendees will learn how AWS’s advanced tools, including Amazon SageMaker and Bedrock, can optimize infrastructure, improve performance, and reduce time to market.Real-World Solutions: Megazone will present hands-on demonstrations of AI services on AWS, offering insights into seamless integration and proven strategies derived from their own expertise. Afternoon Session: Strategic Growth Expansion Scaling with AWS Programs: Discover how AWS initiatives such as the ISV Accelerate and Workload Migration Program (WMP) can accelerate market expansion and support rapid business growth.Global Opportunities with MegazoneCloud: Explore how MegazoneCloud’s extensive partner network and the AWS ecosystem can help software companies bring their products to international markets. This event is more than a technical gathering; it represents a strategic opportunity for software businesses to advance their capabilities and adopt AI effectively on AWS. Why You Should Attend Actionable Strategies: Gain practical knowledge to integrate AI into your business operations.Expert Insights: Benefit from the expertise of SupremeTech, AWS, and MegazoneCloud leaders with proven success in the AI landscape.Networking: Connect with industry peers and potential partners within Da Nang’s growing tech community.Global Expansion: Access tools and programs to scale your business internationally. Event Details Date: March 20, 2025Location: Voco Ma Belle Danang - 168 Vo Nguyen Giap Street, Son Tra Da Nang, Vietnam Register Today to Stay Ahead in the AI Era Do not miss this opportunity to leverage AI on AWS and position your software business for success. Join the event that SupremeTech partners with AWS and MegazoneCloud on March 20, 2025, to grab the insights and tools you need to lead the charge in innovation and growth. Click Here to Register Now and take the first step toward a future of innovation and growth. Related articles about AWS: Mastering AWS Lambda: An Introduction to Serverless ComputingCreate Your First AWS Lambda Function (Node.js, Python, and Go)Triggers and Events: How AWS Lambda Connects with the WorldBest Practices for Building Reliable AWS Lambda Functions

            11/03/2025

            178

            Ngan Phan

            Our success stories

            +0

              SupremeTech Partners with AWS and MegazoneCloud to Drive AI-Powered Business Growth

              11/03/2025

              178

              Ngan Phan

              E-commerce (Shopify)

              +0

                How to Build a High-Performing E-commerce Store

                E-commerce is growing every year and is set to make heavy profits, with more and more people opting for it. However, with ever-growing competition in this domain, you need to stand out to stay afloat. You have to compete with giants like Amazon, eBay, and Alibaba, which can give you a tough time. In this blog, we will discuss building a high-performing e-commerce store in detail. So, let’s get started. See more: Exploring 7 Top Online Food Ordering Systems for Small BusinessesSmooth Sailing: How to Migrate Website to Shopify? Step-by-Step Procedure for Building an E-commerce Store E-commerce stores are becoming increasingly popular due to their range of products on a single platform, short delivery time, and easy payment options. Let’s go through a step-by-step procedure for building an attractive and high-performing e-commerce store. Step 1: Choose Your Platform Each e-commerce store is unique and has its own goals and target audience. Hence, you need to choose an ideal e-commerce platform for your needs. There are a number of options available including Shopify, WooCommerce, Squarespace, WordPress and more.  These eCommerce platforms have their own features, so you should discuss each one with your development team and pick the most suitable one for your needs. Step 2: Create an Account on the Chosen Platform Once you have chosen your eCommerce store platform, you need to purchase the subscription, in case it is not open source. These platforms offer a variety of plans, uptime guarantees, and security features.  If you have chosen an all-in-one e-commerce platform, all you need to do is go to the provider’s website and create an account. Then, you select a plan and pay for it if it is not free. Step 3: Choose a Template After you have decided on your eCommerce platform, you will have a variety of options regarding templates. Each has its own colors, fonts, and layouts, which gives an e-commerce store a consistent look and feel. Templates can be free or premium ones, for which you need to pay. Generally speaking, paid ones offer more features and designs. This saves time which will be spent on coming up with designs from scratch. Step 4: Build Your Webpages & Product Pages You must not use the template as it is; you should customize it according to your requirements. Some common customizations include adding your logo and contact details.  Other changes could be adding product images, configuring your site navigation, and building check-out and returns pages. Step 5: Write Product Descriptions As it is not a brick-and-mortar store where customers can view the products or feel them, you need to work on your product descriptions along with images. They need to be very accurate, easy to understand, and detailed. It should include basic details, along with information about who the product is meant for and where it can be used.  Product images should be high-definition and of the same size, and should show the product from all possible angles.  Step 6: Set Up Payment Gateway As most of your customers will opt for online payments and not Cash on Delivery, you need to have a secure payment gateway. So, integrate secure payment options on your e-Commerce store, which are hassle-free, fast and secure at the same time.  If you redirect your customers to other platforms like PayPal, ensure that data is fully encrypted.  If your payment options are not convenient, no matter how good your product catalog is, customers will not come back. Step 7: Integrate Shipping  The platform you have chosen for your e-Commerce store may allow integrated shipping along with selling. This creates a seamless customer experience and lets you focus on selling products.  You also need to decide on your shipping policy, such as free shipping, flat rates, variable fees, etc. Along with this, you need to decide on your returns and refund policy to make the situation clear for your customers. Step 8: Test & Launch Your e-Commerce Store After all the hard work, it is time to test your e-commerce store before launching it. You should do rigorous testing to ensure there are no bottlenecks and pain points. You can do the testing in-house or outsource the task.  Check all links, buttons, and navigation options and ensure they work. Payment processing should also be thoroughly checked. Your e-commerce store should be compatible with desktop, mobile devices, and all browsers. Once everything has been checked, you are ready for launch. Popular eCommerce Platforms To Consider Several options are available for e-commerce platforms. Let’s discuss some popular ones to help you choose. Shopify Shopify is an eCommerce platform suitable for Web, iOS, and Android. It is easy to set up and has all the necessary tools. The support and resources provided are best in class, which makes it popular and effective.  The only constraint of Shopify is that it can be expensive if you add many extra apps. Many eCommerce stores currently run on Shopify, which has been around for 18 years and is ideal for small businesses that want to go online. BigCommerce BigCommerce is an e-commerce platform suitable for Web, iOS, and Android devices. It is the SMB version of a very popular enterprise eCommerce platform. It has integrated features like shipping and taxes to encourage established businesses online. However, it is not recommended for small retailers setting up their businesses.   It also enables listing your products on e-commerce giants like eBay, Walmart, and Amazon.  As a result, customers do not necessarily have to buy from your store.   BigCommerce has 12 free themes, all of which have a great look. They also have a drag-and-drop site builder that can be used to customize the look.  WooCommerce   WooCommerce is an e-commerce platform for the Web, iOS, and Android. It provides all the flexibility of WordPress, is widely supported, and has many apps and integrations. Installing WooCommerce on your website is very easy, similar to installing any  other plugin on WordPress. If you use WordPress for your eCommerce store, you should ideally go for WooCommerce. Wrapping Up E-commerce is still nascent and will continue to grow over the decade. It provides a range of products and the convenience of buying them from your home from across the world. So, whether you are starting or have an established business, you should consider going online, as it will increase your reach. After considering everything, you should choose your e-commerce store platform. This will ensure that you have a high-performing e-commerce store. For building your e-Commerce store, get in touch with SupremeTech. 

                10/03/2025

                104

                E-commerce (Shopify)

                +0

                  How to Build a High-Performing E-commerce Store

                  10/03/2025

                  104

                  Customize software background

                  Want to customize a software for your business?

                  Meet with us! Schedule a meeting with us!